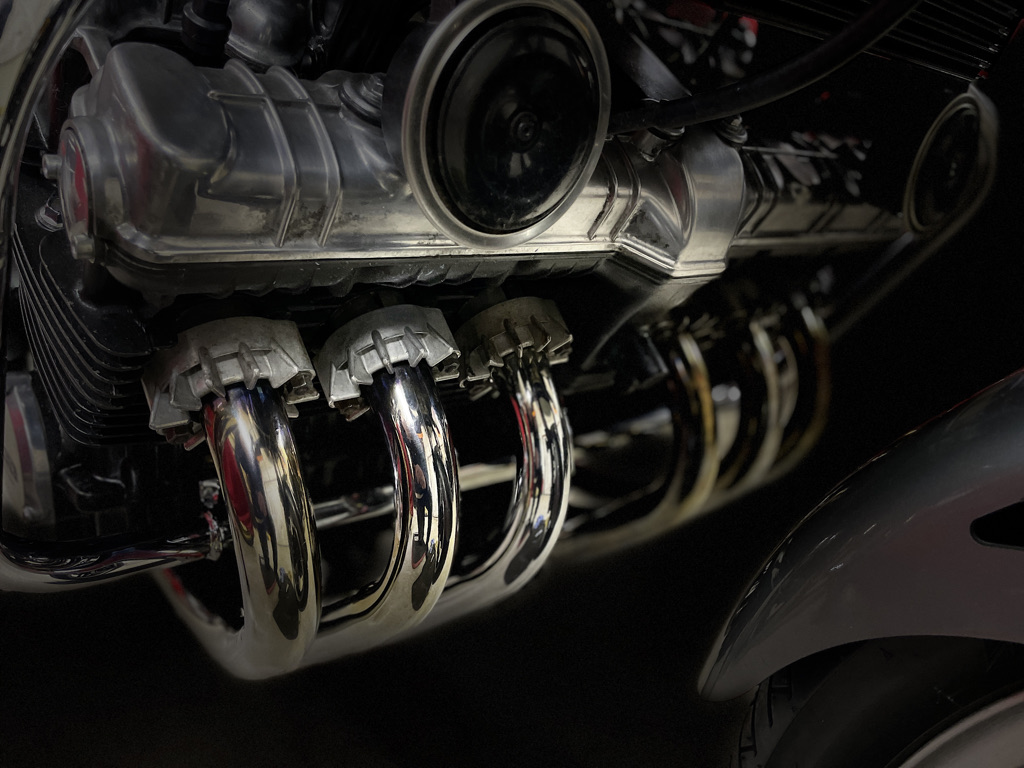
Ah, the CBX1000. It’s always been about one thing…..the mighty six cylinder powerplant.
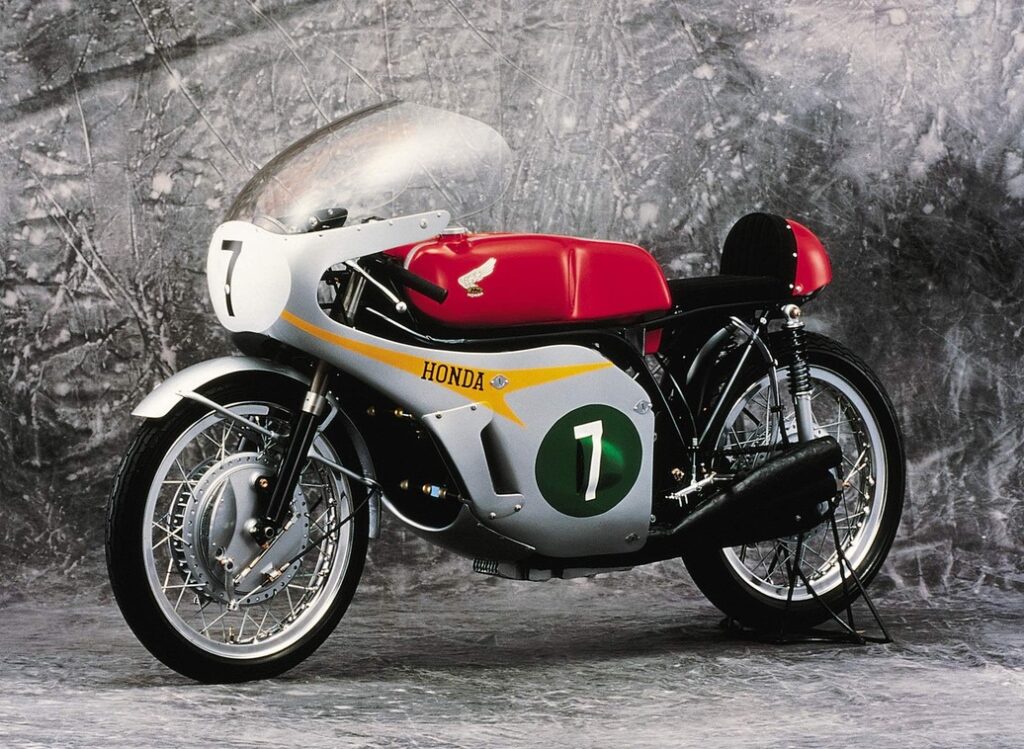
The Genesis of the inline six motorcycle engine as we know it today began with the Honda RC166 1966 Championship winning racer.
Honda RC166 1966 Racer. Photo courtesy of motorcyclespecs.co.za
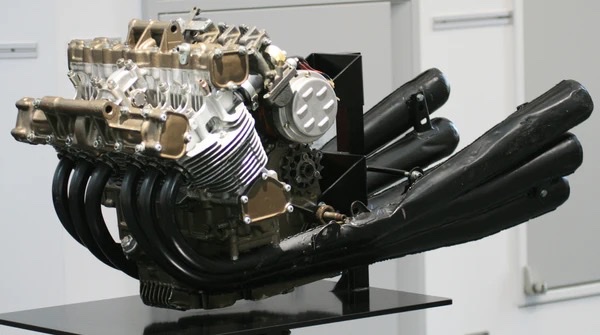
Soichiro Honda broke convention to challenge the 250cc two stroke racers of the day, by enlisting the young talented engineer Shoichiro Irimajiri who concocted the six cylinder 250cc four stroke which made up for having two crankshaft rotations per cycle by having six minute 41.21cc cylinders revving to a mind melting 20,000 rpm.
Arguably among one of the best sounding motorcycle engines ever made. A decade and a bit later, Honda did it again, taking on the contemporary inline 4, 1000cc bikes by reviving the inline 6 that had given them so much race success. (Although Benelli beat them to the first production 6 cylinder bike when they launched their 750 Sei in 1972, the Honda was a beefier and more powerful motorcycle with 1047cc which bested even Benelli’s later 900cc effort.)
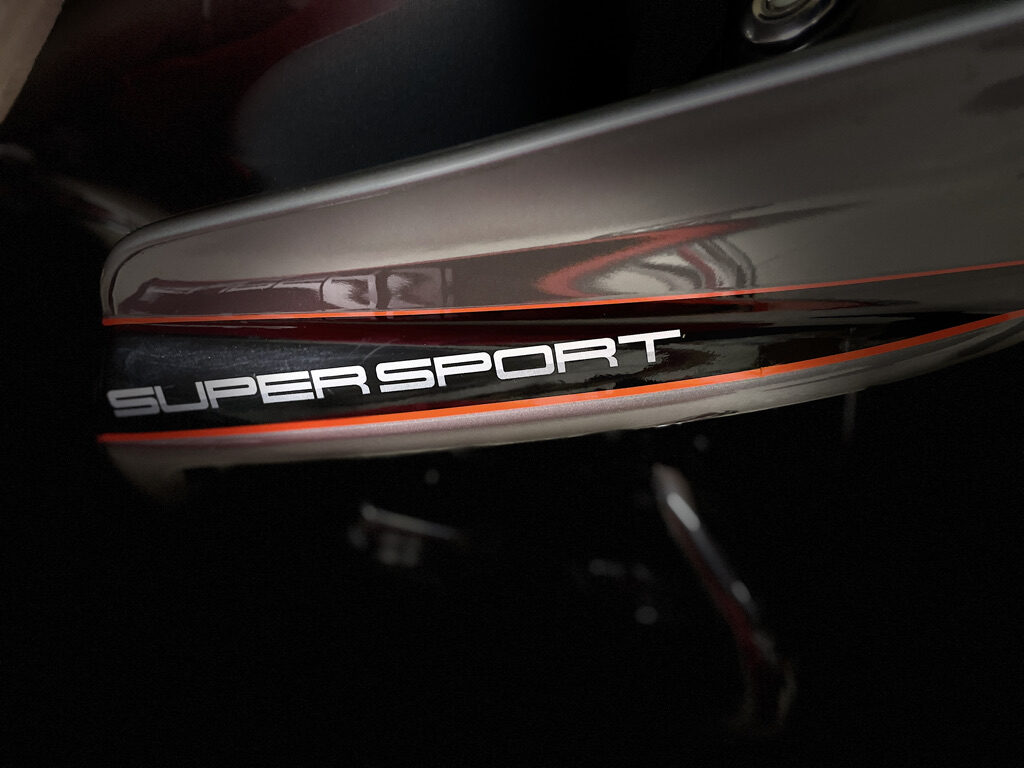
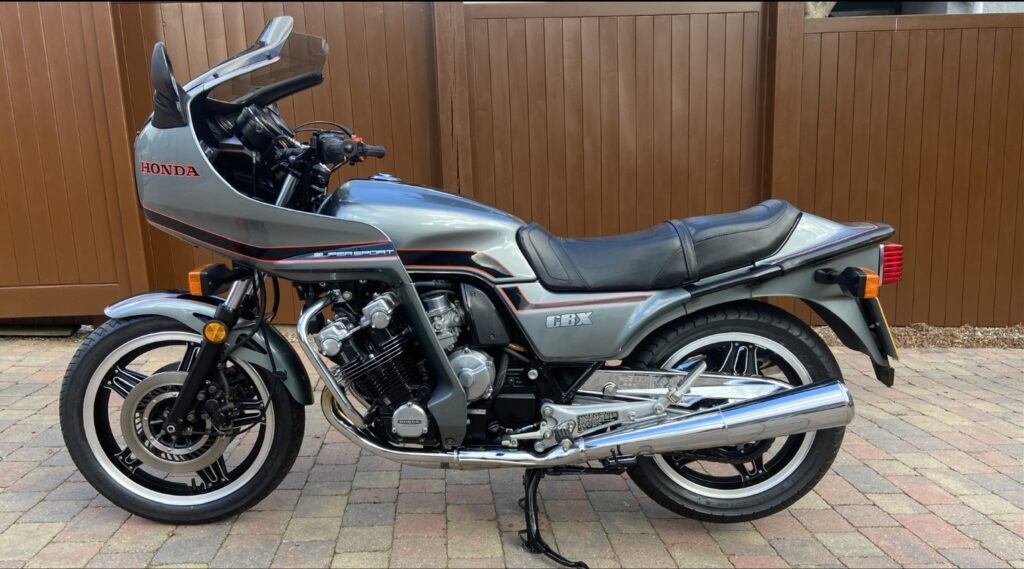
Enter the Supersport CBX, originally launched as the naked Z model in 1978 which later morphed into the faired Prolink which utilised thicker forks, bigger brakes and incorporated the ‘Pro Link’ mono shock rear end as well as being re-tuned for better torque and midrange while further refining the engine for smoother idling and better low speed running by changing the angle of the six carbs as well as using higher lift cams with less duration and a redesigned ignition advancer system increasing maximum advance from 2500rpm to 3000rpm.
A full fairing was fitted to the Pro Link CBX1000, much to the disgust of many purists who felt the CBX had gone soft, although the mighty engine was arguably better than ever and despite its extra weight, handling and braking was improved through beefier components. Those who preferred the ride and look of a naked were of course free to remove the fairing and the additional weight that came with it!
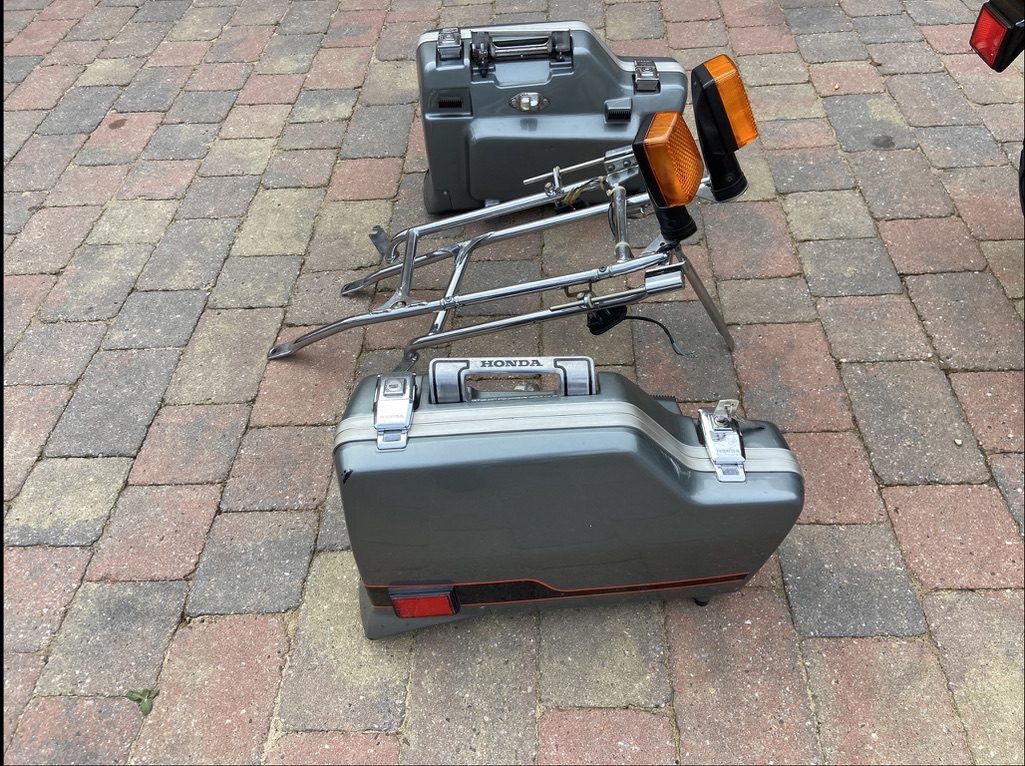
Offered as an extra were these slimline pannier boxes, a rarity if you can get one that comes with them.
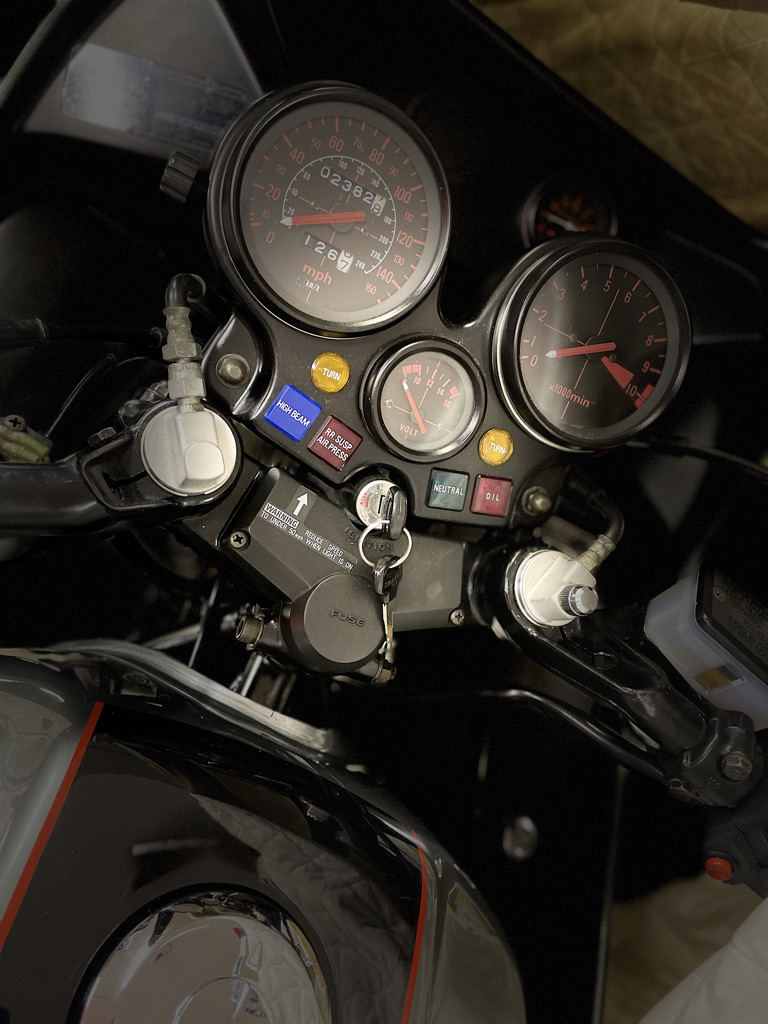
This particular example has covered just 2,382 miles at the time of purchase, 3 previous owners and complete with the original purchase invoice, service history and MOT’s.
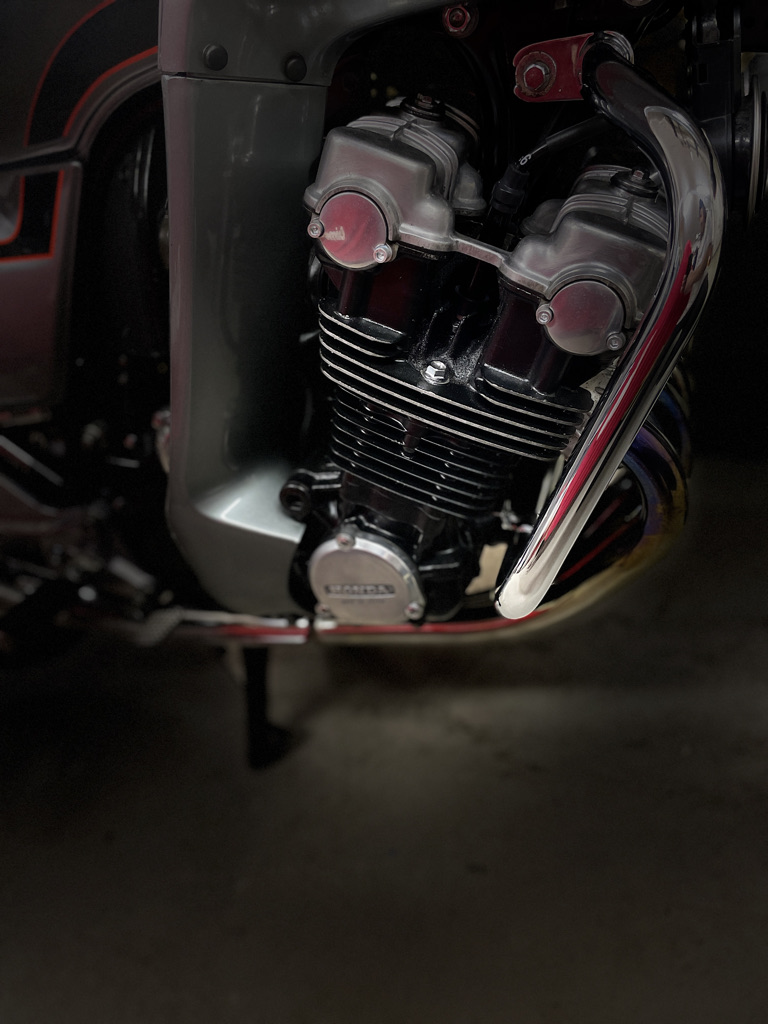
Engine bars were standard on the Prolink, protecting the oil cooled 1047cc engine.
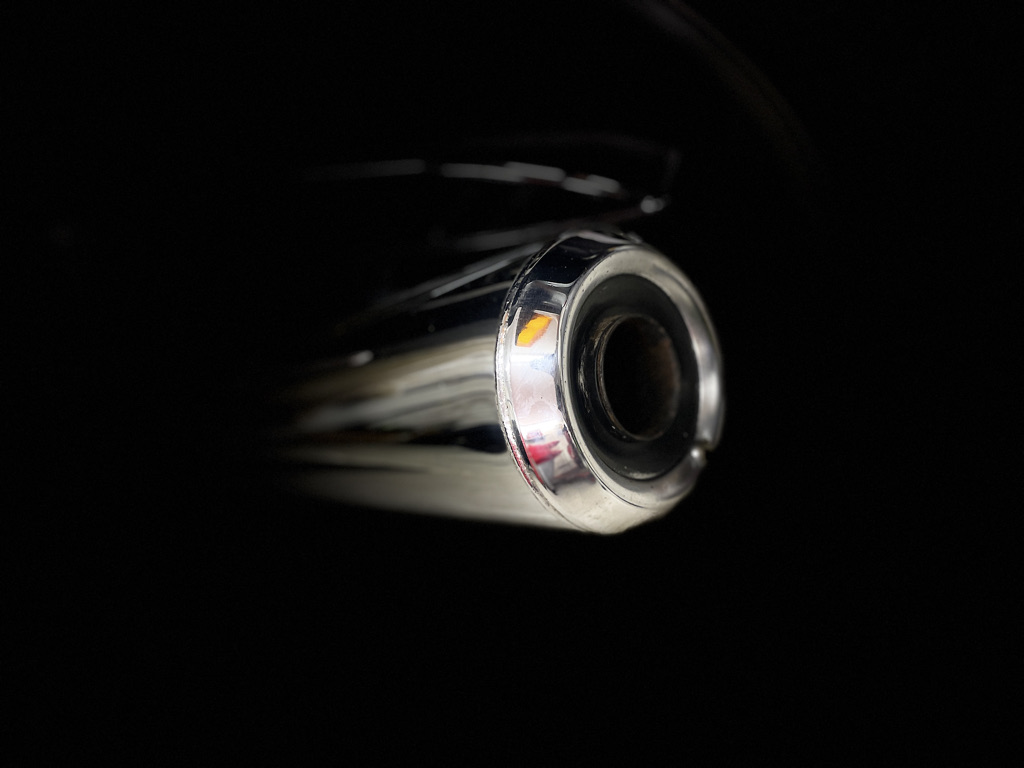
A 6-2 double walled exhaust design with crossover pipe emits the wonderful sound from the tailpipe. Aftermarket options include 6-1 or 6-6 configurations each offering a variation on the very distinctive engine note.
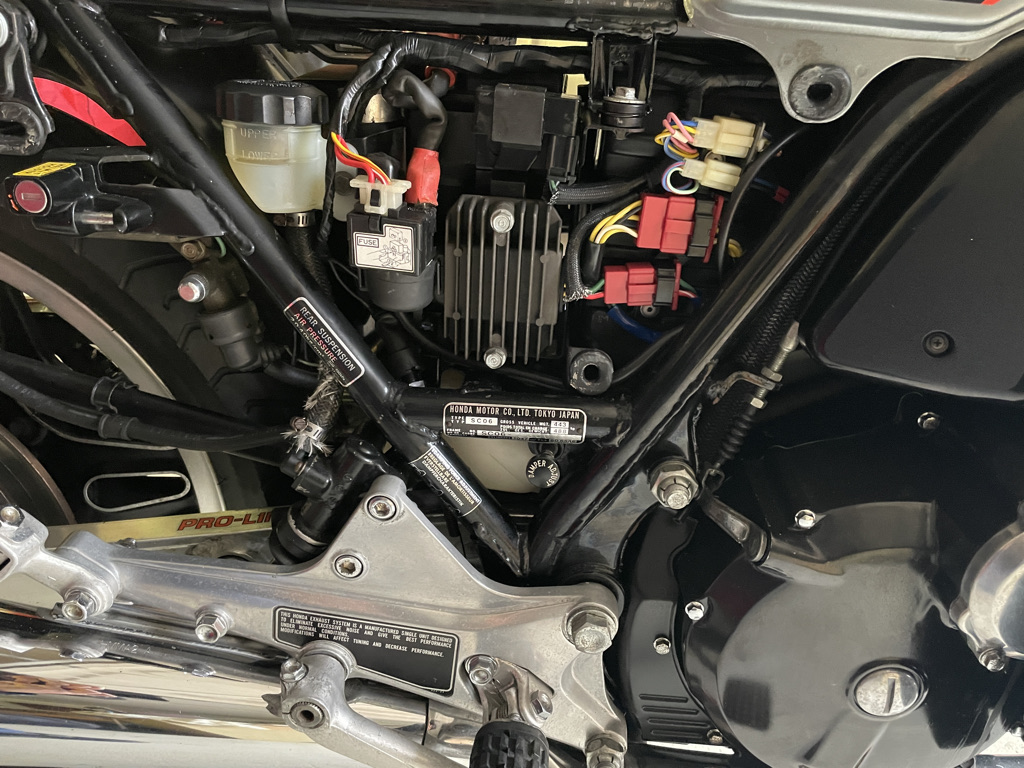
The low mileage is backed up beneath the skin where the electronics still look like new.
A year into ownership at the start of this post and where to begin? We bought the best boat we could afford, it was in wonderful condition, well looked after and had a clean survey (aside from a stbd cutlass bearing that would need some attention at the next haul out).
As our boat neighbour once said, the problem when you go looking for problems, is that you invariably find them. It’s not that I go deliberately looking for problems, but I’m a believer in preventative maintenance and catching things early.
It has been an eventful first year, I thought I was well prepared for the toll of owning a boat and always felt the first year would be the worst as we tended to all those little bits and made the boat our own.
There were however quite a few issues that have arisen that needed time and funding spent on them. I spent most of the winter months down in the bilges in fact and we have blown our estimated annual maintenance/upgrade budget well and truly. Off the top of my head, here’s the top 20…
Water ingress through shaft seals – Poor installation/modification at time of fit.
Snapped through alternator bracket. Could have sent it into orbit around the engine room, fortunately spotted early.
Engine issue stbd not exceeding 1600rpm in certain scenarios.
Dirty fuel filters.
Stbd aftercooler running hot.
Stbd shaft Seal running hot.
Clogged transmission coolers.
Heat exchanger end caps no continuity to anodes.
Ceased sea cock to generator underwater exhaust
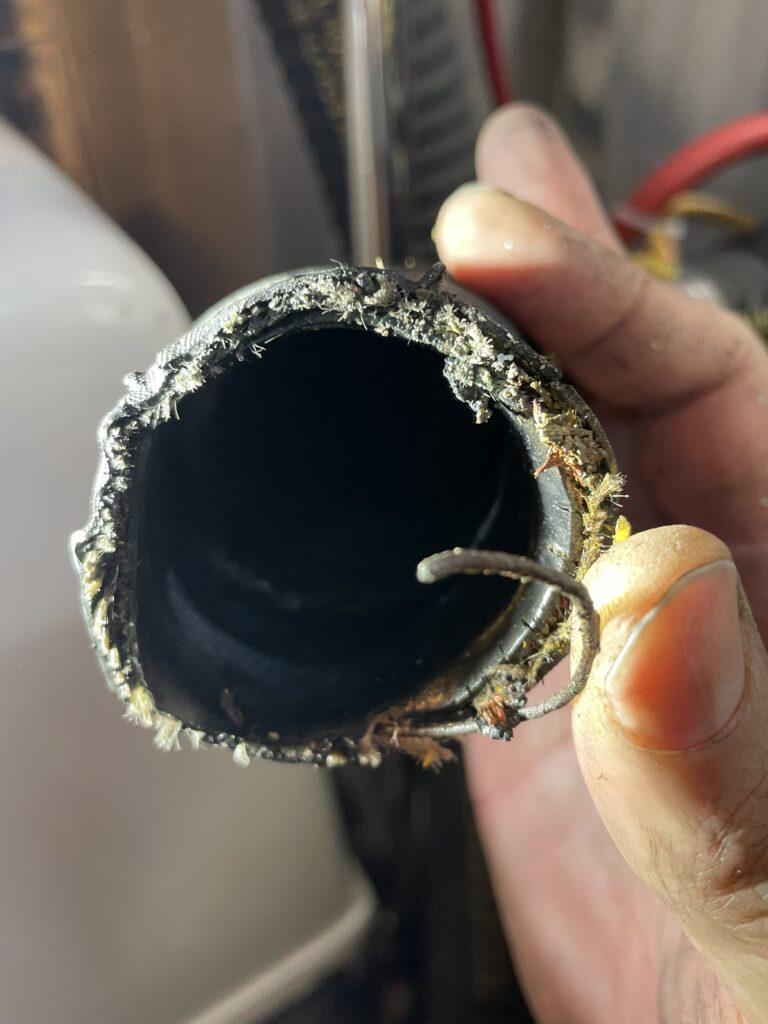
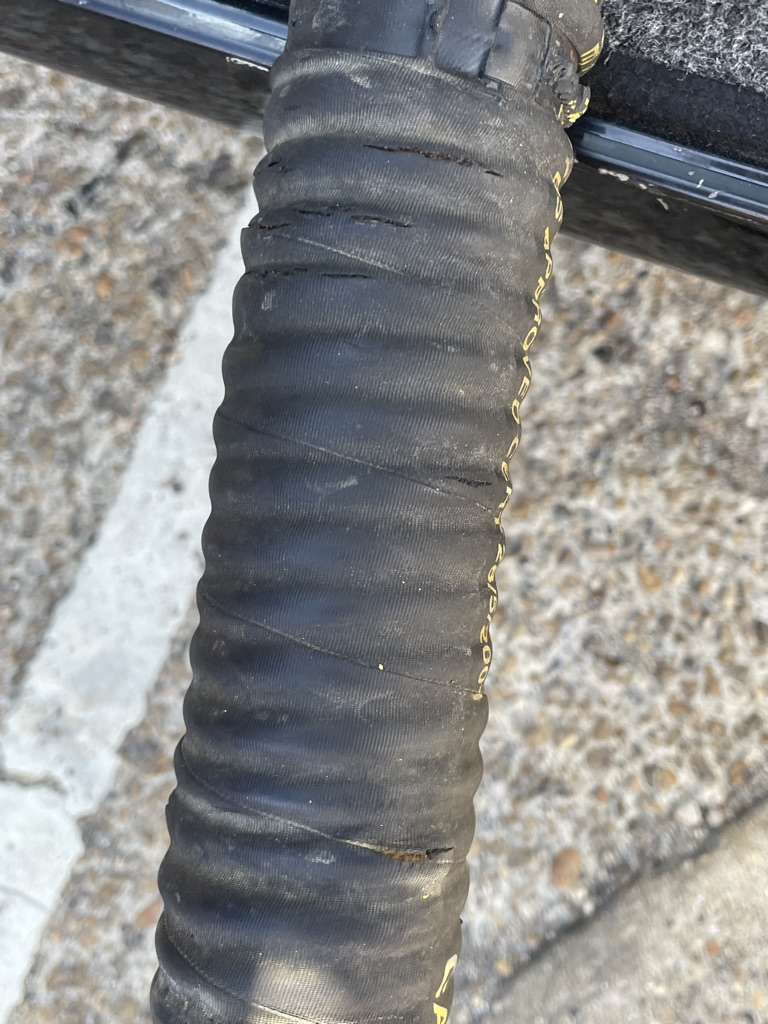
Worn through wet exhaust stbd
Port Exposed starter motor cables
Port Starter cables touching exhaust manifold and burning protective casing
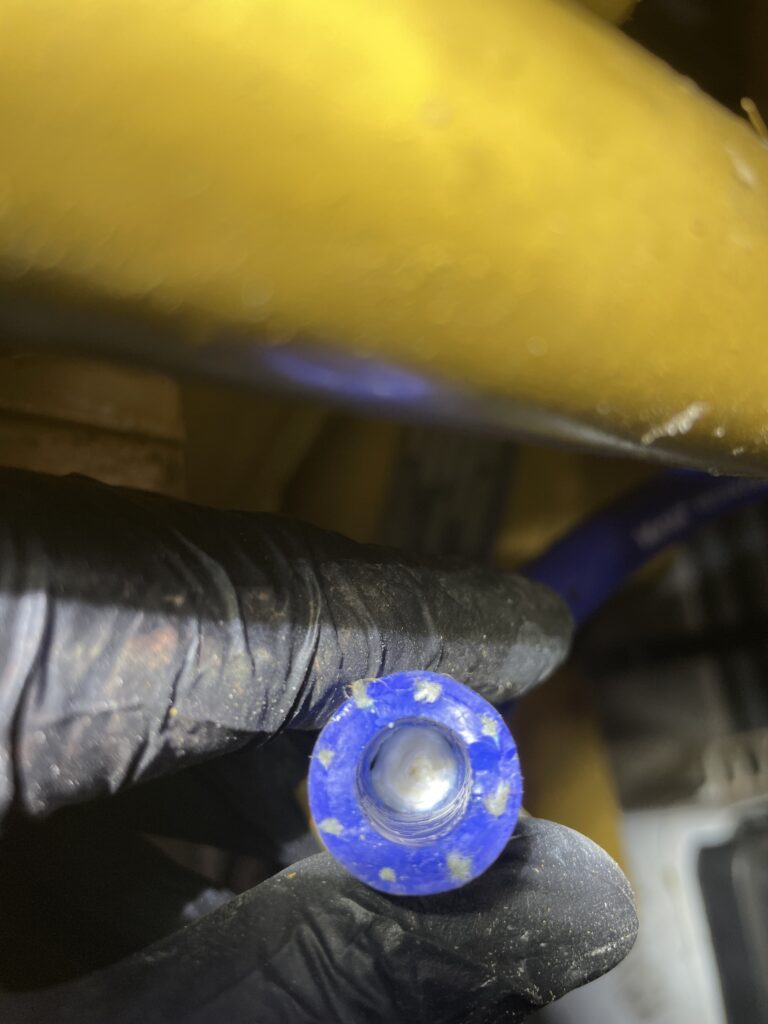
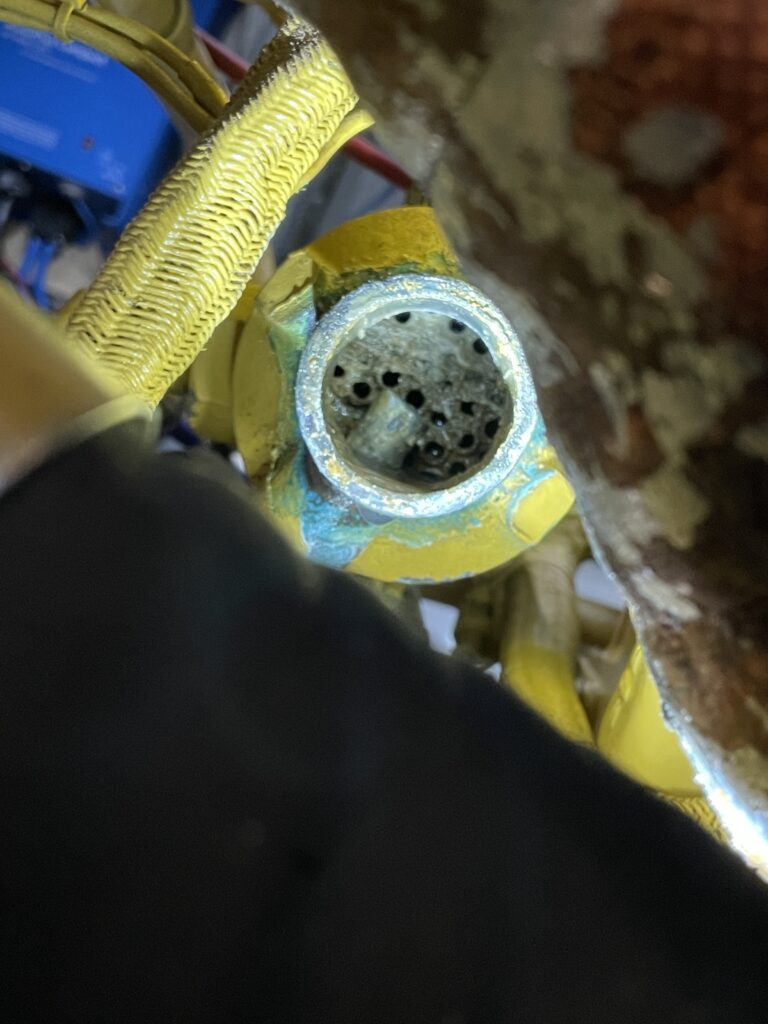
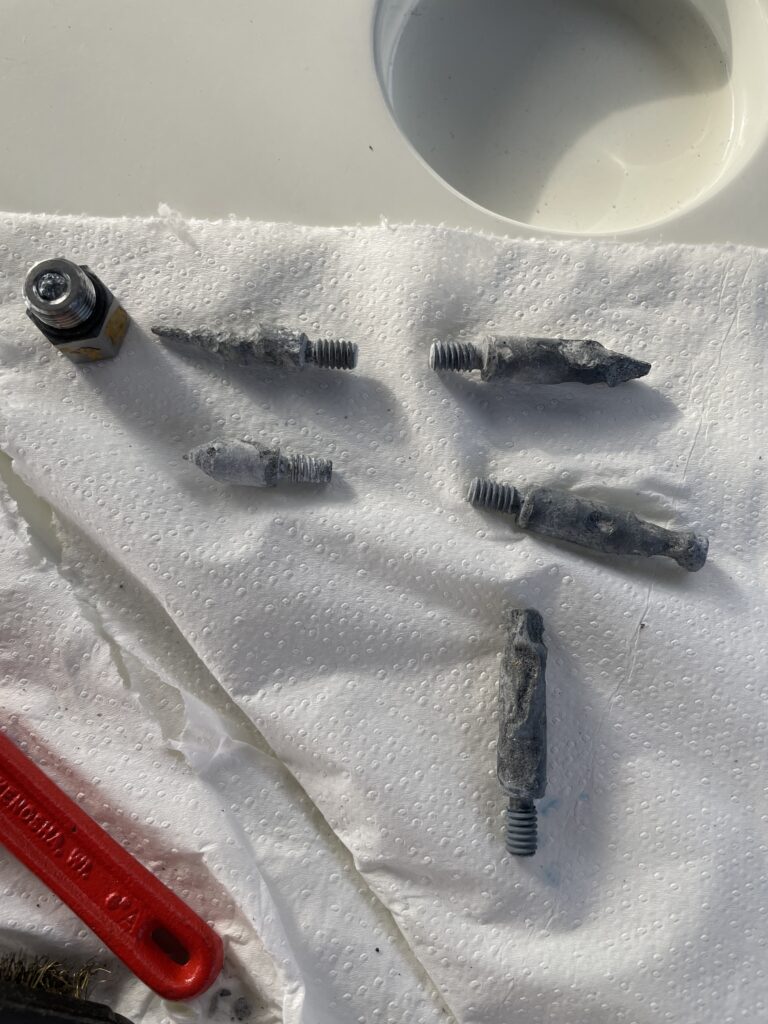
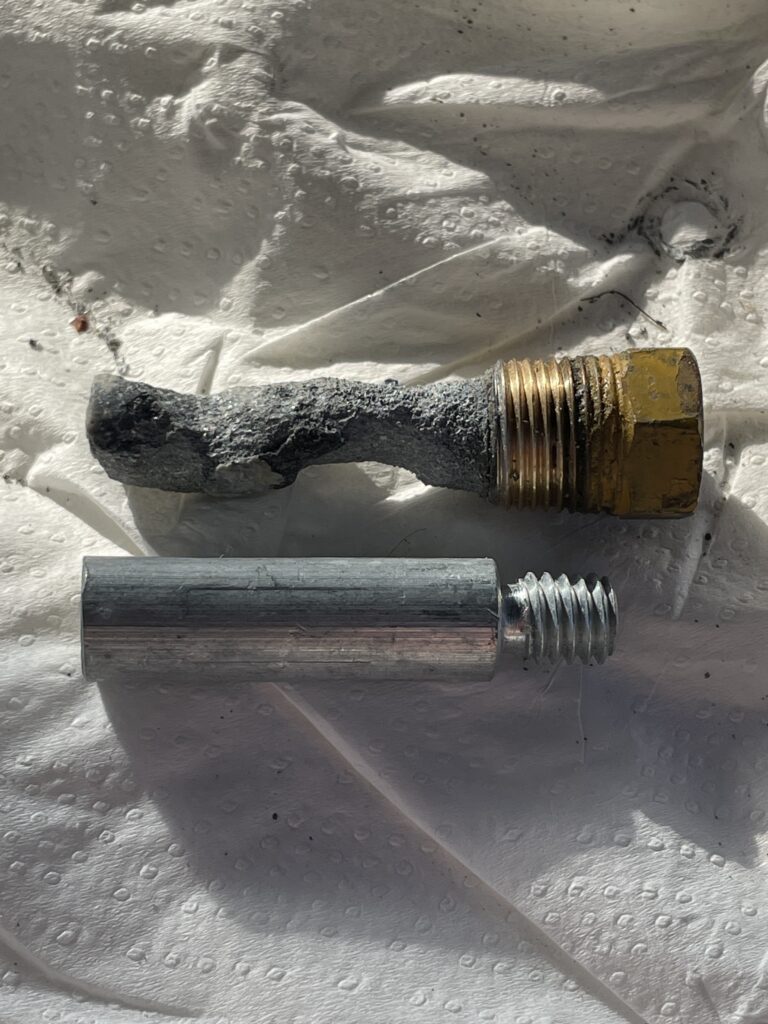
All Engine anodes worn and fallen off.
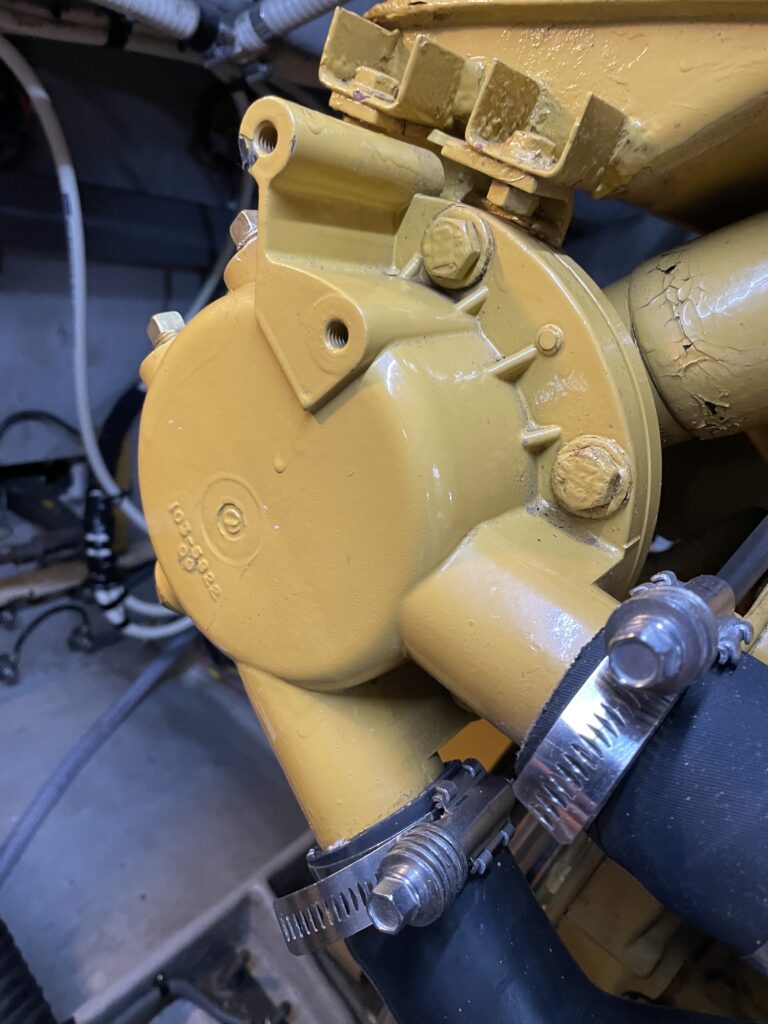
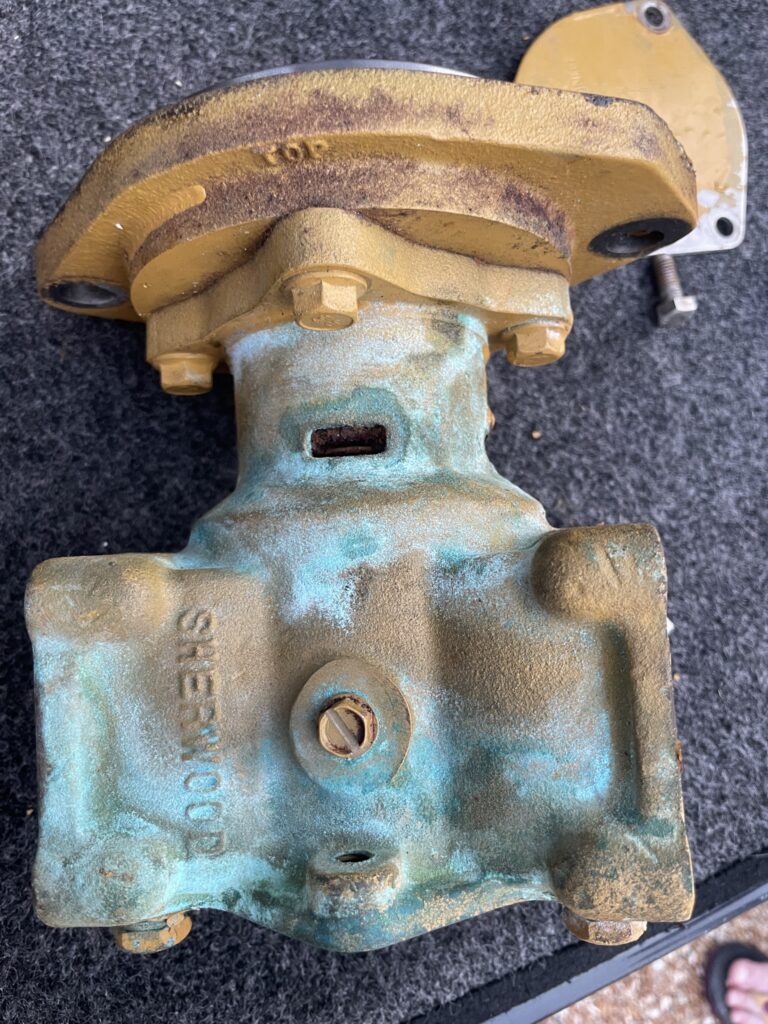
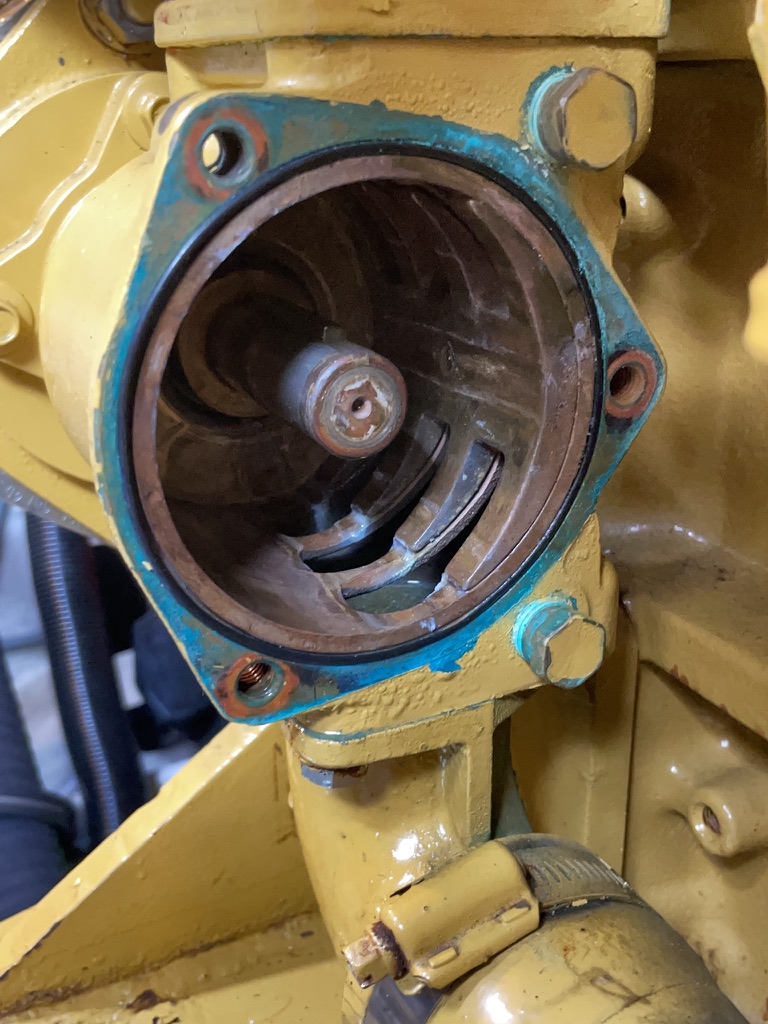
Failing seawater pump.
Hoses below the water line with cracks etc.
Mismatched propellers 23″ port vs 24″ stbd.
VDO Sumlog Speedo and Nm odo not working
GPS positioning orientation out of calibration
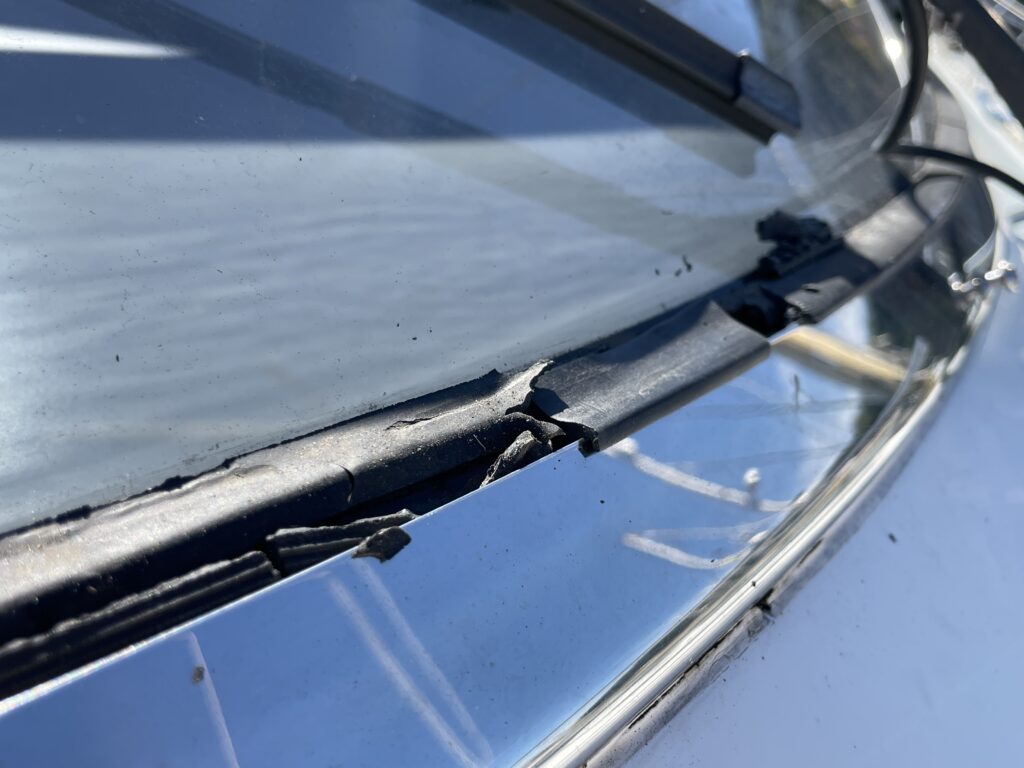
Windscreen Trim falling apart
Navigation lights big voltage drop
Improvements/Upgrades;
Leather deep clean
renewed press stud fittings
Rubber bow thruster joystick
Windshield trim
Stainless Steel Radar arch brackets
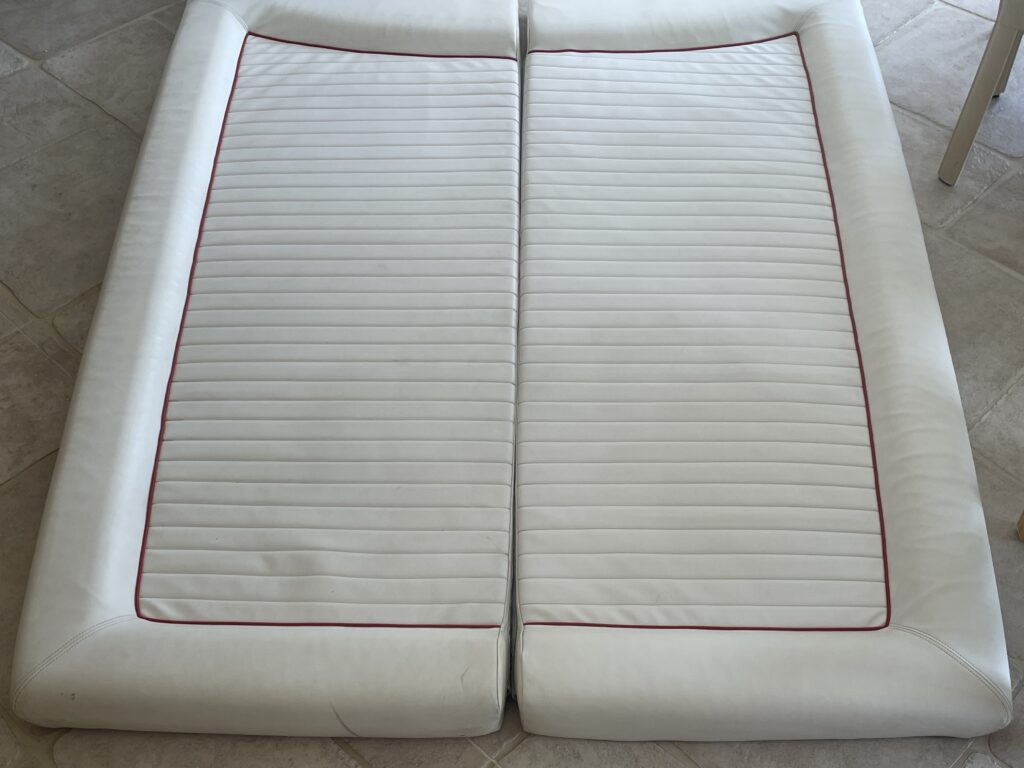
New pocket sprung mattresses throughout
New engine bay hoses and S/S clamps throughout
Diesel Dipper system installed.
Radar arch searchlight repaired
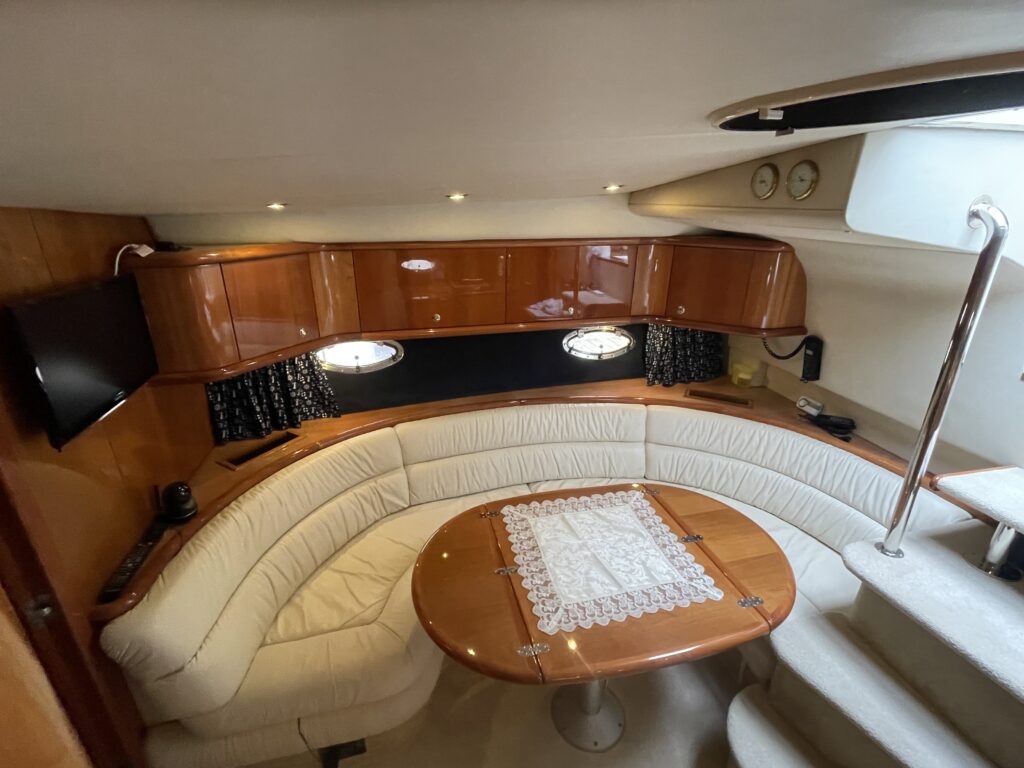
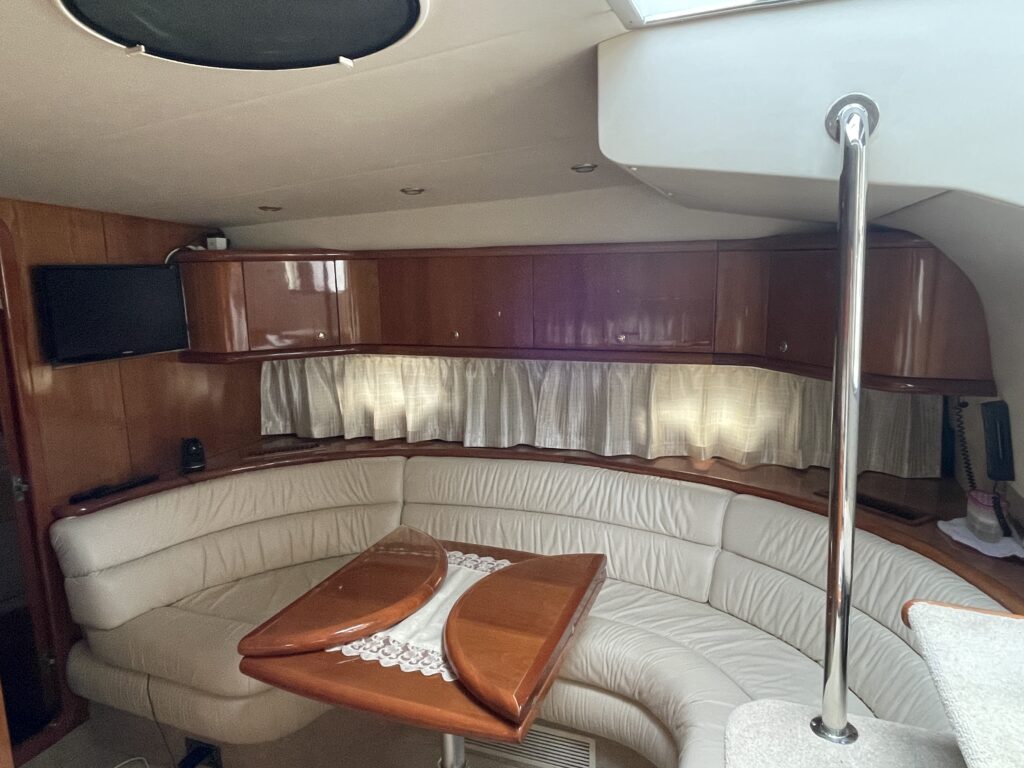
New curtains
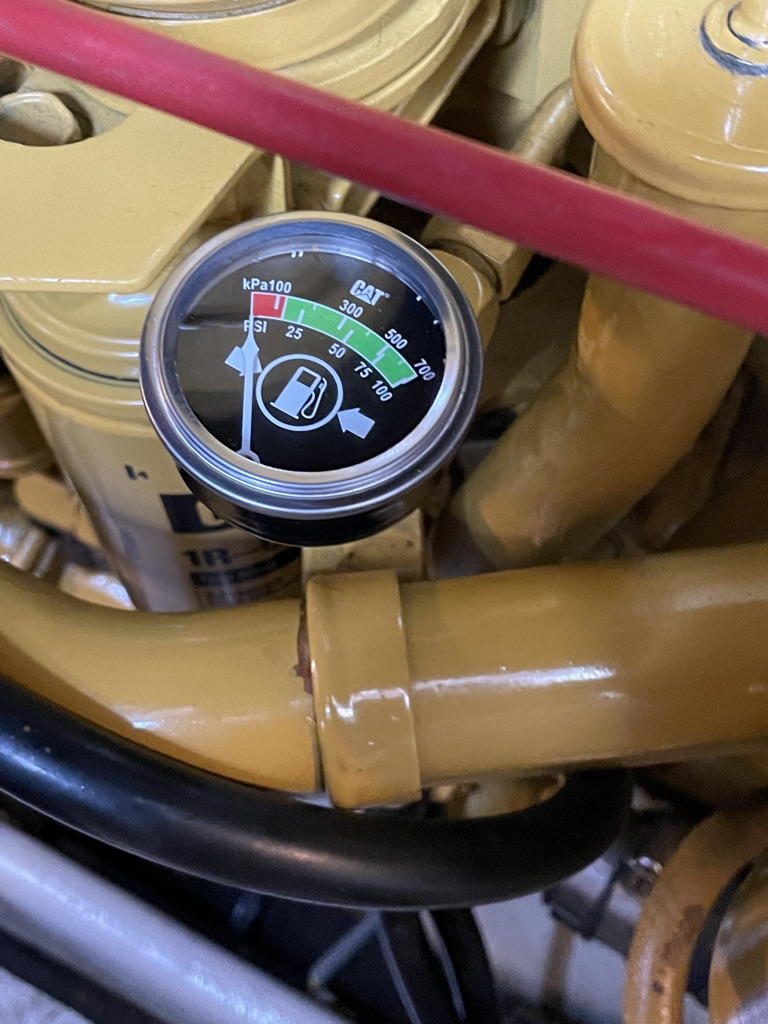
Caterpillar Fuel pressure gauges
Separ fuel primary filter vacuum gauge and lid installation
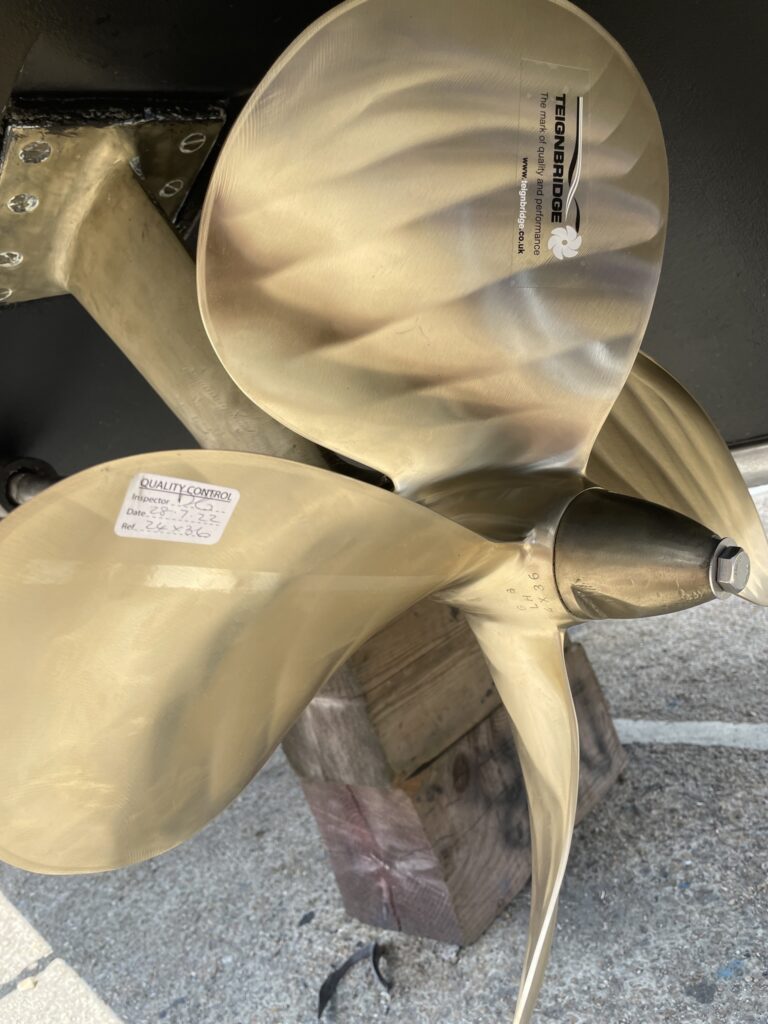
Port 24″ Teignbridge propeller
New Cutlass bearings port and starboard
PSS Pro face seal upgrade bellows and retainer
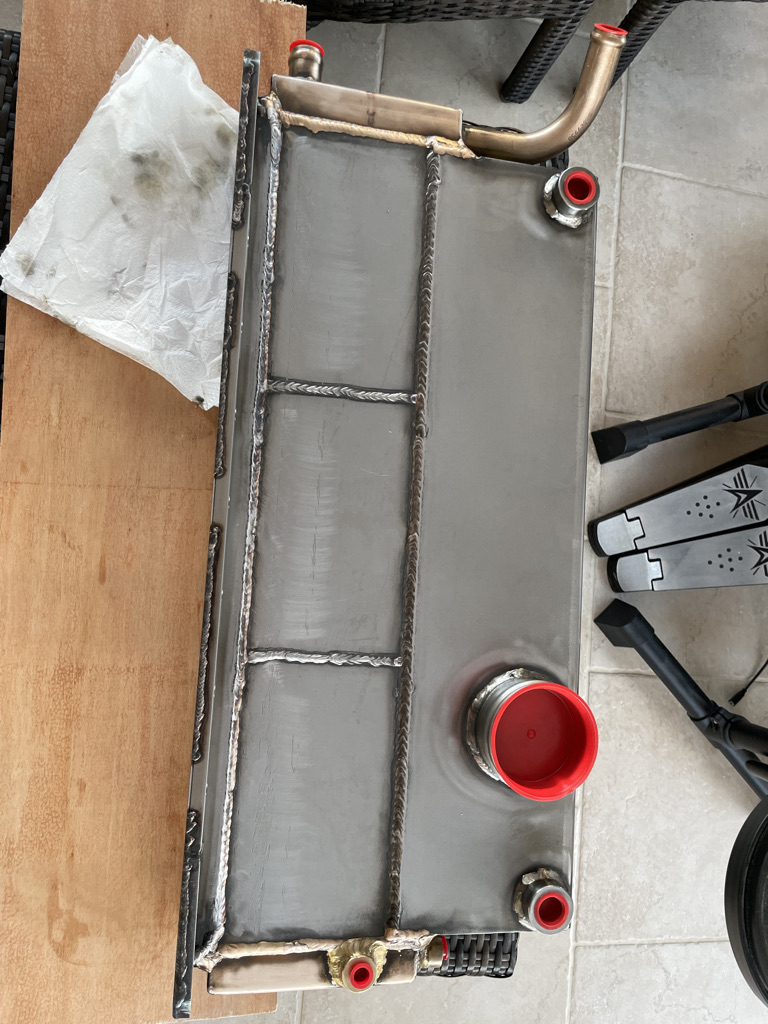
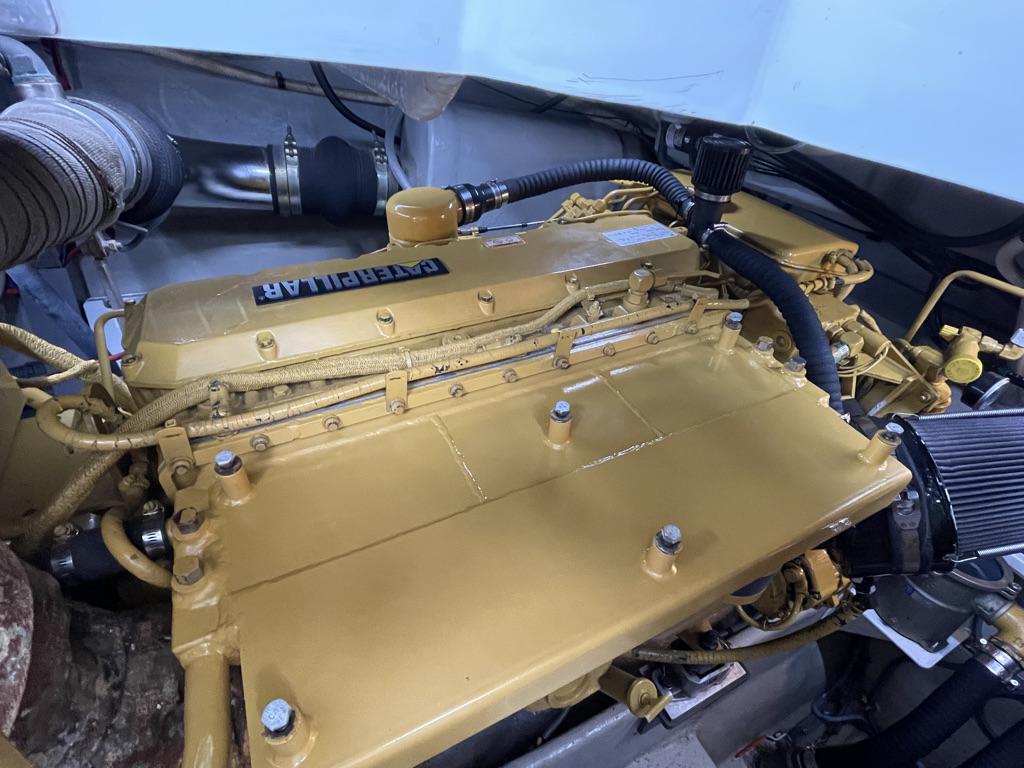
New Caterpillar Aftercooler stbd
New Heat Exchanger end caps port & stbd
New Caterpillar Updated Thermostats
New Generator battery box
New struts electrical cupboards
New breather pipework
New Alternator brackets port & starboard
New Caterpillar Starboard sea water pump (port side pump renewed by previous owner)
New Impeller portside water pump
New Rule bilge level switch
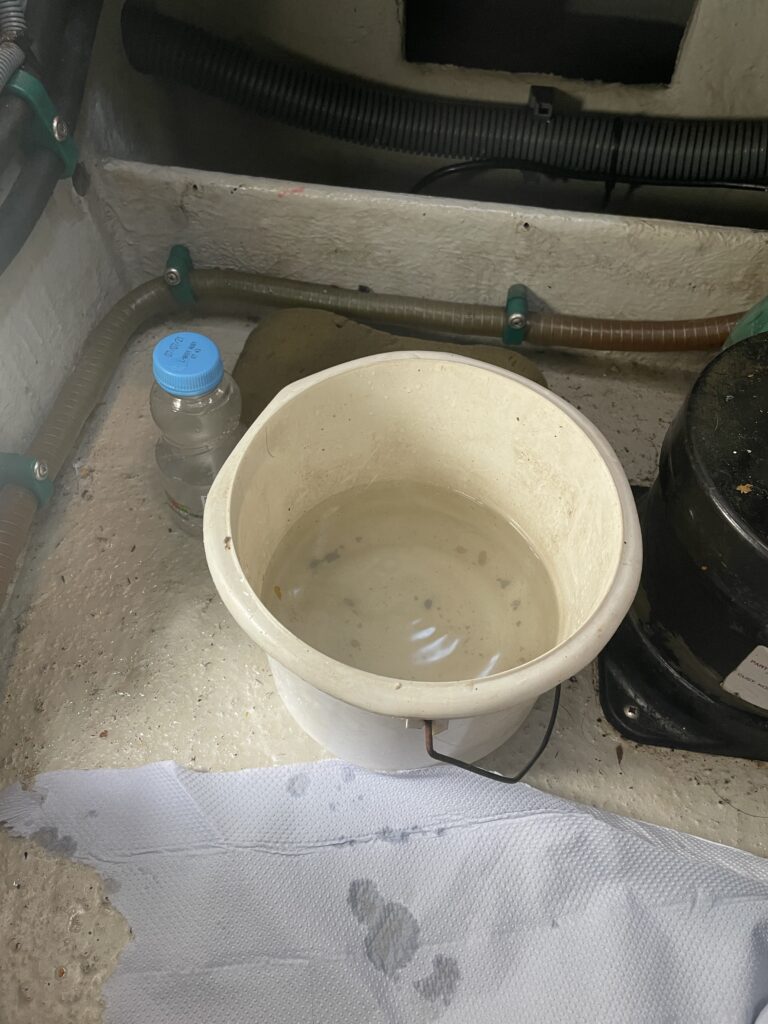
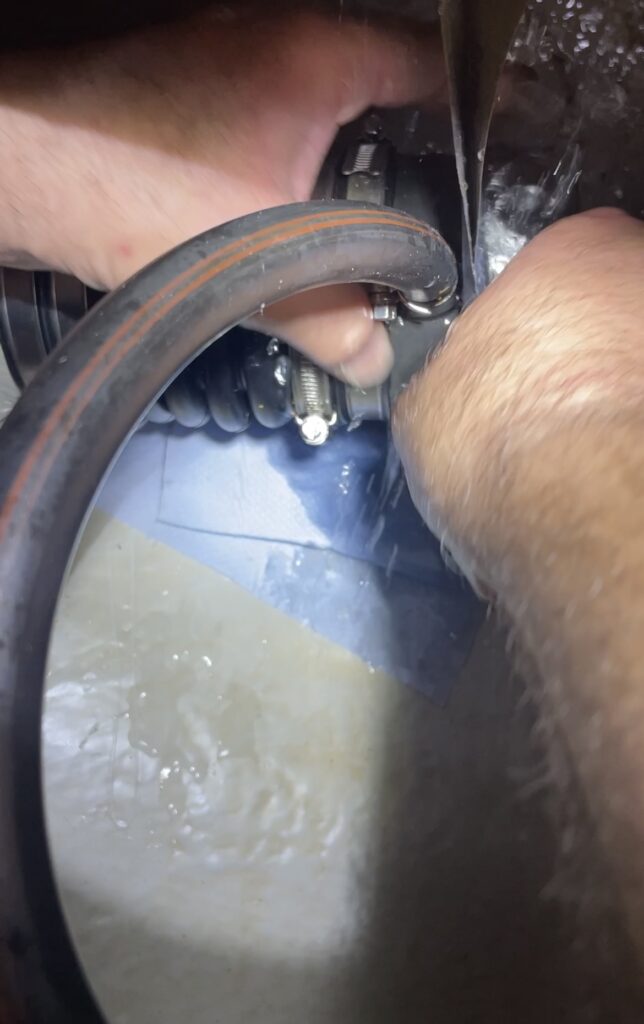
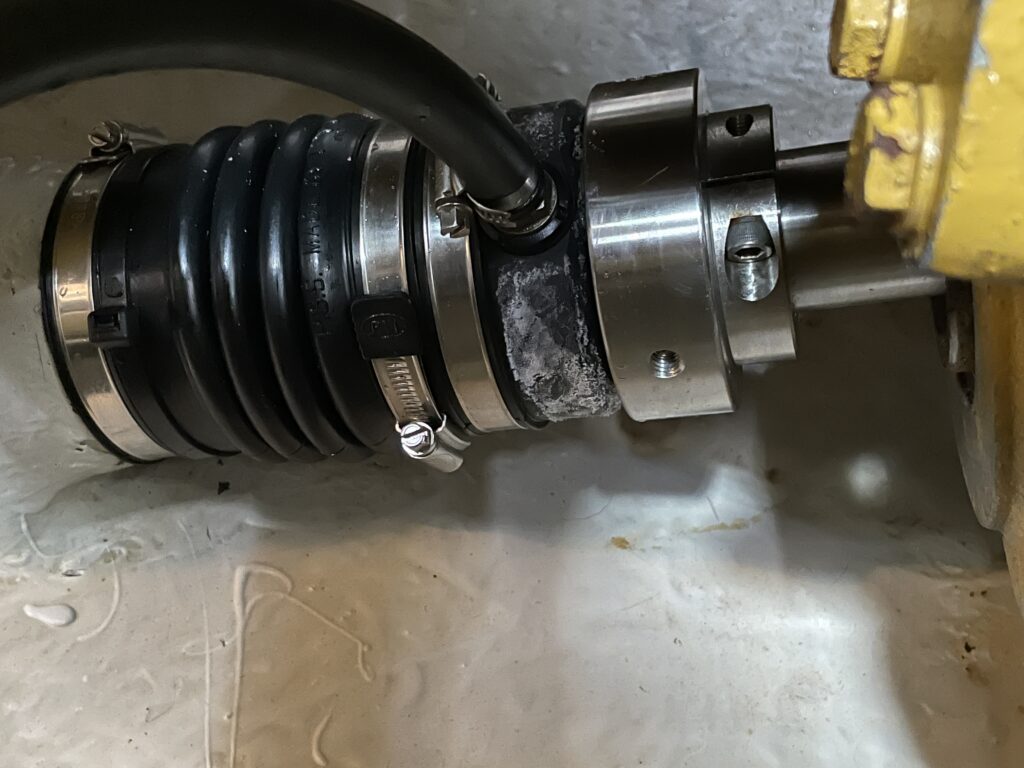
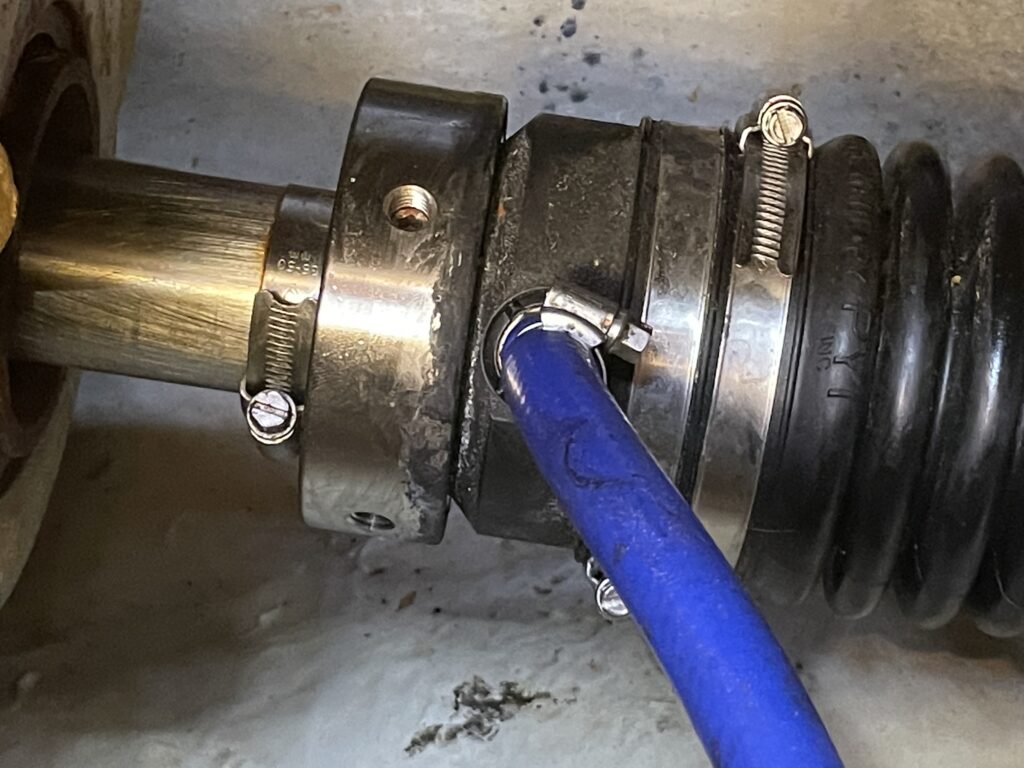
The first issue to arise was water coming in through the recently installed PSS shaft seals. The boat came with PSS seals installed. They are meant to be dripless seals however on our maiden voyage home there was water coming in.
Not at any rate and not enough to set the bilge pumps off, but probably 5L or so of water needed baling out on an 8 hour journey. This continued dripping while moored up, at one point I was going to the boat every two days to bail out. There were no obvious issues, however after some head scratching, it came down to its initial installation where the cuffs of the bellows had been cut down and the two jubilees did not subsequently fit as they were supposed to with one sliding off the stern tube causing the bellow to deflect meaning the sealing faces were not sitting right and the compressed length figures were no longer accurate since they were modified!
Fortunately this was able to be rectified while in the water as disconcerting as it was. I was shocked how quickly water enters the boat when this bellow graphite stator is pulled away from the rotating disc. A failure of the bellow does bear thinking about because it is serious business.
The solution was to remove one of the jubilees, substitute with a cable tie and re-compress the seals with more preload.
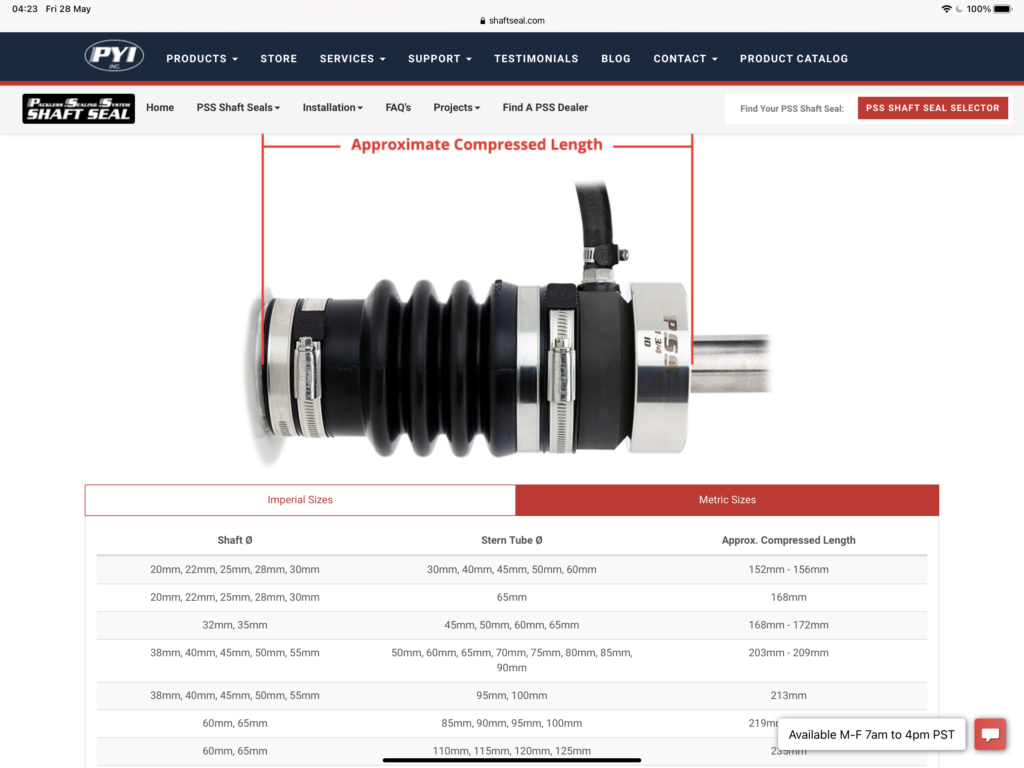
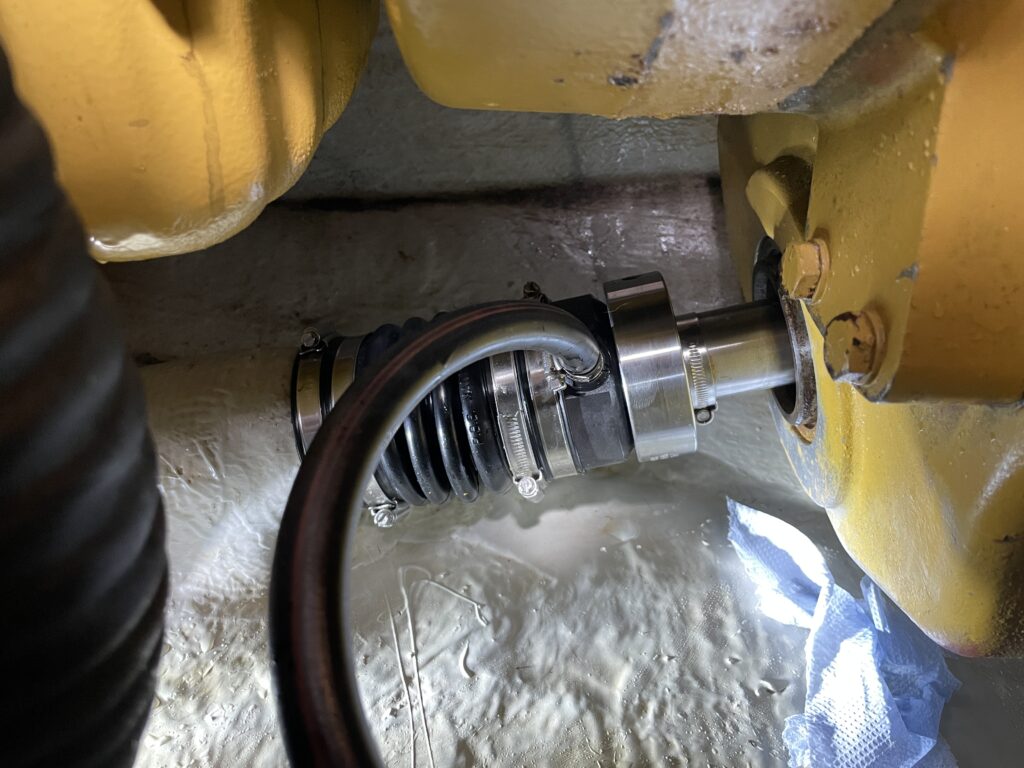
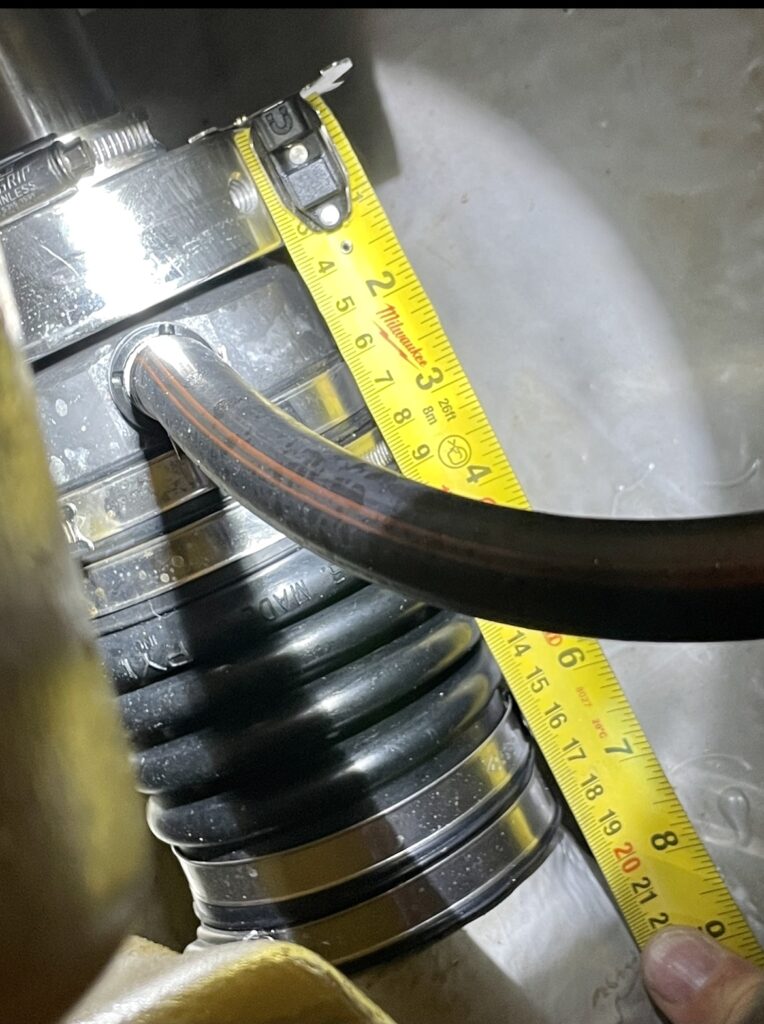
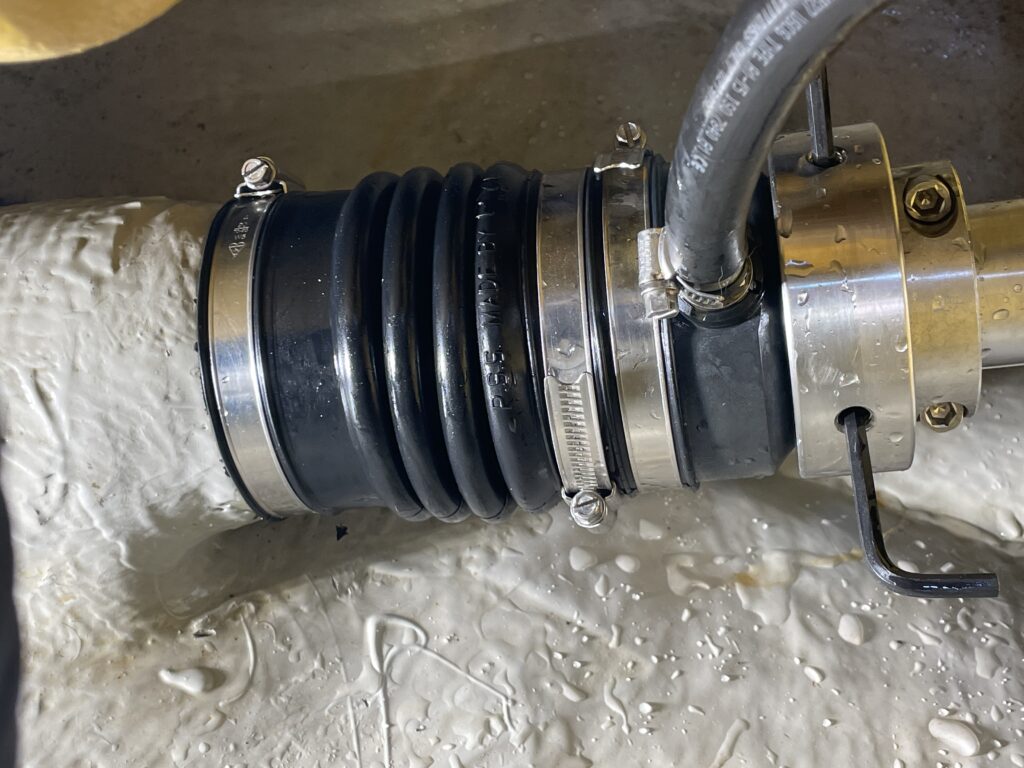
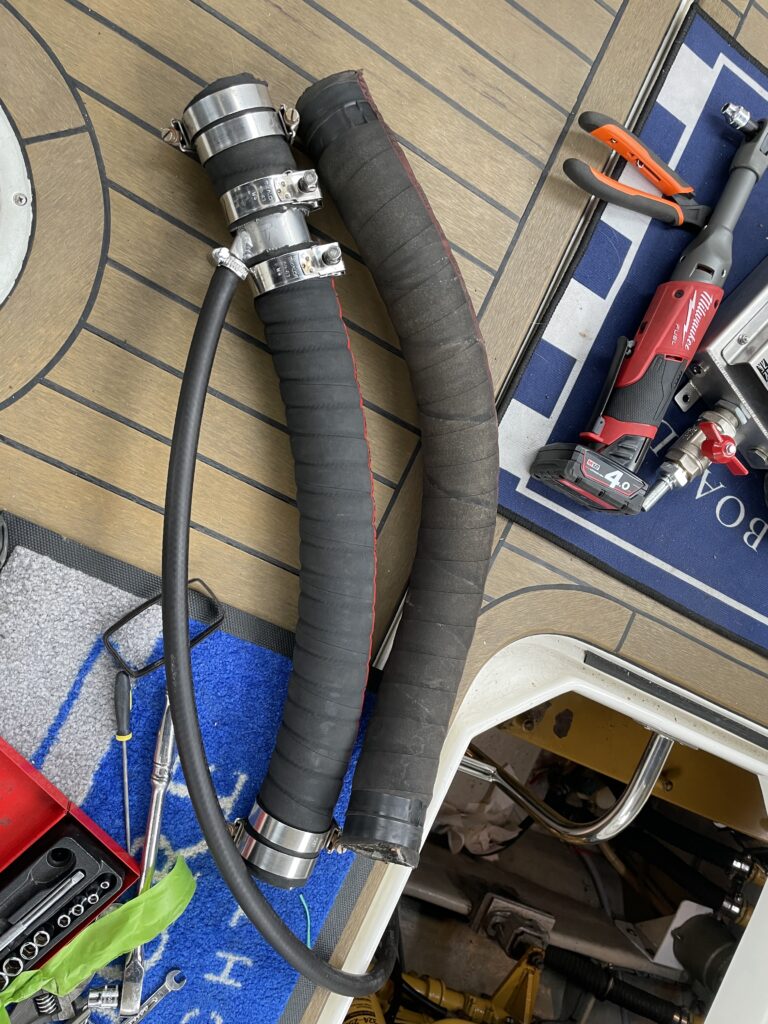
This did the job and kept the water out but I wanted a better long term solution, one which would allow two jubilees on this below the waterline fitting! Cue, PSS Pro bellows put on order, the heavy duty silicone versions are shorter in length and therefore would not require cutting down to suit the available space and also featuring locking collars which I had previously ordered and installed above in the last 2 photos, which replaced the less substantial jubilee clip which is a fail safe in case the locking collar was to come loose, which in turn would loose compression on the bellow and literally sink the boat!
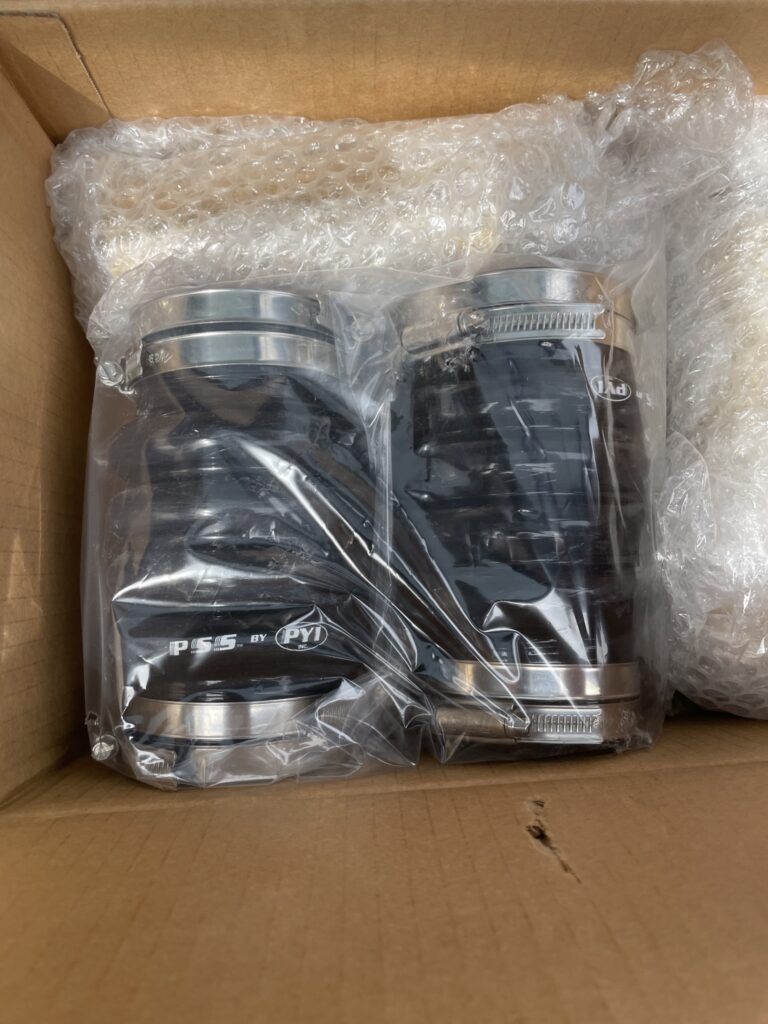
The PSS Pro seals arrive (below) and look infinitely more robust, but fitting them involves removing the prop shafts so this will have to wait until I’m ready to take the shafts out.
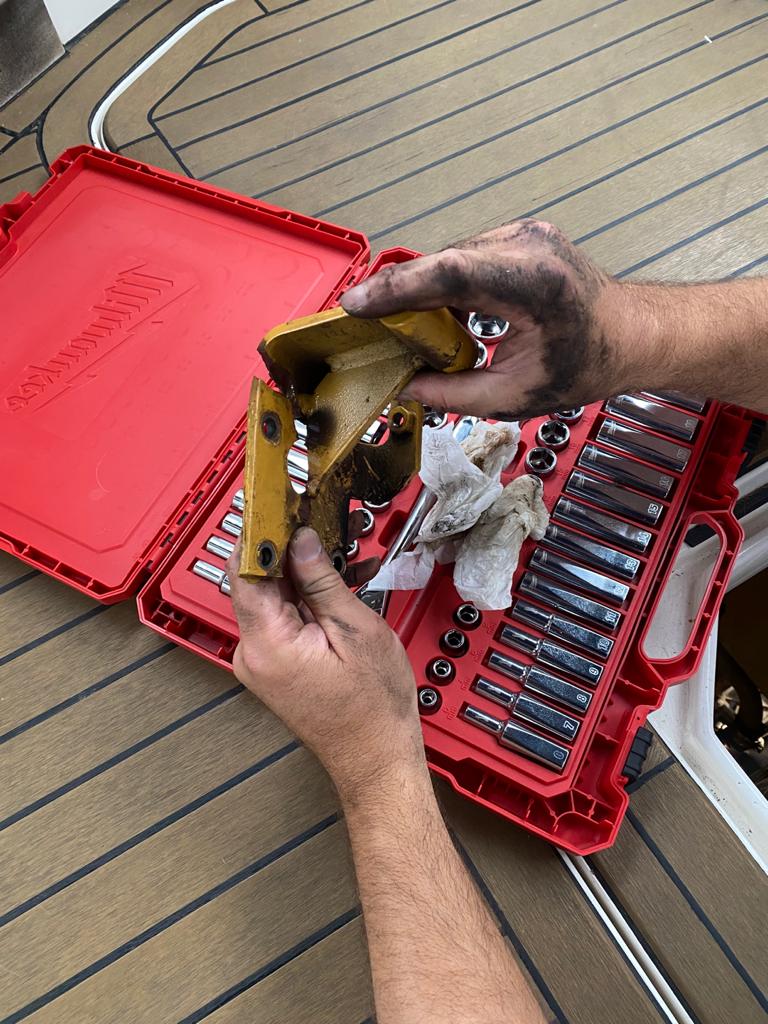
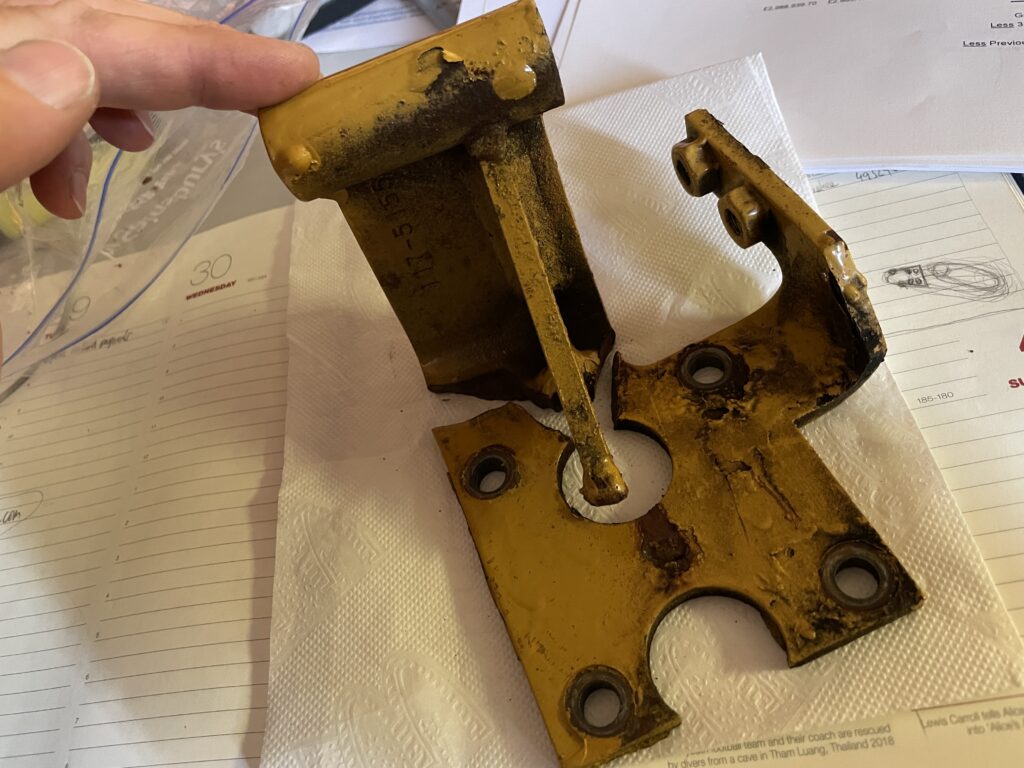
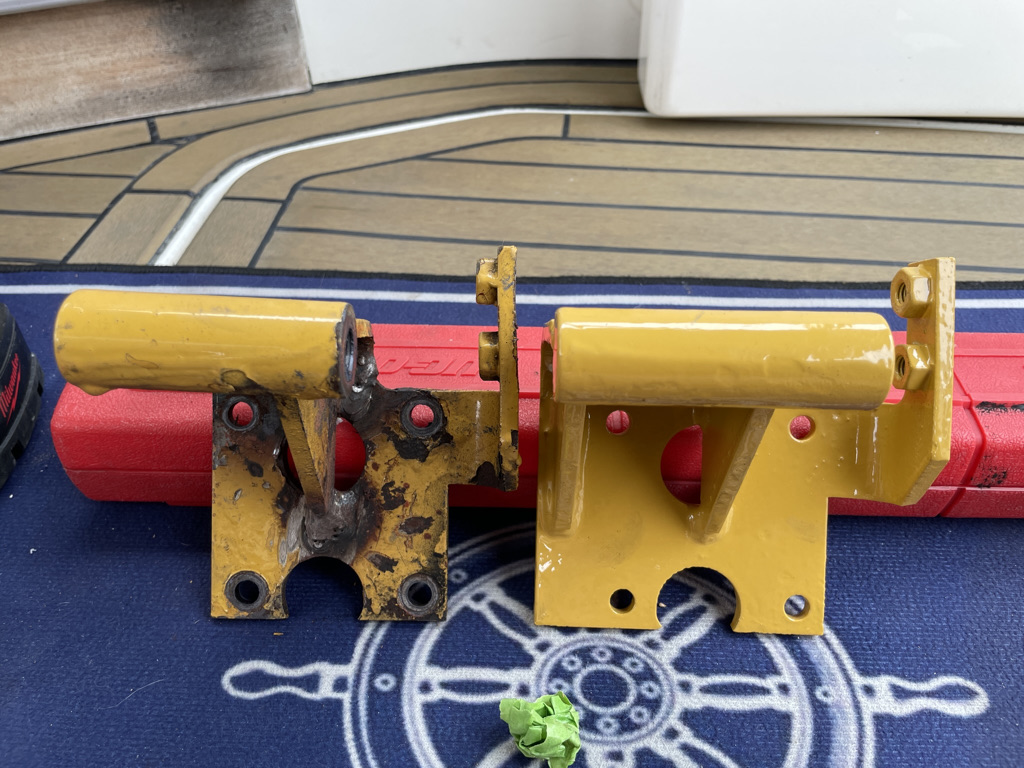
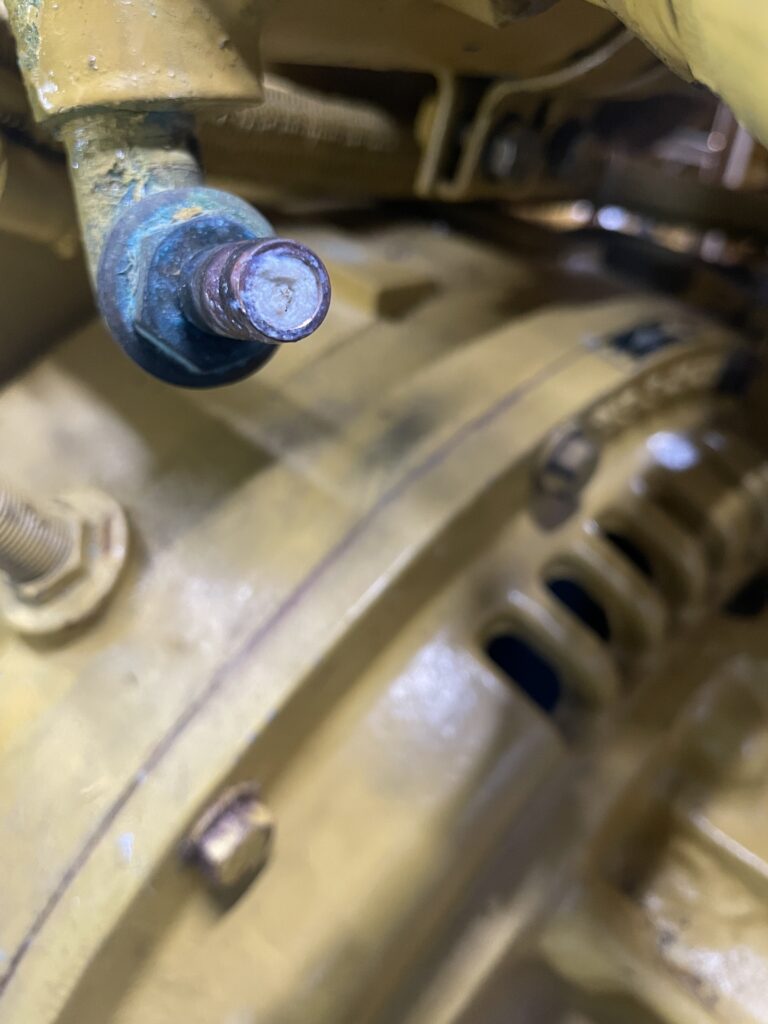
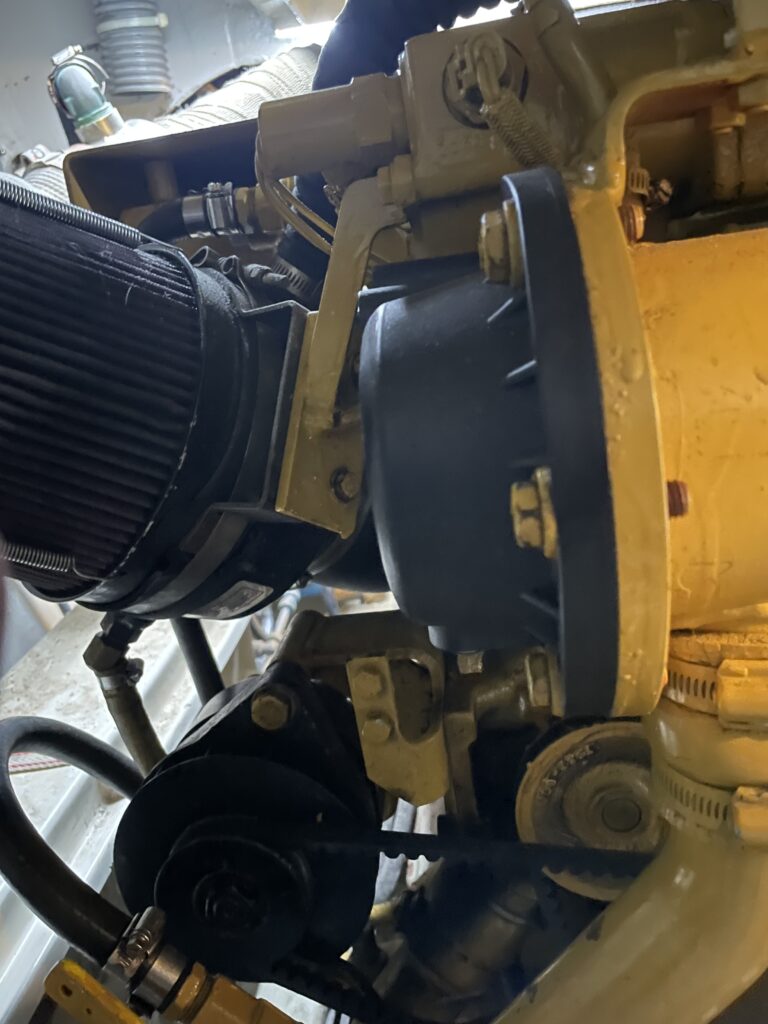
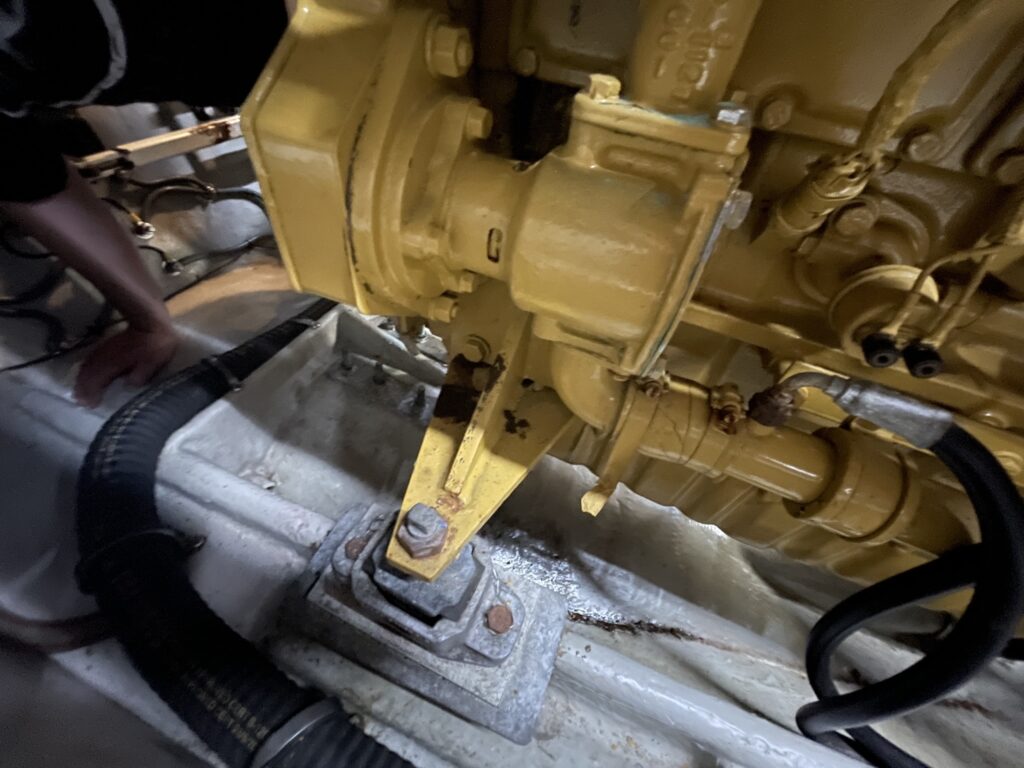
Alternator bracket – While checking the belt tension during one of my random engine bay inspections, I note there is some flex in one of the belts, and it looks like the alternator itself has movement. Closer inspection reveals the bracket is cracked through, fortunately the tension setting bolt is keeping the whole assembly together barely as the bracket it turns out is cracked completely through.
I have this welded temporarily (left bracket in below photo) to get underway asap while 2 new brackets which are back order items are placed on order, one for each engine as the other side looks like it may not be too far behind. When the new brackets arrive, it is apparent that they have been redesigned. I first note that they are longer, they just looked different but on closer look, they now have two fins supporting the alternator top mount which is why they look so much longer. Clearly this must be a known failure point prompting the redesign. I’m glad I ordered two!
Engine running problem. This has been an interesting journey and led to looking at many things closely. The starboard engine seemed to intermittently hang when powering it up on its own for example to turn hard to port when entering the marina where the sea is notoriously choppy. It would get to say 1600rpm and wouldn’t give any more. I tried to replicate this and it seemed when there was load on the engine it hit a wall, when powered up with the other engine it seemed to work ok and rev happily to where it should go. This had me looking at fuel quality, fuel pressure, turbocharger, breathers, chargecooler, water pumps, everything.
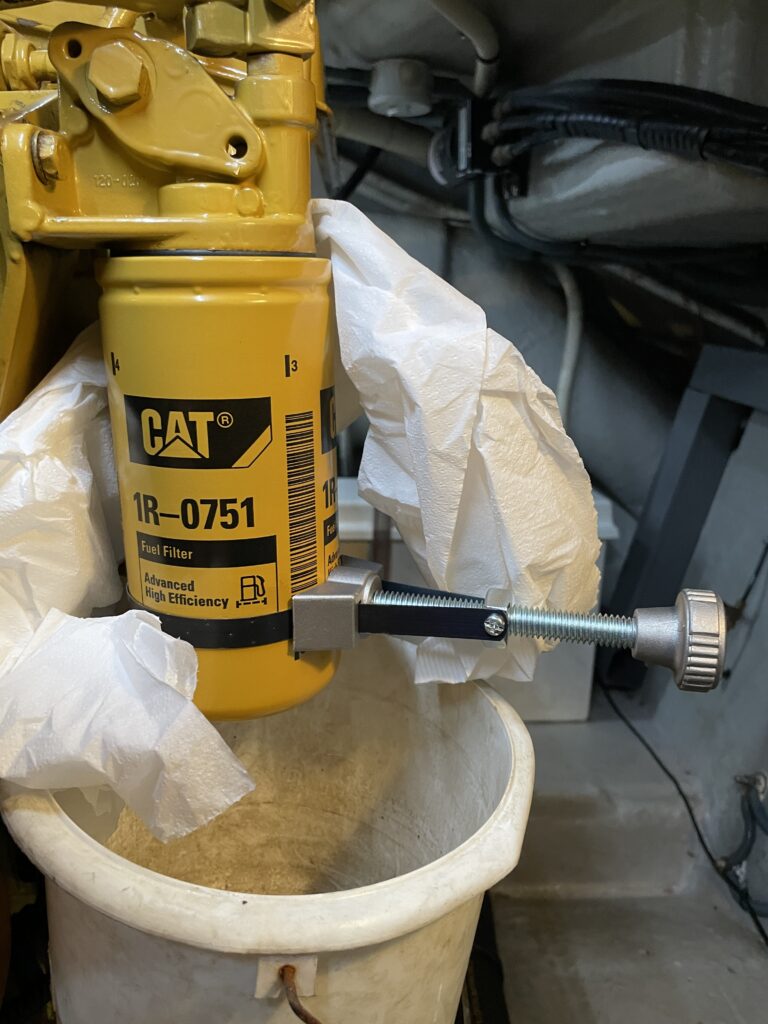
First off, diesel bug…which had me installing a diesel dipper covered in another blog post, as well as replacing the Separ primary and Caterpillar engine fuel filters.
I install new CAT fuel pressure gauges to each engine, new separ vacuum gauges on the primary filters with new modified lids, and some temporary clear fuel return line attachments to check for any air bubbles in the fuel system.
It appears that fuel starvation through low pressure or injector failure isn’t the issue with the engine hanging. The turbo looks as new, as it should since both were renewed by the previous owner. I note during one of my engine inspection while underway that my starboard aftercooler is running hotter to the touch than the port side. There is water coming out of the wet exhaust which would indicate that the water pump is working and there is no blockage. So I begin wondering if there is an air leak in the inlet causing the turbo to run hotter increasing the inlet temps. I don’t like the look of the starboard intercooler around where the anodes are, the paint here had been touched in when I bought the boat and I had to keep touching it up.
I decide to run it with the heatshield removed and note there is quite a bit of paint burnt off the cooler suggesting it is running hot.
I monitor this and come to the conclusion that it’s noticeably hotter than the other side. I bite the bullet and order a very expensive after cooler which due to covid and decimated supply chains are on back order. We’re in winter now and so we are not using the boat anyway for the moment.
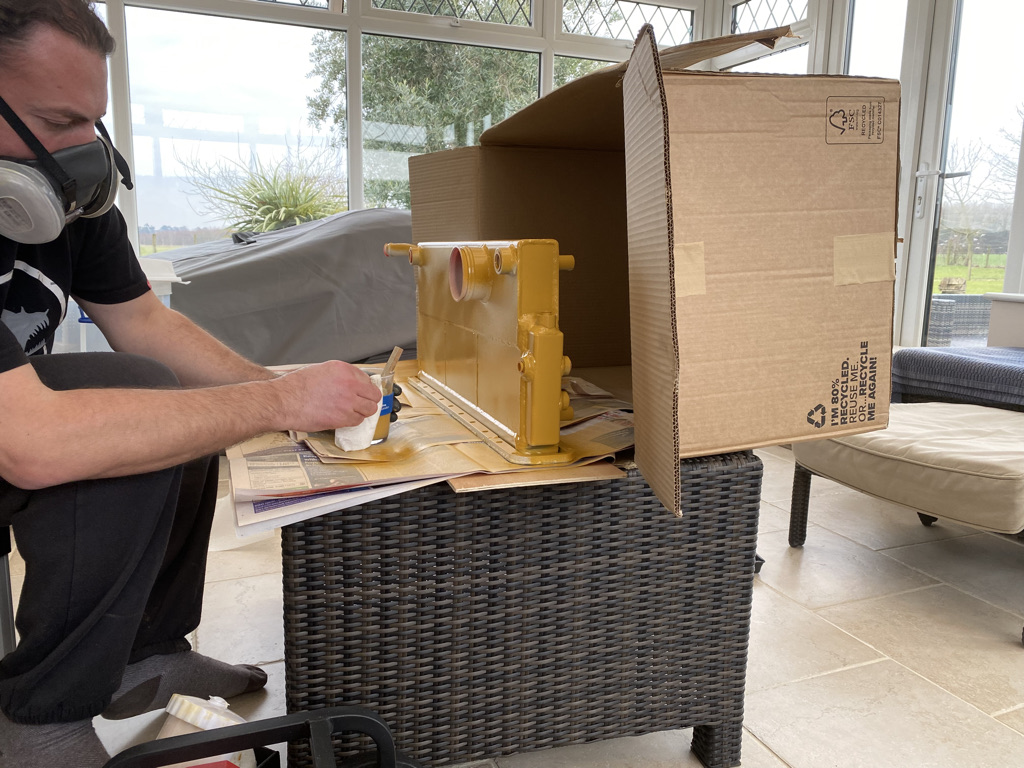
The new aftercooler arrives unpainted…it’s a beautifully made piece and very heavy!!
I set up a make shift spray booth and paint it in CAT yellow!
Wow what a difference!
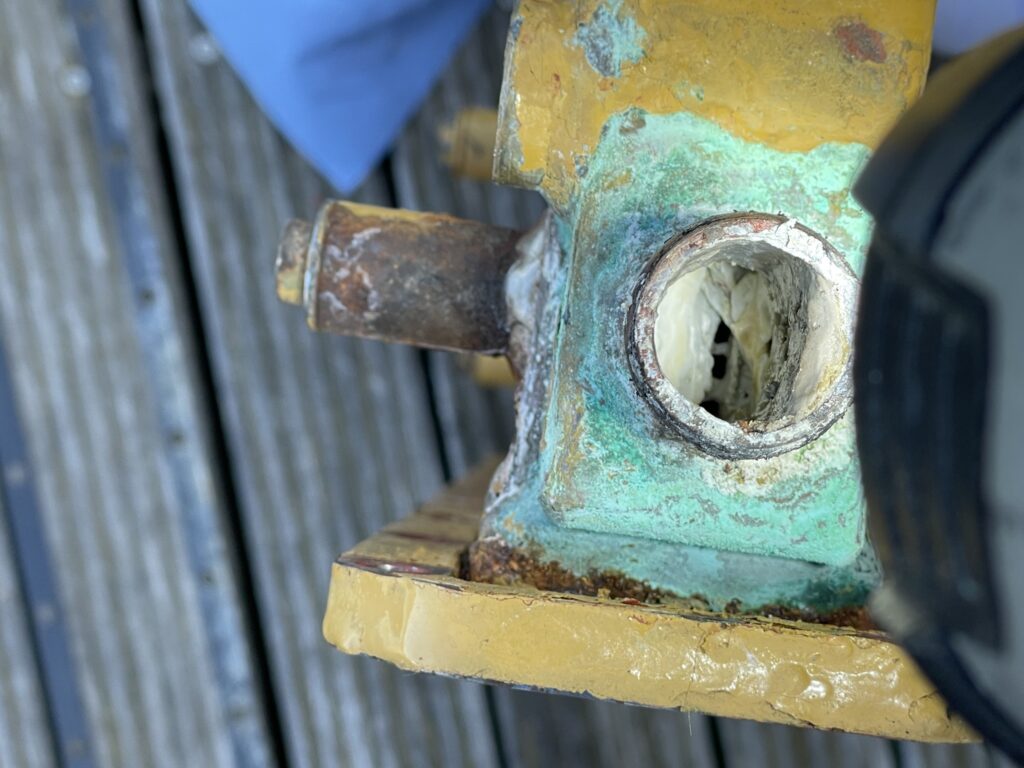
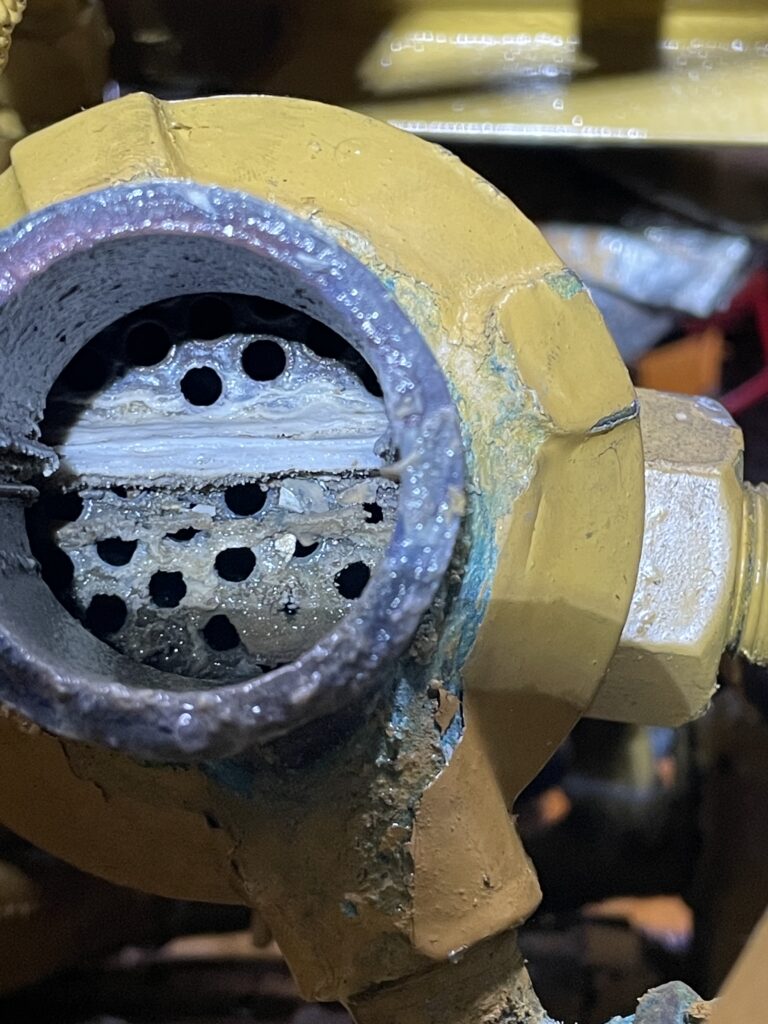
Upon removal of the old one, it becomes apparent what the issue was and why the aftercooler was running hot!
A deeper inspection reveals…
The inlet charge from the turbocharger compressed air should be cooled by the sea water cooled chargecooler, only here the chargecooler wasn’t seeing much cold water as it was so massively restricted in the cooler. Water was still running out of the exhaust but not as efficiently as it should.
It looks like this turned out to be the performance issue we were experiencing, reduced performance under high load conditions due to increased inlet temperatures which only occurred on the return leg of our typical journey to our local bay which had been making diagnosis somewhat difficult. Fortunately this was caught very early and not hammered around under heavy load conditions or on long journeys!
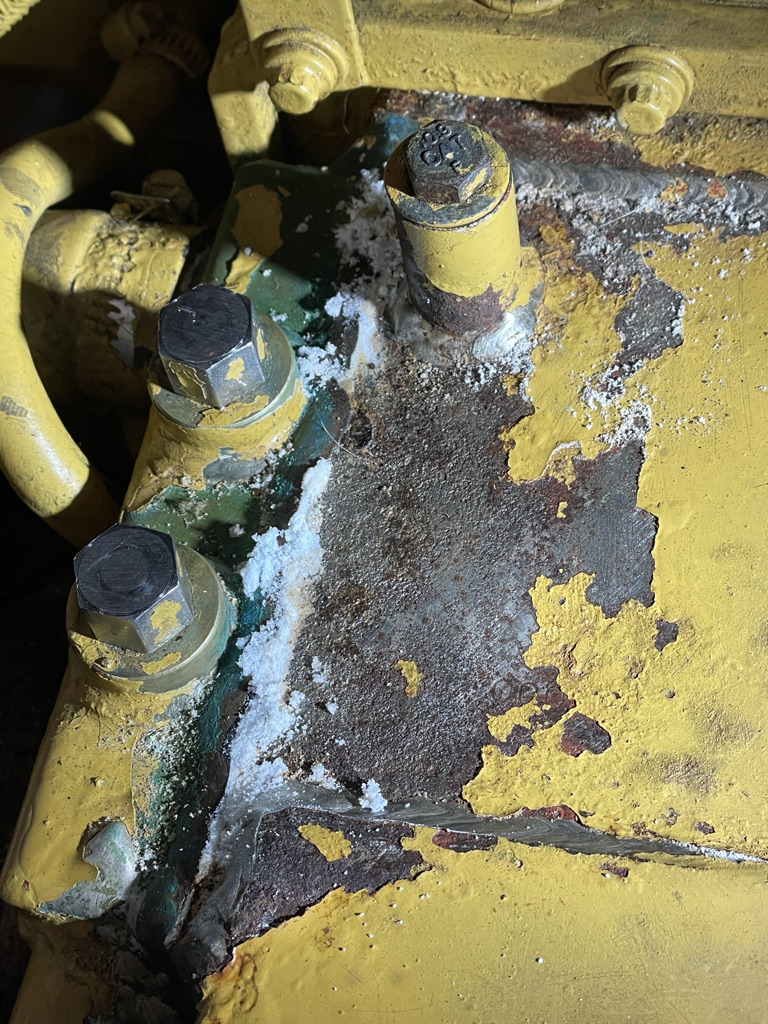
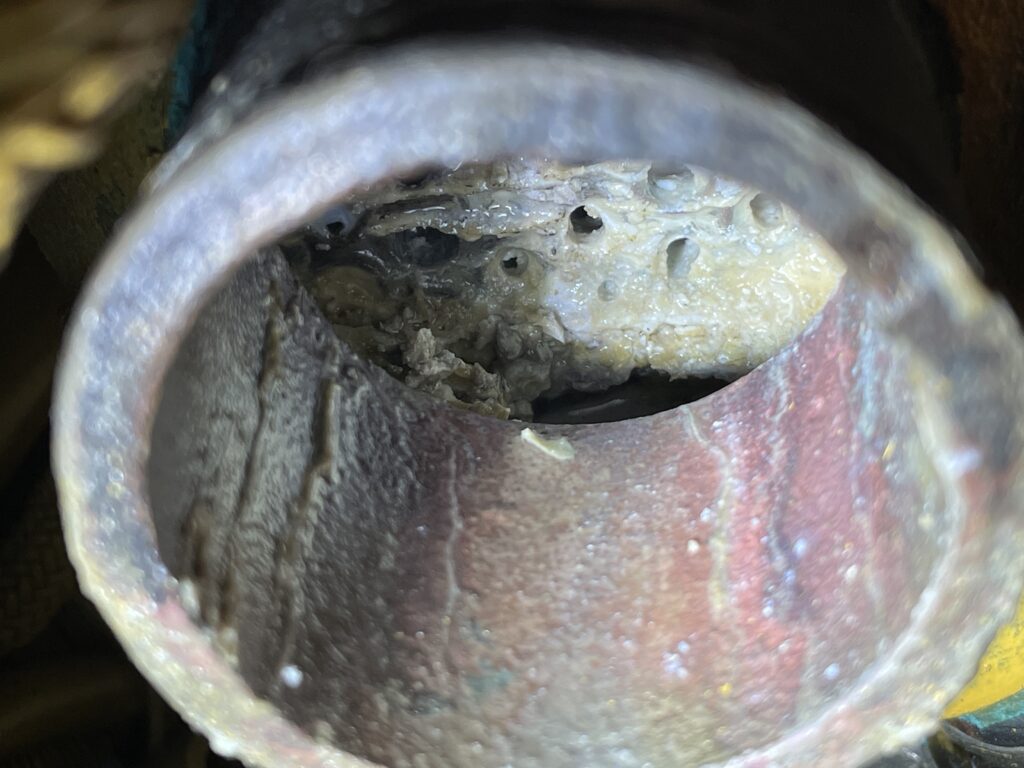
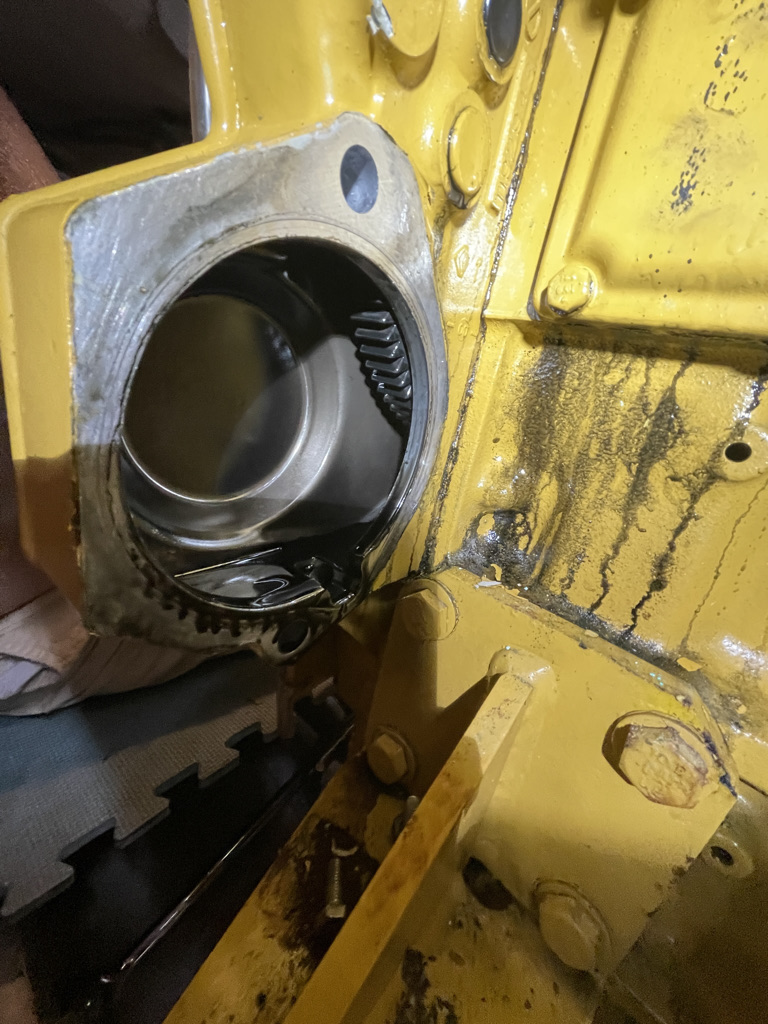
Another day another engine bay inspection, I note one of the shaft seal stators on the starboard side is warm to the touch and the other side is cool. On closer inspection, I see carbon build up suggesting this is seeing heat.
I check the transmission oil cooler and once again make a discovery!
stbd inlet…Stdb transmission cooler inlet…
The feed to the shaft seals is completely blocked, hence they were not receiving any cooling and the transmission coolers are showing early signs of blockage!
I clear all the coolers, install new hoses and check the port side and clean that also.
A cautionary tale comes some months later, when another recently purchased non resident Sunseeker sits two boats away from me on the hard standing in dry dock (far left).
The RNLI had rescued it, diesel bug had killed the engines. He was towed in, while being towed in the shafts were windmilling under the water on the 8 knot tow. This boat was fitted with ‘Tides’ seals which were Sunseeker factory fit. Because the engines are off and not supplying water to them, the windmilling action caused those plastic seals to melt, allowing the ocean into the bilges. Fortunately being under tow by the RNLI meant access to a serious bilge pump to clear it. The boat required immediate craning out. I thank my lucky stars I have PSS seals fitted with their graphite stators. Looking at old pictures from when we bought the boat, there was a small amount of burnt carbon on the shaft rotor even before we had set out on an 8 hour 24 knot homeward journey! This leaves me seriously impressed with PSS seals and I will shout their praises from the rooftops after witnessing how the competition fare under typical real world circumstances!
Anodes, regular maintenance items. These can break off if left too long and get lodged in the coolers helping to cause build up.
Heat exchanger caps showing lack of continuity for the anodes through their internal circuit. 2 of the 4 caps were new, the other 2 were showing signs of failure so 2 new ones ordered!
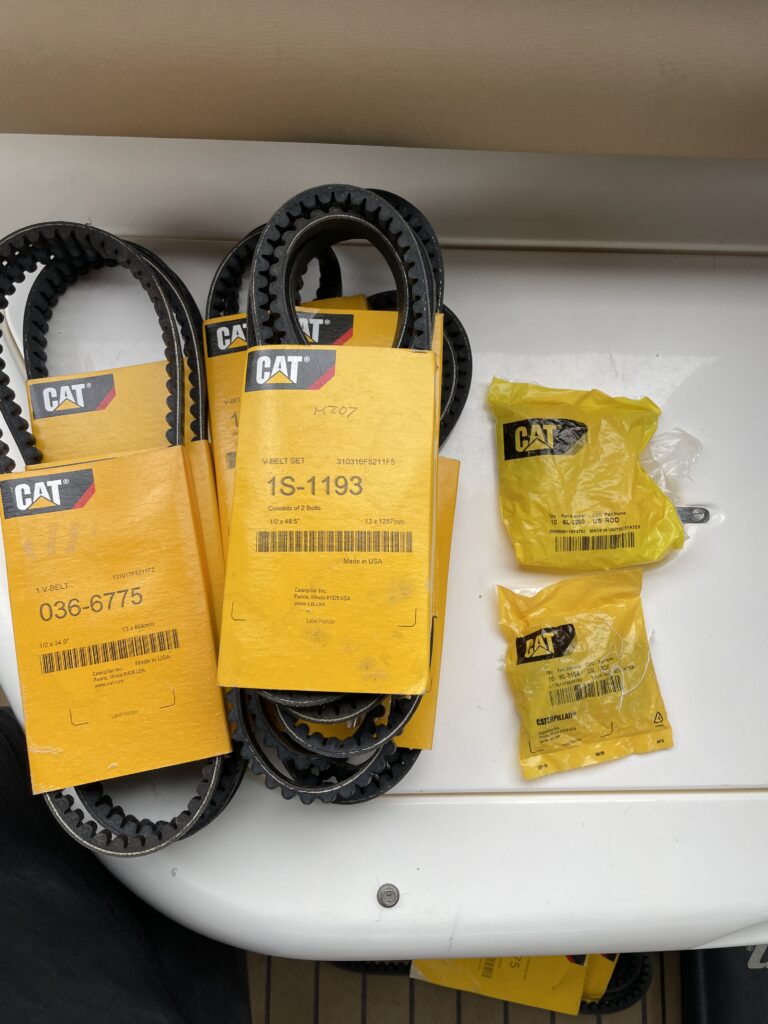
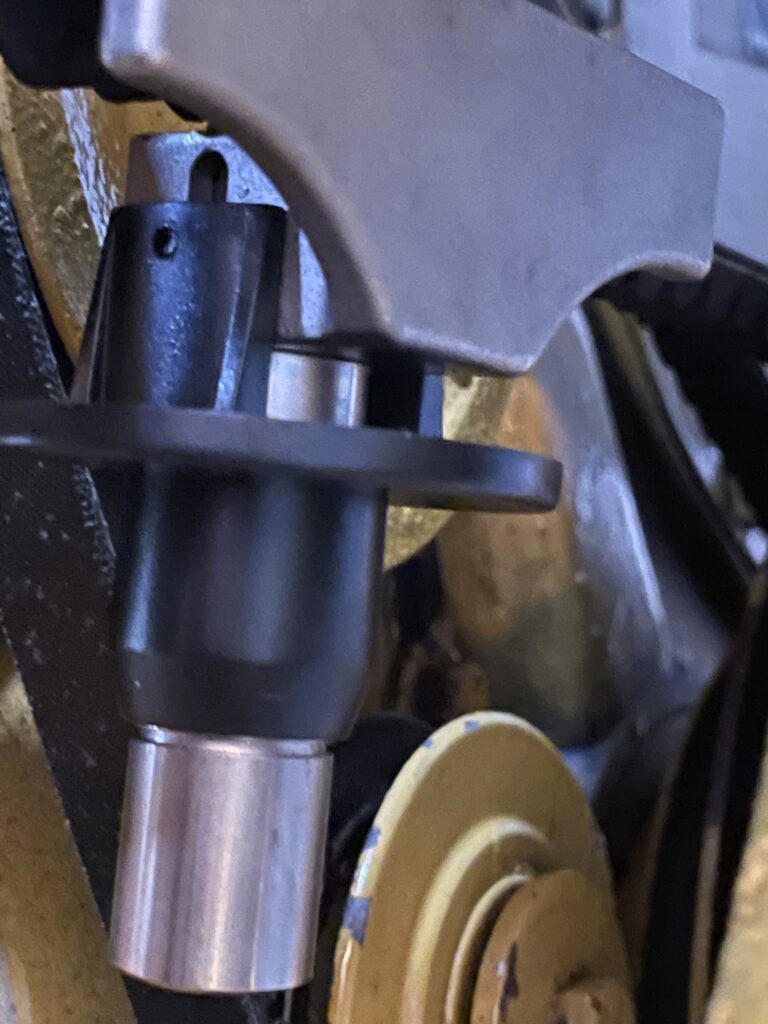
Belts, another regular and easy maintenance item. There are 2 belts per engine, one for the alternator and one for the sealed circuit water coolant pump (the sea water pump being gear driven).
Set to the correct tension…
Rubber work… Some of the rubber was looking very worse for wear, in particular the window trims. After eventually sourcing the correct profile I set about removing the old and replacing with new!
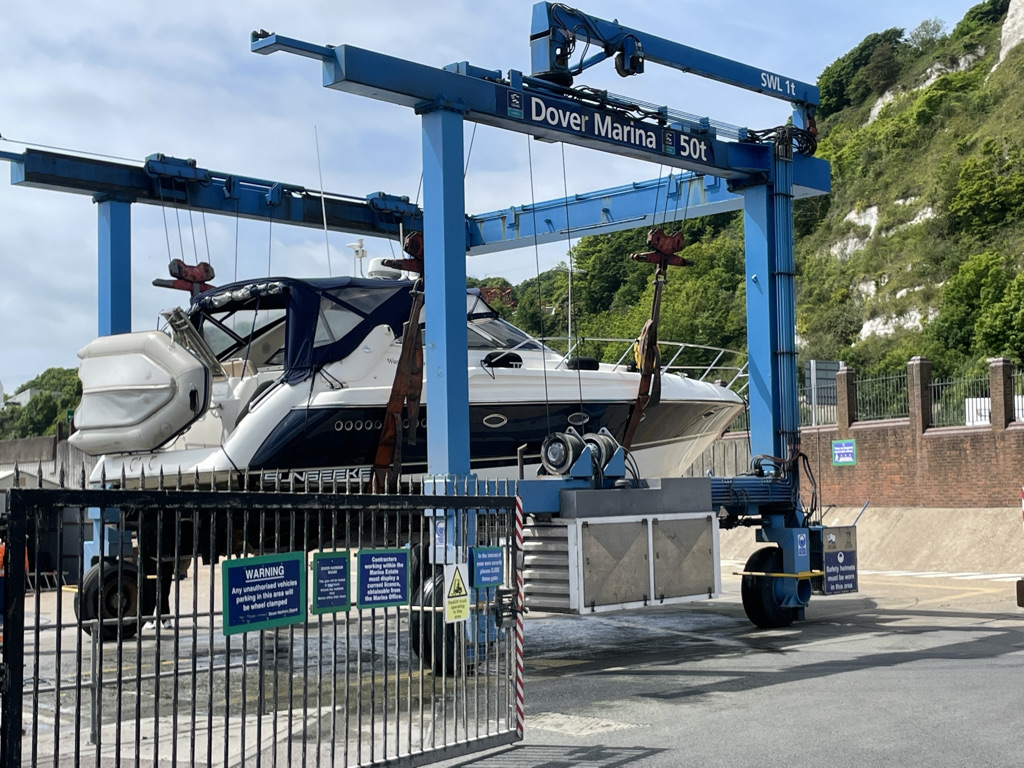
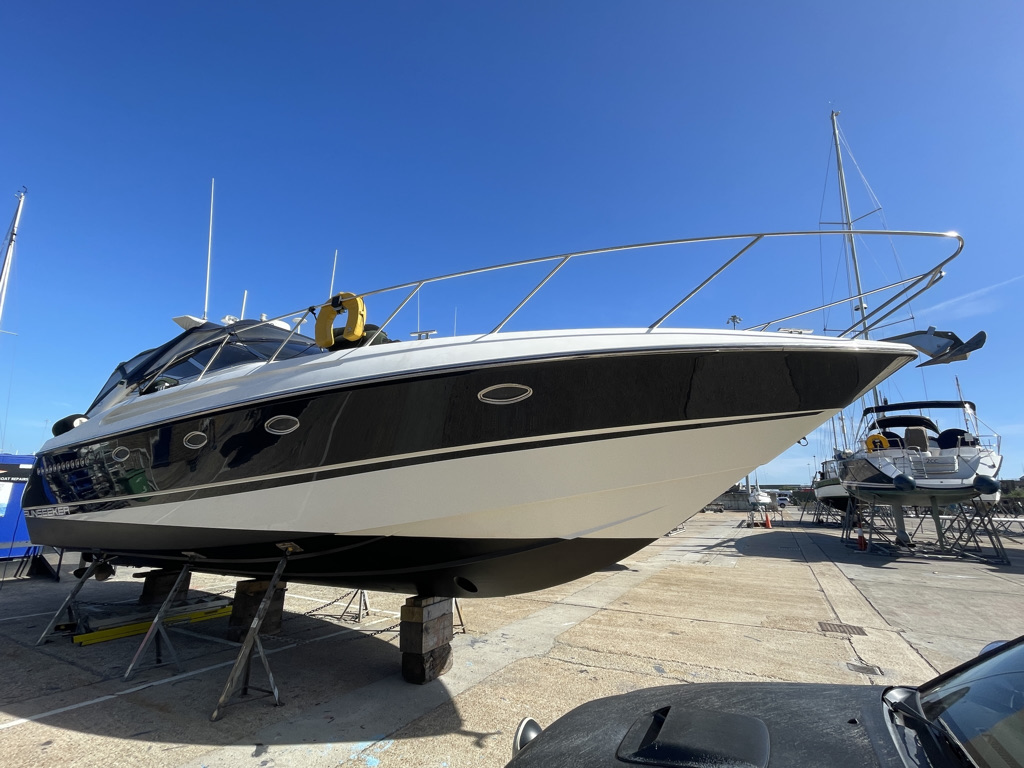
By now we are hauling out in preparation for the 2022 season!
Expecting a nice quick turnaround for anti foul and anodes so we can get back on the water!!
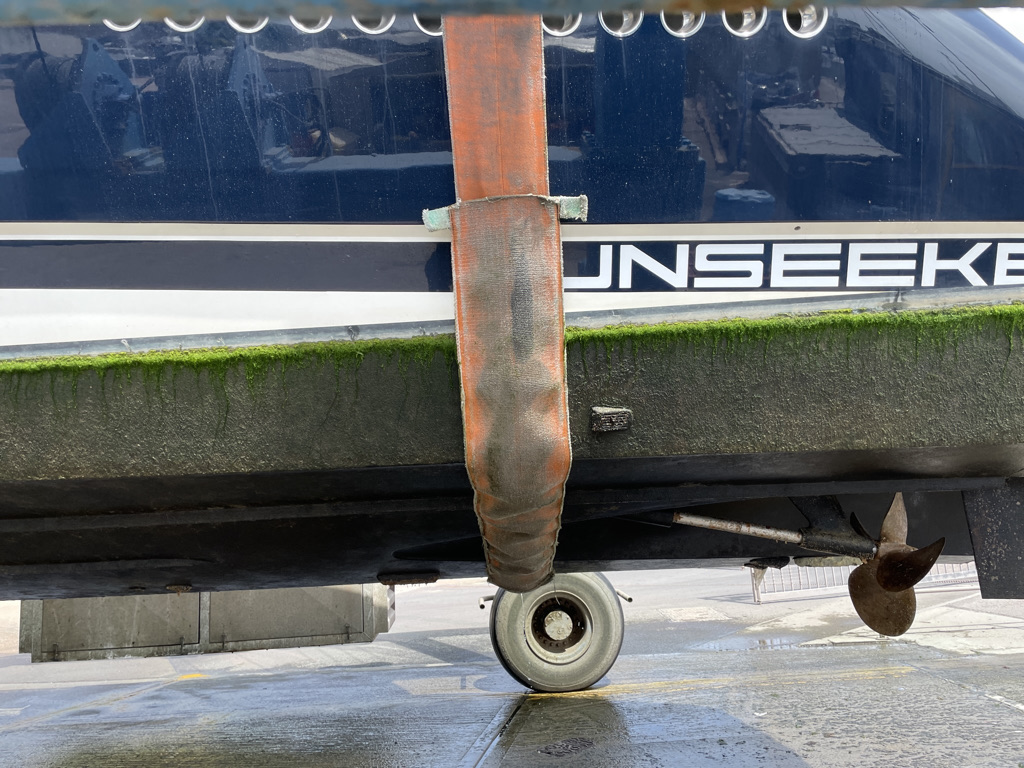
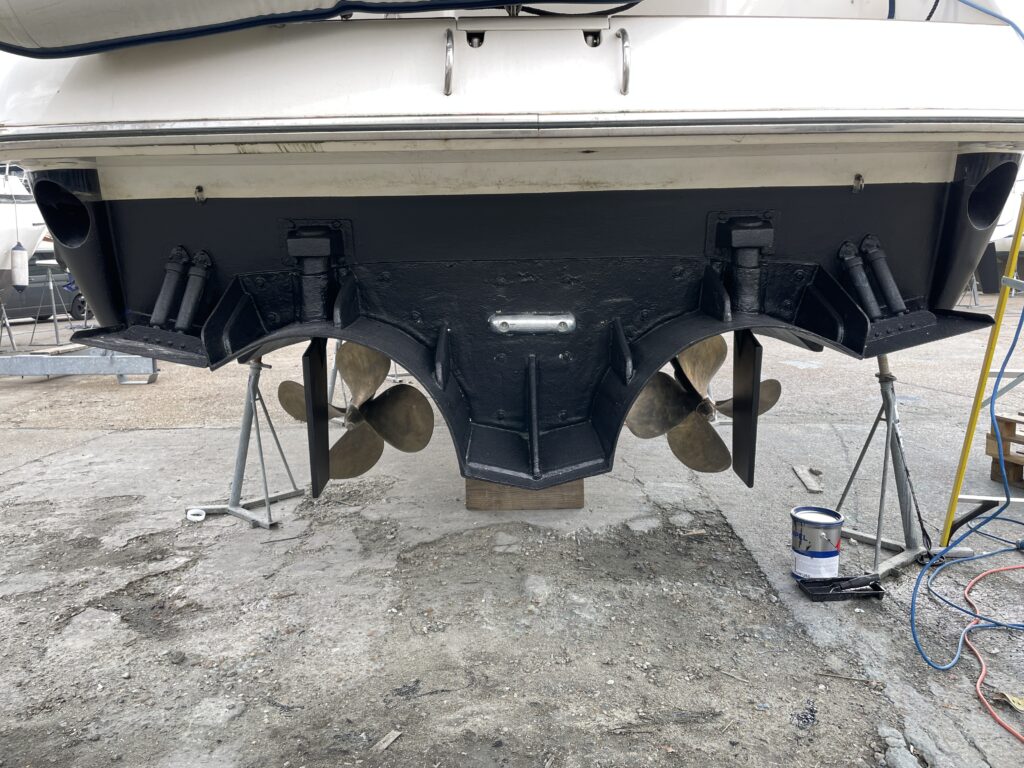
A quick jet wash on the bottom and it’s looking much more respectable. We set to light sanding in preparation for new anti foul.
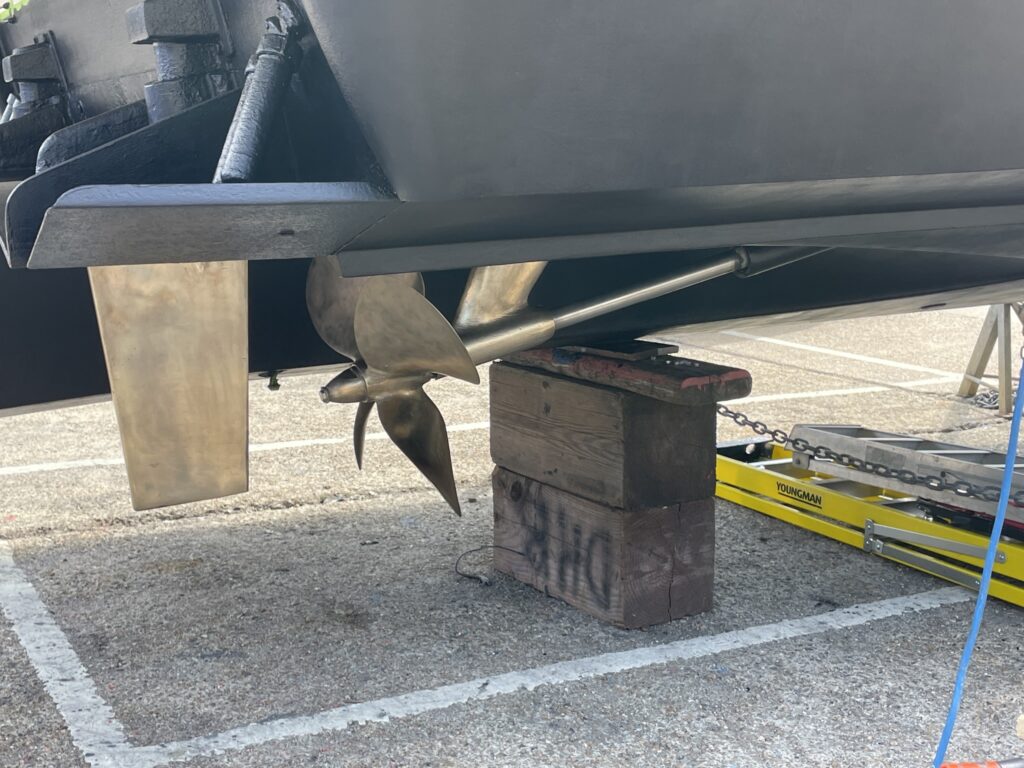
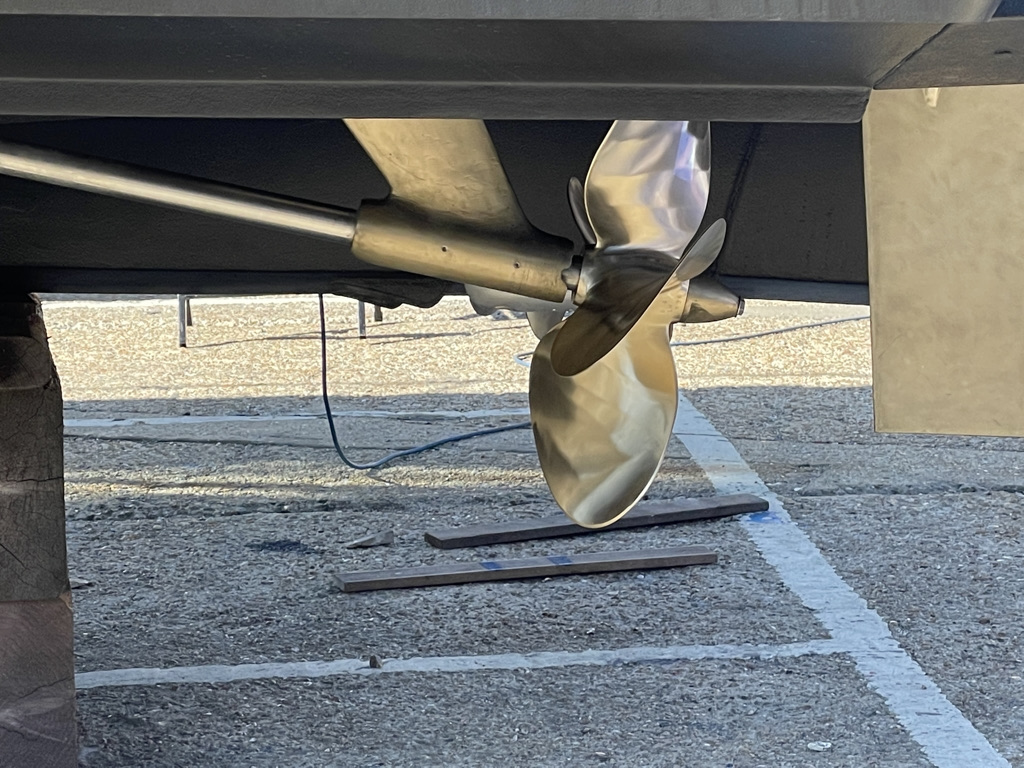
A few days later and we’re all done. Hull anti fouled, props, P brackets and rudders polished…
And all polished up…
When we bought the boat, the only item picked up on the survey of any significance was that the cutlass bearing would want replacing at the next haul out as there was a slight bit of play in it. We decide to replace both at the same time while we’re there. At that point, we notice than one prop appears to be a different size to the other. 24″ (factory) vs 23″. This won’t do, so we order up a new prop from Teignbridge who made the originals. The manufacturing time delay on this renders the boat out of the water for the remainder of the boating season, along with another discovery…
The starboard water pump shows the first signs of crapping itself. The brown sludge exudes from the tell tale. These are also on back order!!
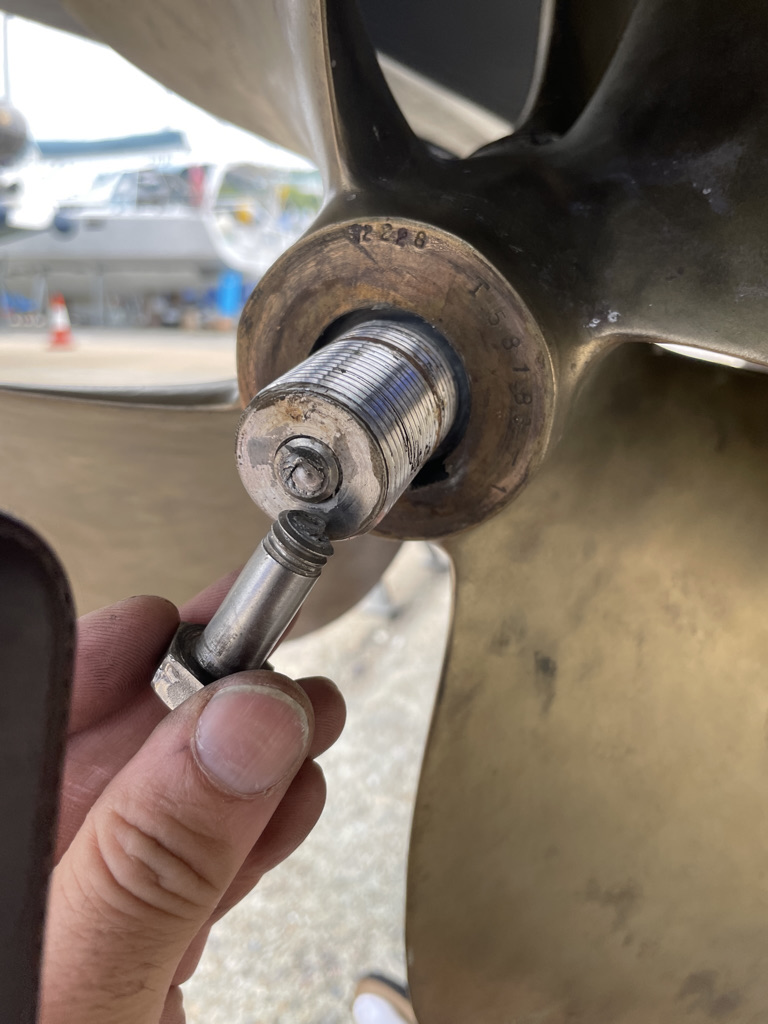
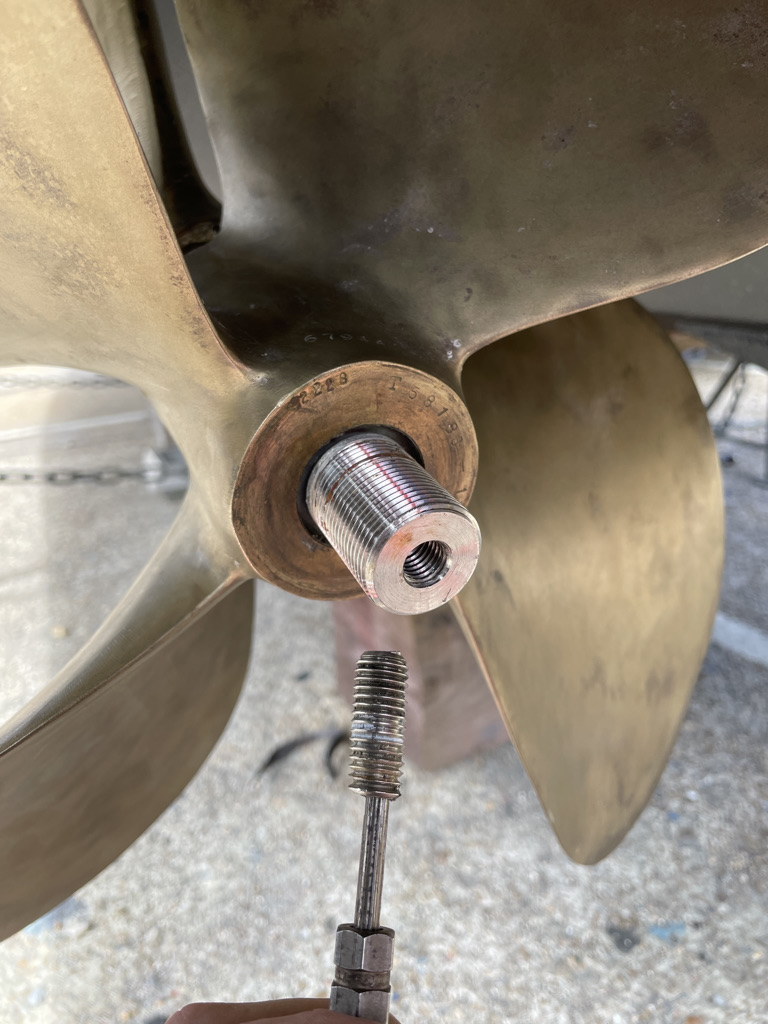
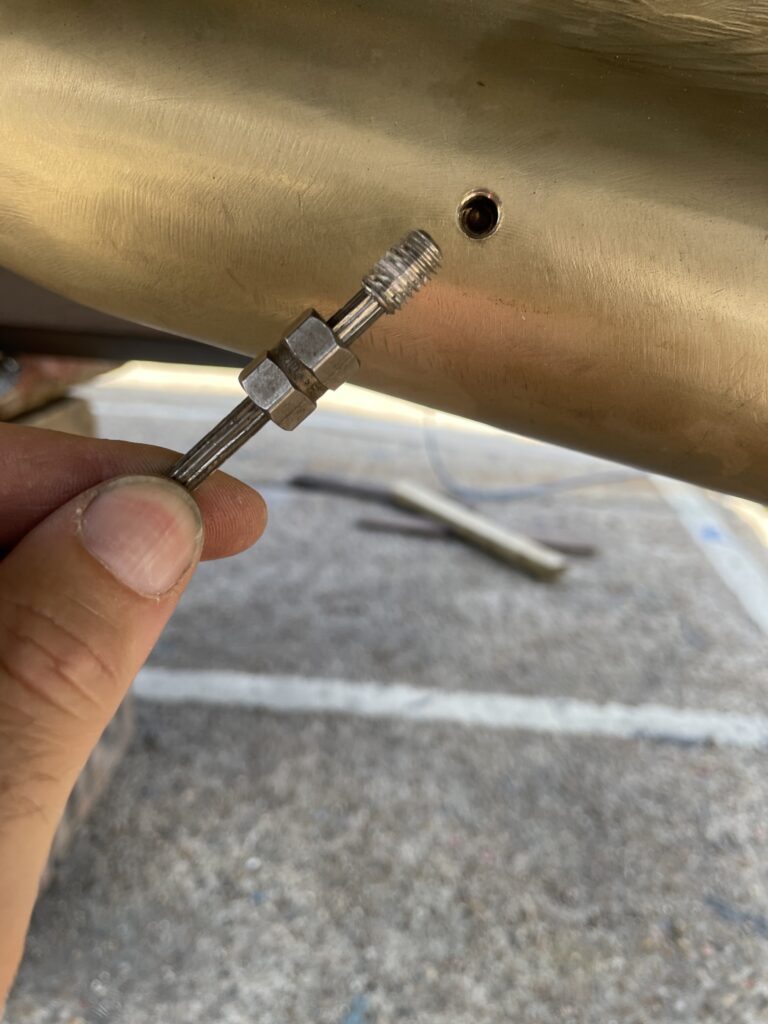
I learn the hard way that props are fitted with left handed thread bolts…
Fortunately, drilling out broken fasteners is something I’m fairly used to…being stainless steel makes it a little trickier…
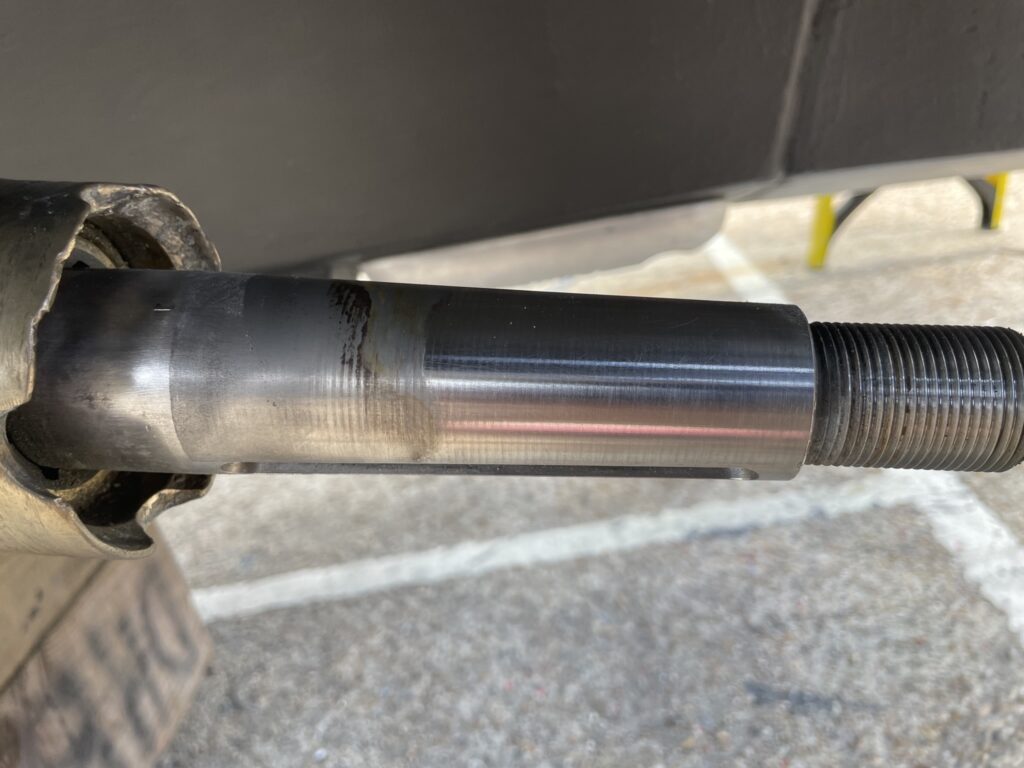
Meanwhile, the original props refused to come off without getting the pro’s in with proper oxy torches!
We also end up fitting larger grub screws for the cutlass bearings with the old ones also needing drilling out.
Teinbridge finally come through with a beautiful new prop for the portside…
Props refitted with new bolts and washers, new cutlass bearings with new larger grub screws…
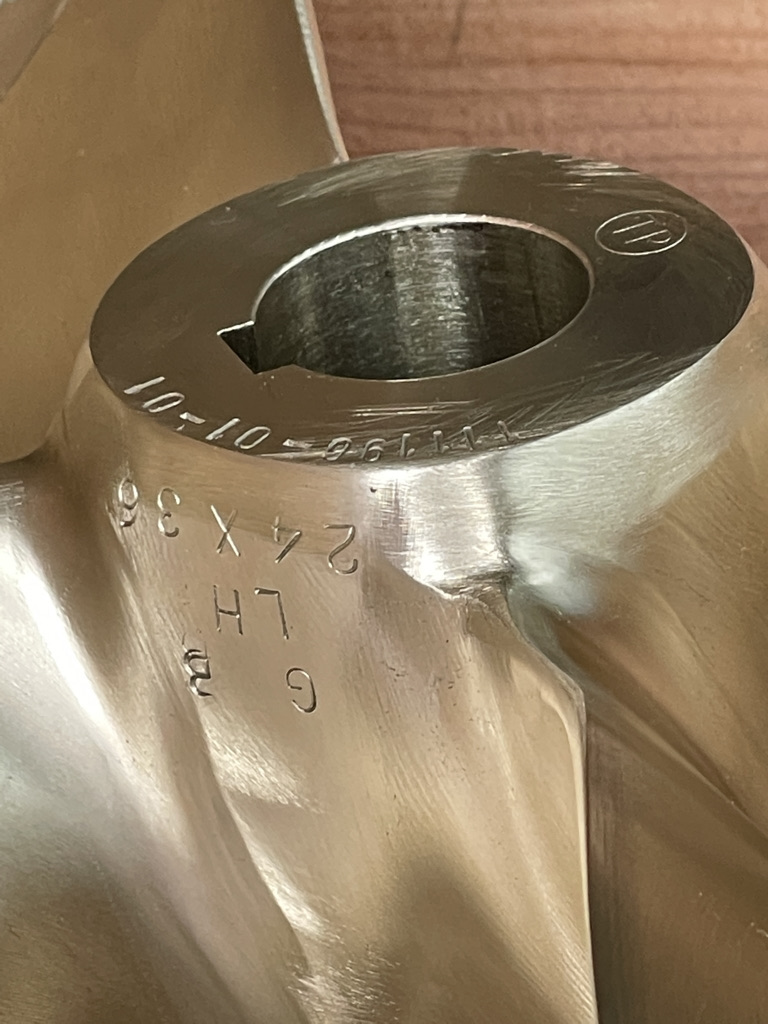
It turns out that the new prop looks virtually the same as the 23″ prop that came off, they’re not easy to measure but I suspect that the prop that was installed was a 23″ stamped prop modified to a 24″ diameter, as I learn that props can be heavily reworked. Anyway, the stampings both match now (24×36)!
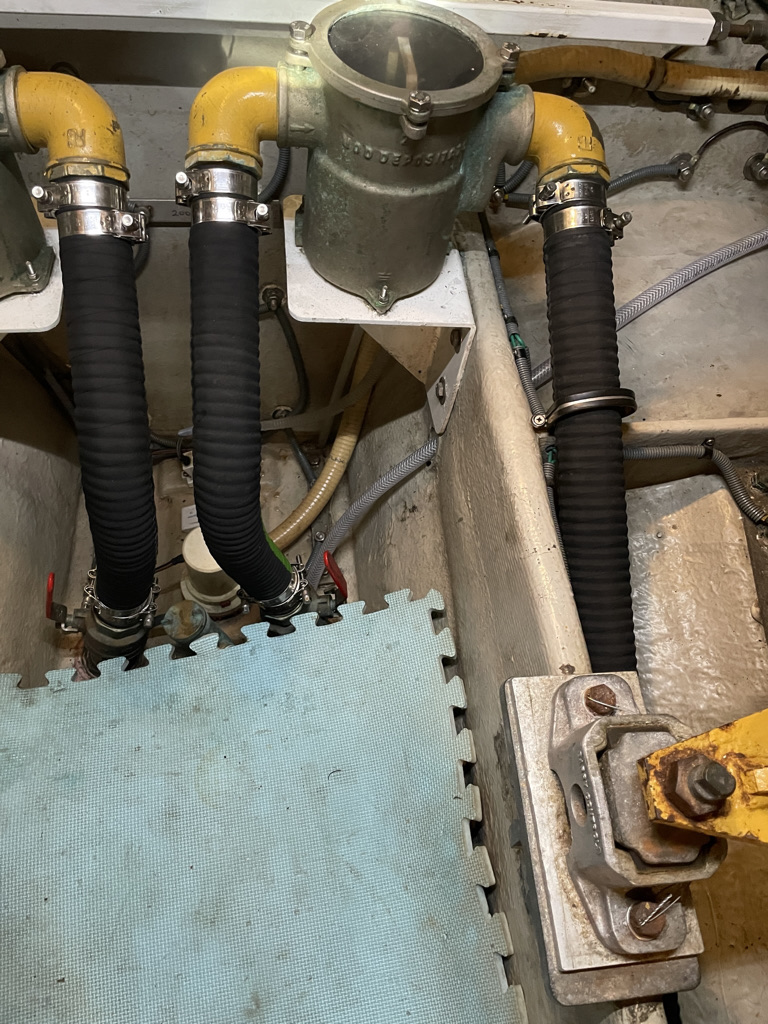
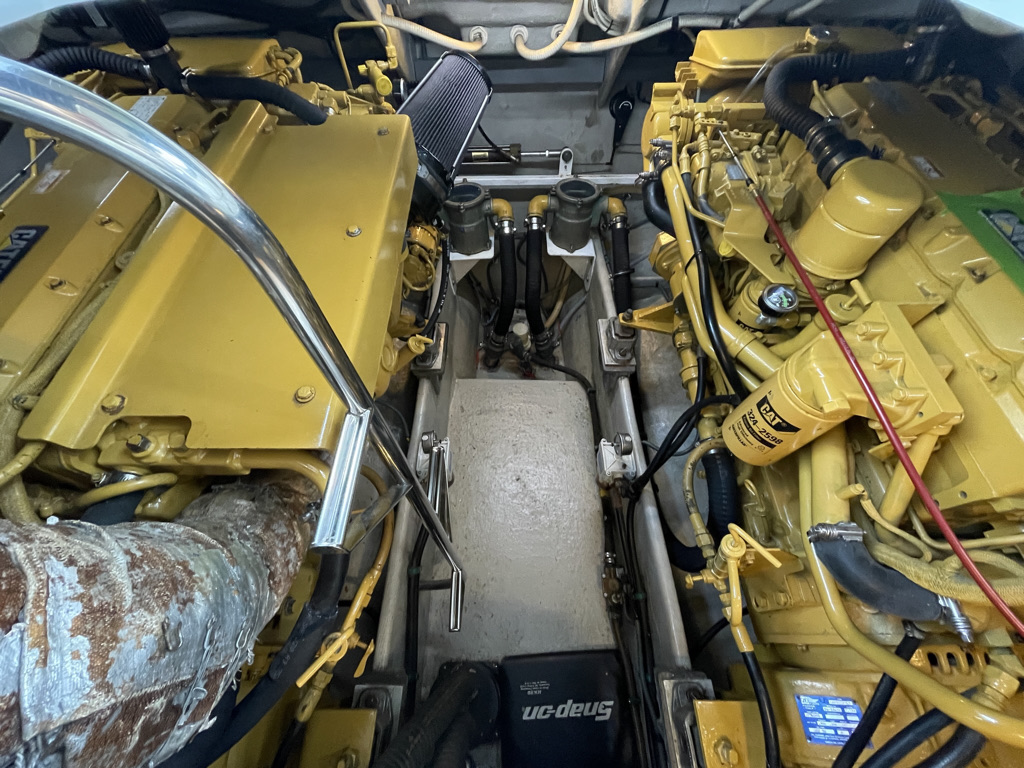
While we are out of the water for the summer, I take the opportunity to look at sea cocks and hoses…some of the engine bay hoses were looking a bit tired, given I’m somewhat neurotic about the thought of water coming into the boat, I decide to replace all the hoses in the engine bay!
The water pump for the starboard engine also arrives. Again unpainted…
Out with the old pump..
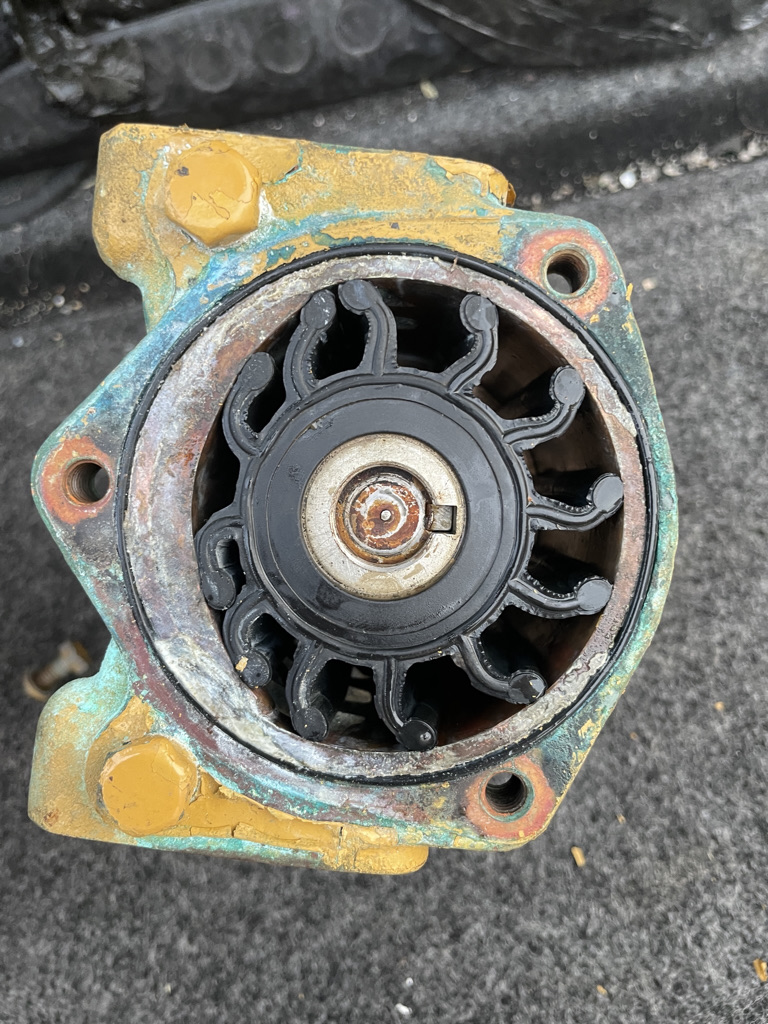
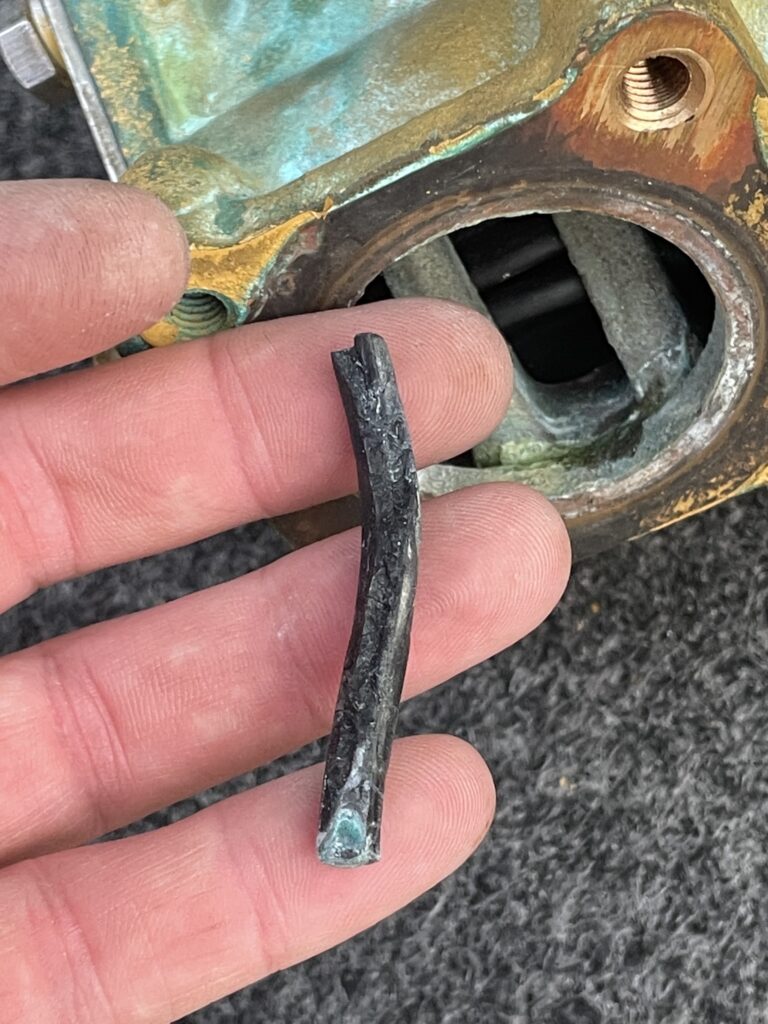
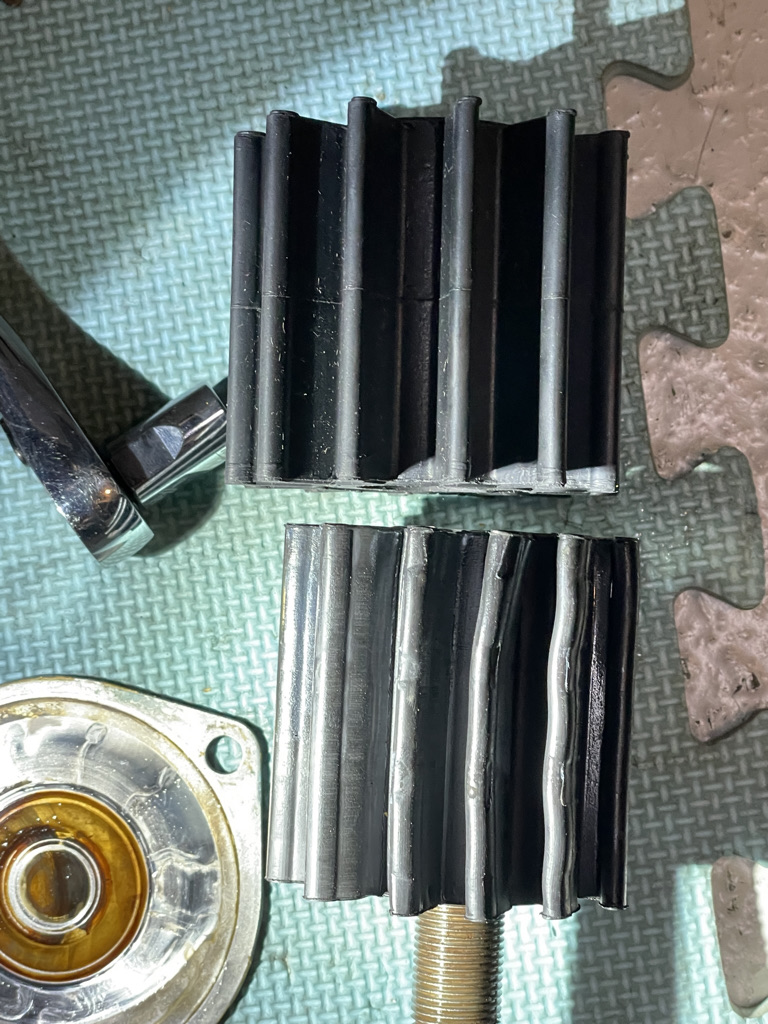
The impellers aren’t too bad but there are dislodged remains in the pump from a previous impeller!
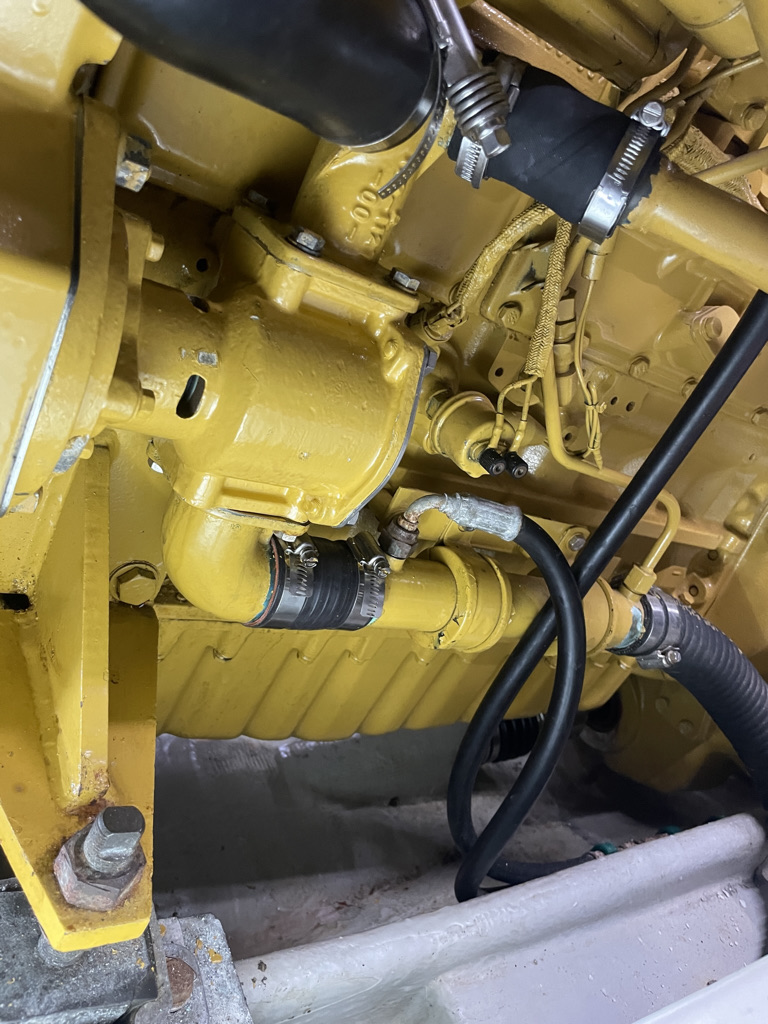
New pump now painted is duly installed with new hoses and area cleaned up.
While the port engine gets a new impeller fitted also…
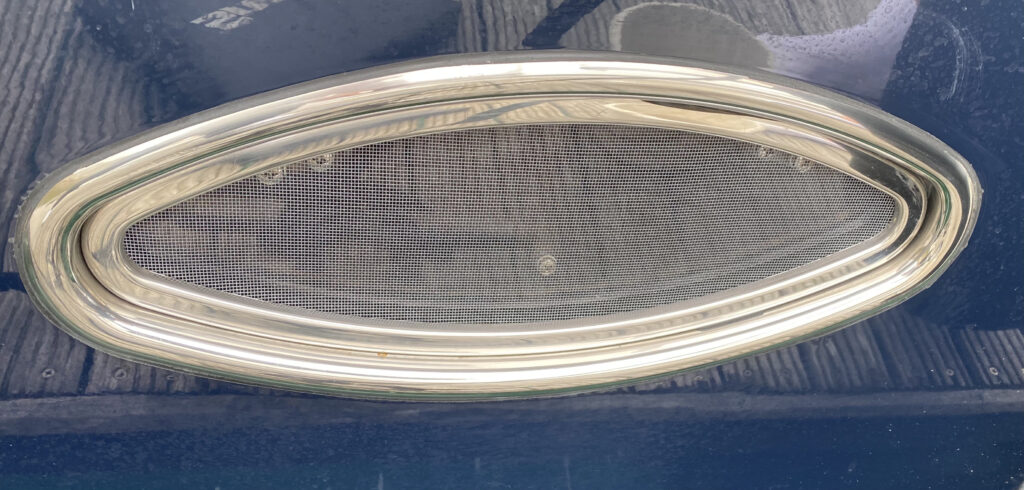
Portholes…one of the first jobs carried out, we replace the ratty old mesh with new.
upgrades, mattresses,
Leather seats given a good clean!
Old curtains
New curtains!
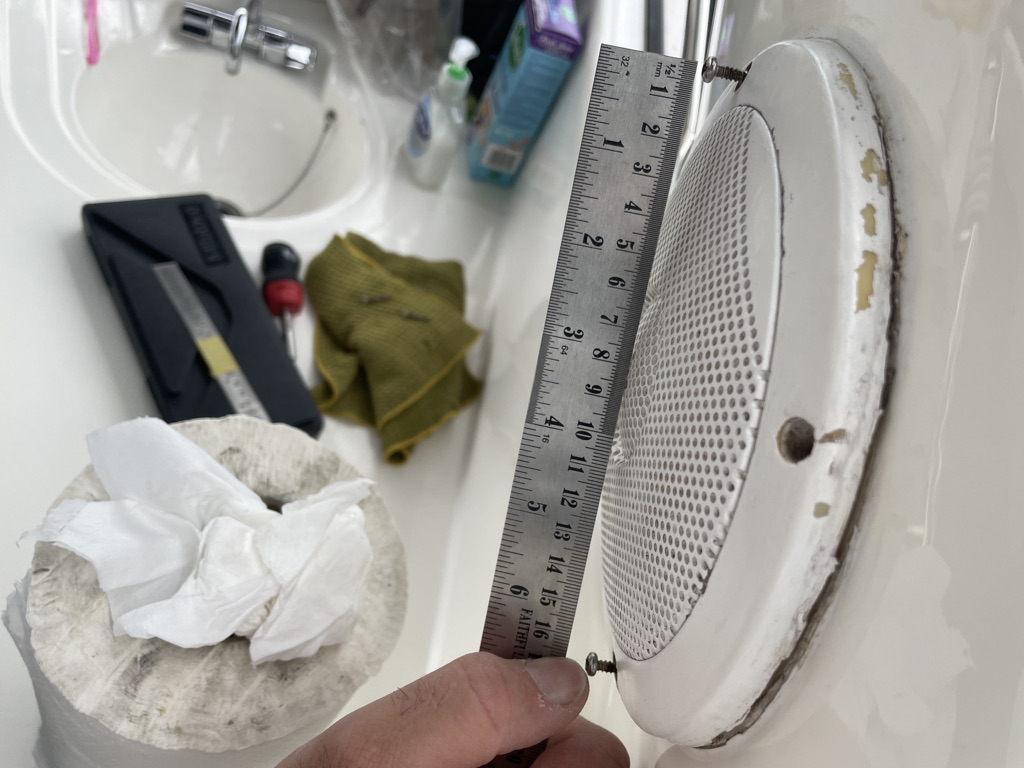
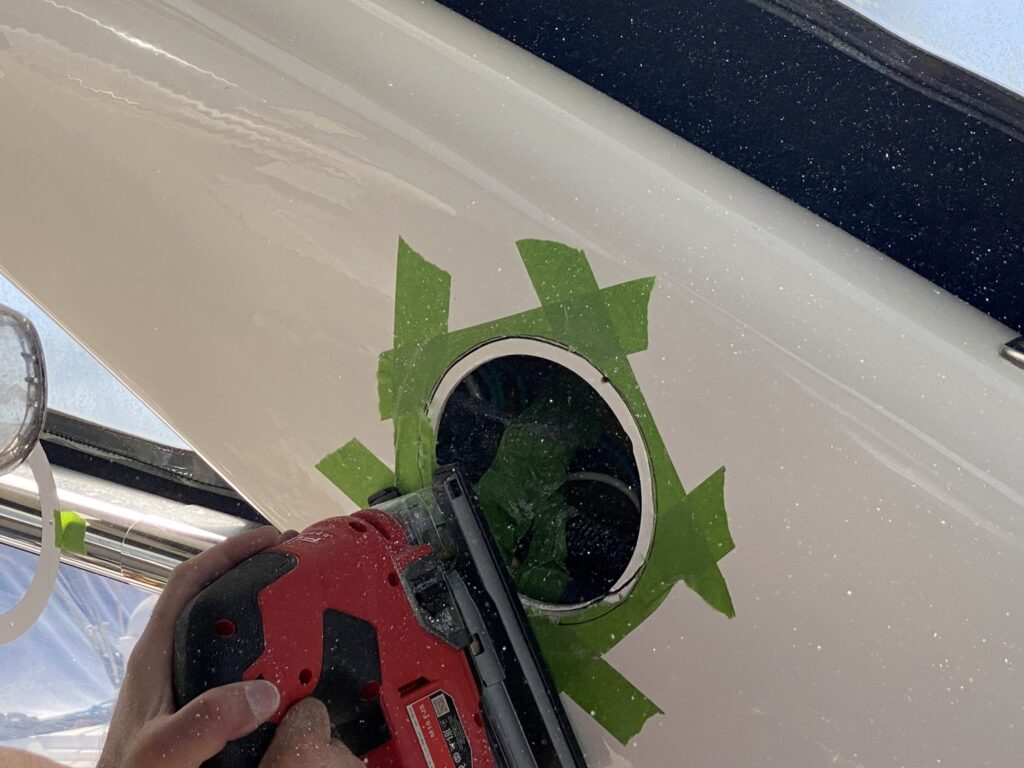
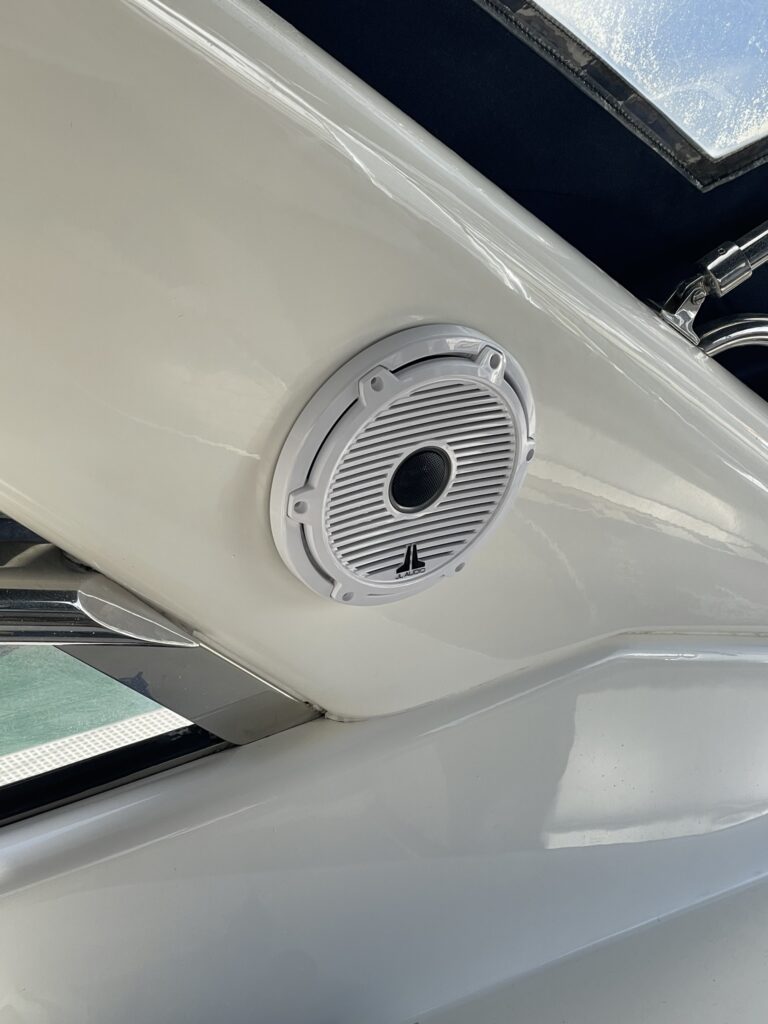
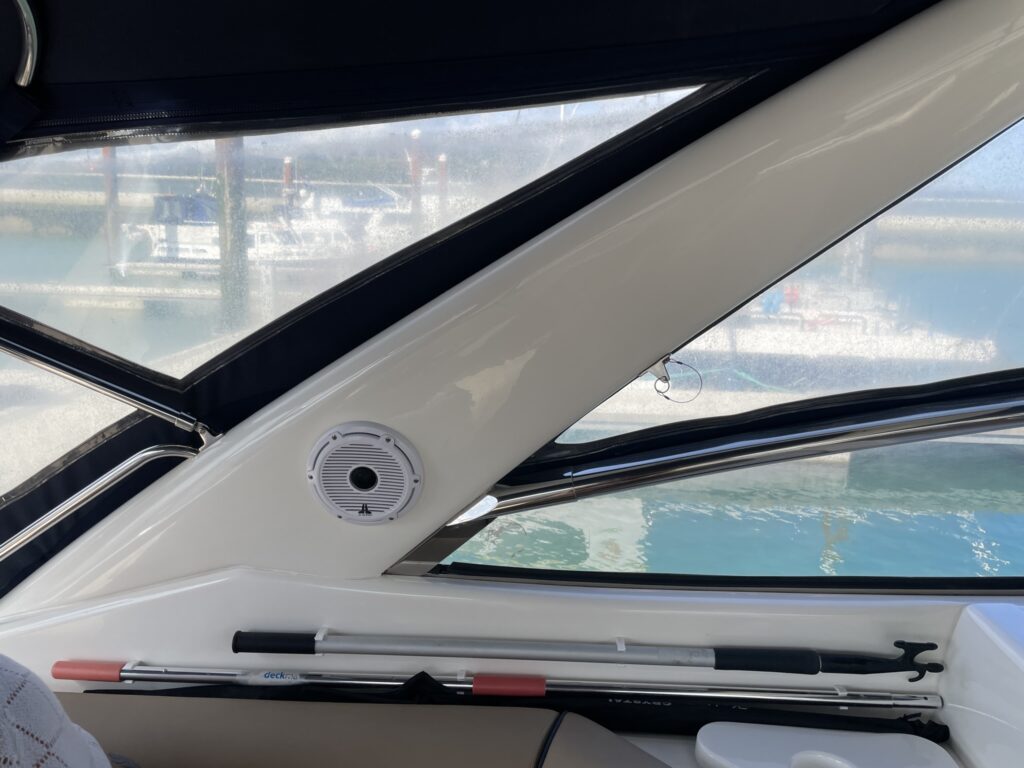
Finally for this blog post..replacement speakers…the original knackered old Alpines are 6.5″ and will be making way for some new ones…
We decide to upgrade the size to 7.7″ JL Audio M6 speakers.
This involves cutting material out of the radar arch, a somewhat scary prospect!
The speakers have RGB led illuminations but this will require separate wiring and a controller so this function is not currently operational. We also remove the rear tender and buy a proper safety raft.
As one can see, work is never done on a boat, it is an ongoing journey with high’s and low’s. One thing is for sure, you either need to be able to do your own work or have very deep pockets, or better still, both!! Since having the boat my other hobby has been ignored while we get this to where we wanted. We are nearly there and hope now to have a period of enjoyment. Hopefully we have headed off many a potential issue through proactive maintenance.
Here’s hoping for a better season in 2024 as 2022 was largely a write off and 2023 wasn’t much better due to a number of reasons, largely down to time available and the weather conspiring against us!
One moment you’re out happily cruising, the next your RPMs are limited on one engine. I guess it was only a matter of time. I throttle back and then re-apply and we’re back on, but moments later the same again.
No plumes of black smoke to speak of indicating to me that it’s unlikely to be turbo or air intake related. This happens intermittently a few times over the next couple of journeys. I check the Separ primary filters, these have always been clean and never shown any sign of water. This time there is evidence of some muck at the bottom of the bowl. I always tend to give them a cursory glance and this is the first time I’ve seen anything.
Sure enough the filters are full of diesel bug.
It’s disgusting stuff. The previous owner had had the tanks polished a couple of years prior. We purchased her with a full tank of fuel and used 2/3rds of that getting home. We then brimmed it and over the next three months or so had used about half a tank.
Of course this might not necessarily be the cause of our issue, there are many things it could be, duff injectors, fuel pump, governor, blocked fuel pipe, blocked fuel strainers on the tank feed dip tube, air leak in the fuel system and much more. However as with any intermittent issue, there is a process of elimination to be done. For us this begins with fuel quality. We now know we have a bug issue, it was a surprise as the fuel wasn’t old and the bowls were always historically clean in our ownership. With the new FAME biodiesel this appears to be a much more frequent issue these days, with many contaminations coming direct from the fill up stations.
Prior to purchasing a boat I’d read up as part of the research about diesel bug issues. The design of our tanks is such that they cannot be removed without removing the engines nor can they be cleaned in situ. They also do not have a sump or drain tap. Our setup holds 990L overall in 2 equal sized tanks with a deck filler each side. The tanks are connected at the base with a large balance line. All the fuel feeds and returns come off the starboard tank and the port tank is the slave as it were.
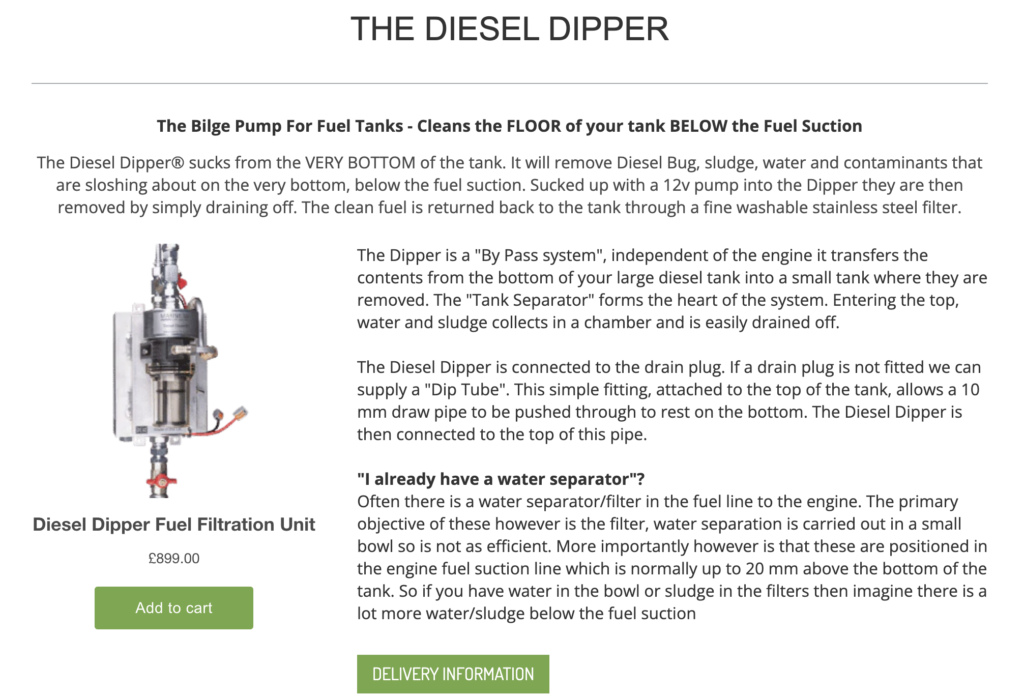
I recalled seeing a product in passing that looked impressive called the Diesel Dipper. I decide to follow this up now with a call to the manufacturers…enter Peter from Marship.
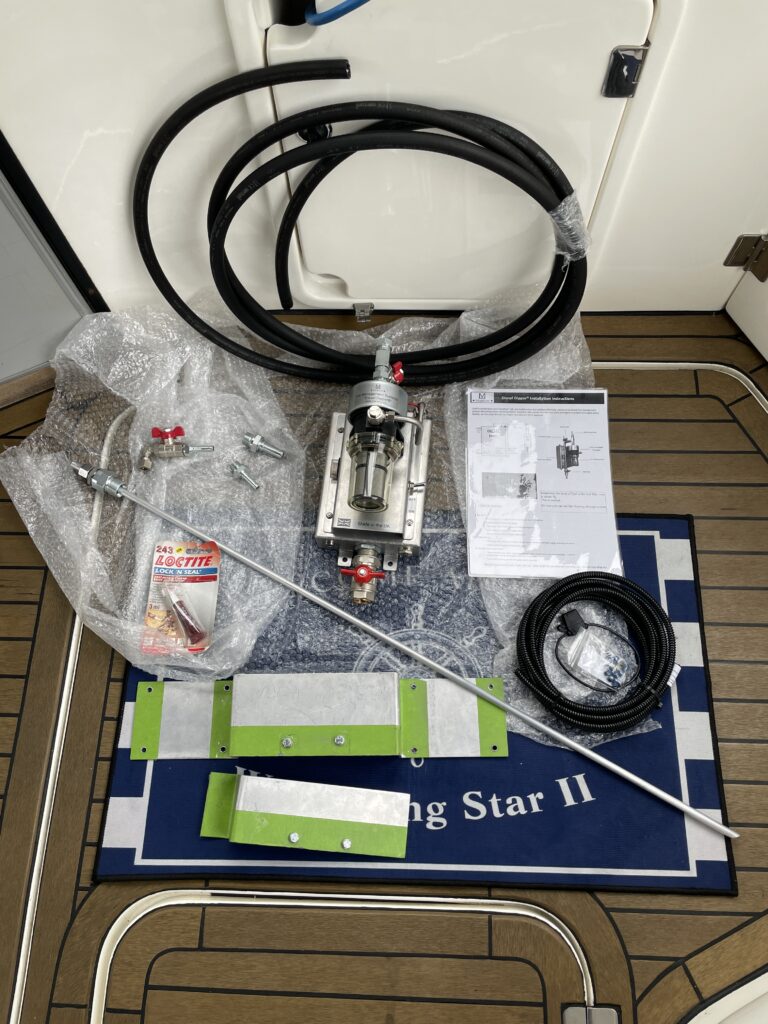
The poor chap patiently answers a barrage of questions over many emails and a couple of phone conversations. Long story short, for diesel bug to exist there must be water in the tank, this could be drawn in through the breathers with the hygroscopic nature of FAME Biodiesel, it could be in the fuel at delivery point, or entering through the deck fillers. Either way, eliminate the water, and you eliminate the bug. So a plan was set in motion to install a diesel dipper and dose up the tank with Marine 16 Diesel Bug Treatment and some Diesel Injector Cleaner for good measure. The dipper arrives as below.
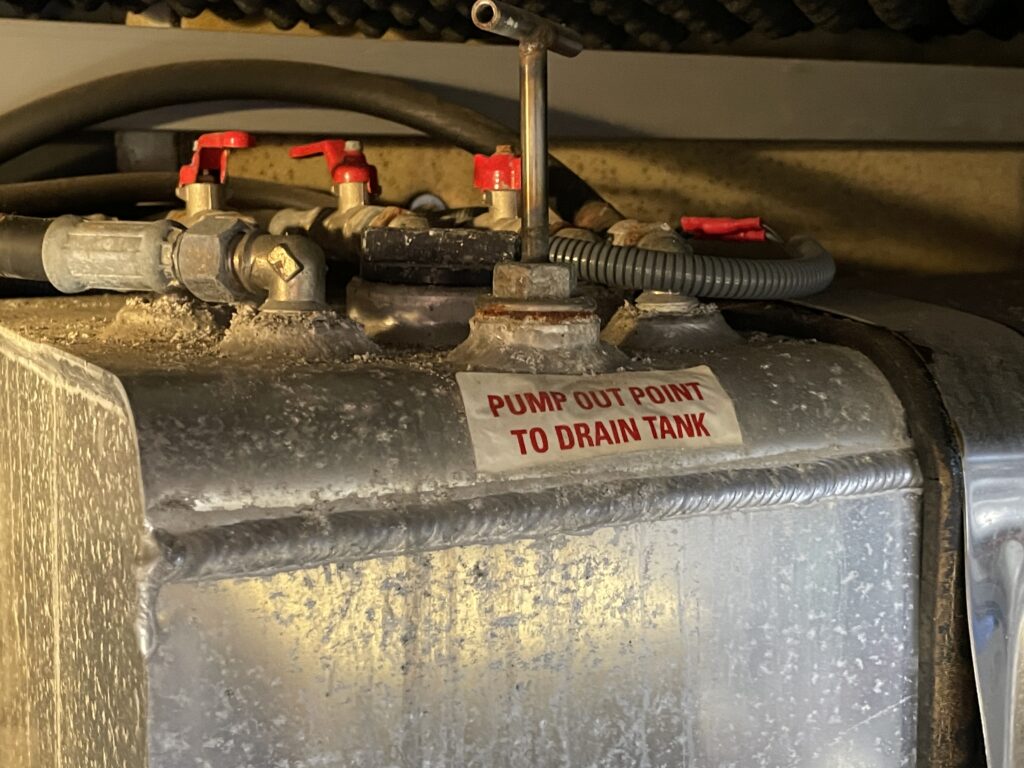
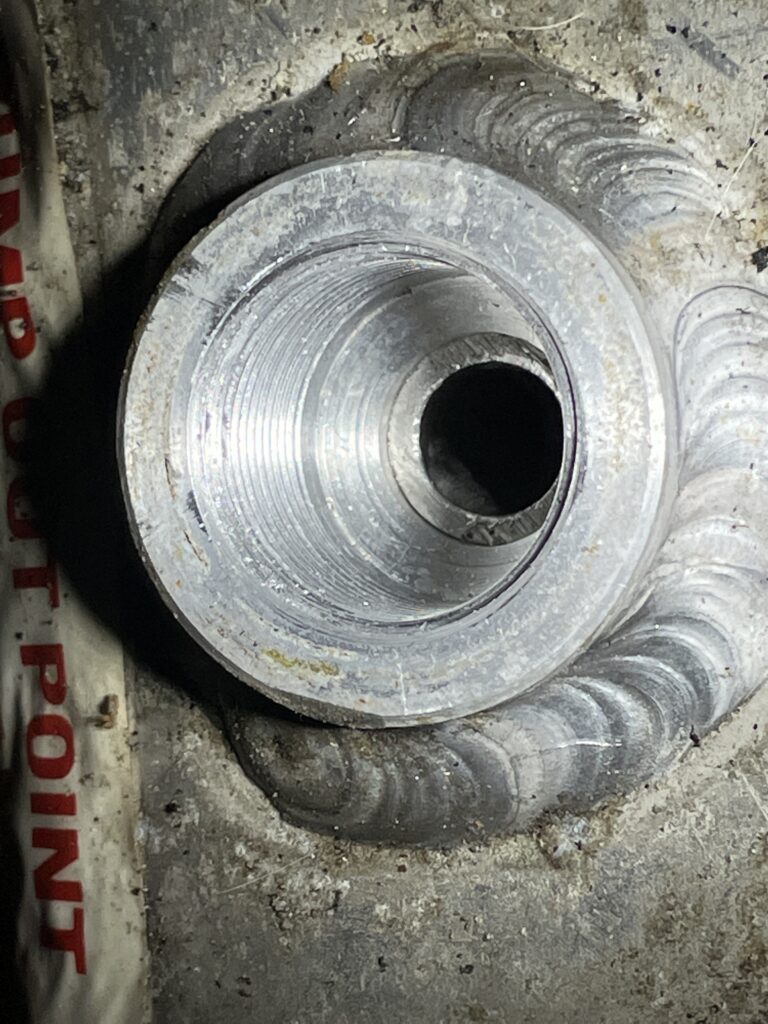
Essentially, installation of the Dipper merely involves connecting up a feed line, a return line, a power feed and an earth, and then four bolts to secure it! Easy in principle. A little trickier when you consider what you have to work with. The engine bay on our boat doesn’t have much in the way of space! I don’t want to drill a hole in the tank for the proprietary and optional dip tube and plumbing a return line without drilling another hole will also add extra work. As it happens, the tank is fitted with a “pump out point”, which can be used to suck diesel out. It transpires that this is its own dip tube set about 10mm off the tank floor. Apparently fuel pickups are generally around 20mm off the tank floor. I didn’t appreciate that the tank already had a dip tube, unfortunatelty it didn’t go all the way to the floor of the tank which Peter recommended for the dipper to work properly. Fortunately, the pipe had an internal diameter of around 10mm, which was enough to get a 10mm dip tube down it…after removing some weld that was in the way with a rat tail file. I order the dipper and various fittings.
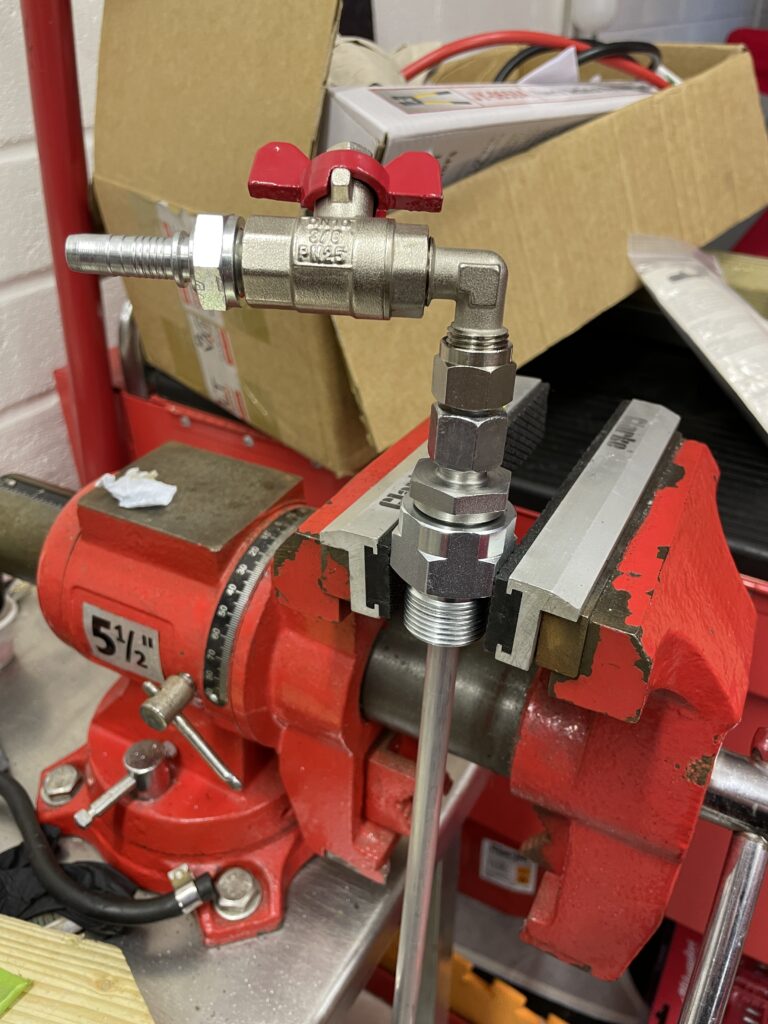
The pump out point bung with the tee handle is removed and Peter supplies me with a suitable length of 10mm OD aluminium tube with a 45 degree slash cut in the bottom. My tank has a 3/4”bspt female thread so with a reducer fitting I adapt it to suit the supplied compression fittings and shut off valve. A 3/8 hose will connect to the barb through which the dipper will draw its diesel.
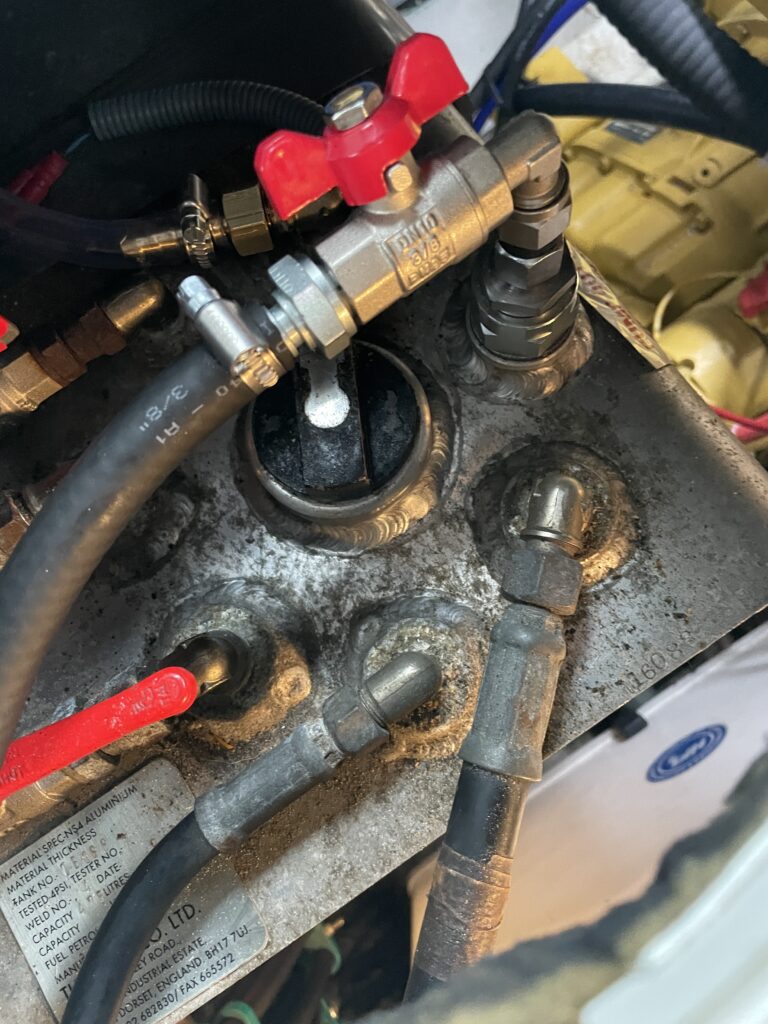
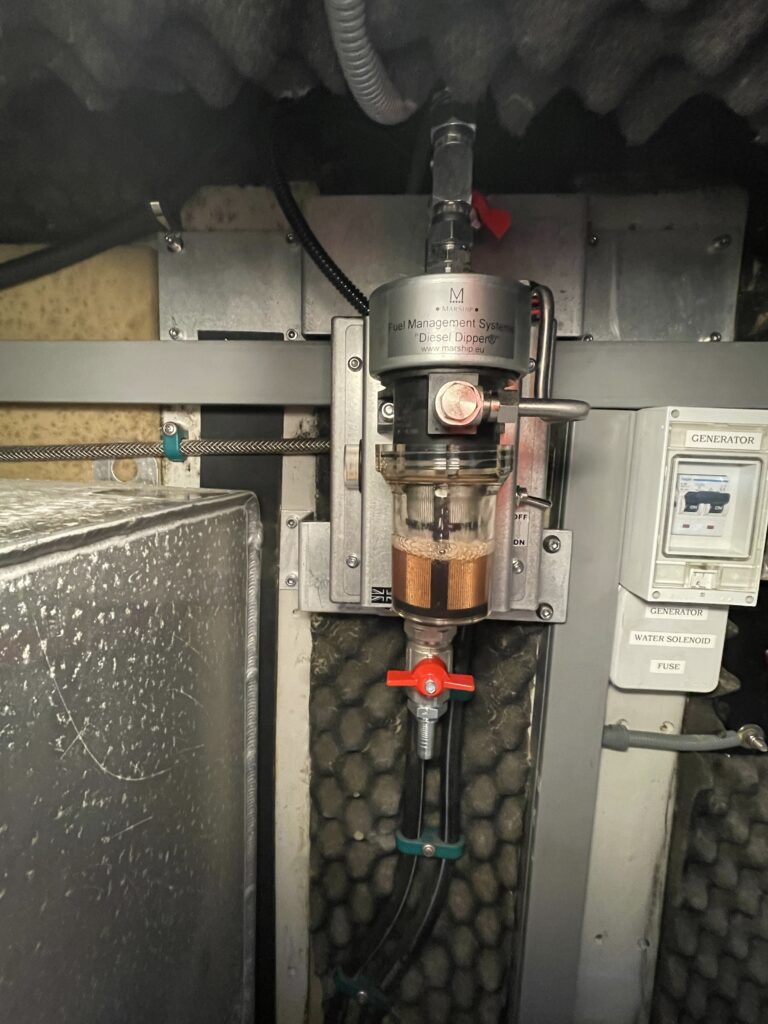
Installed in situ below. For really bad cases of contamination Peter recommends moving the dip tube 20mm off the tank base and gradually lowering it. I’ve set it to the base, if it’s too badly contaminated I’ll raise it up as necessary but I’m being positive for the moment!!
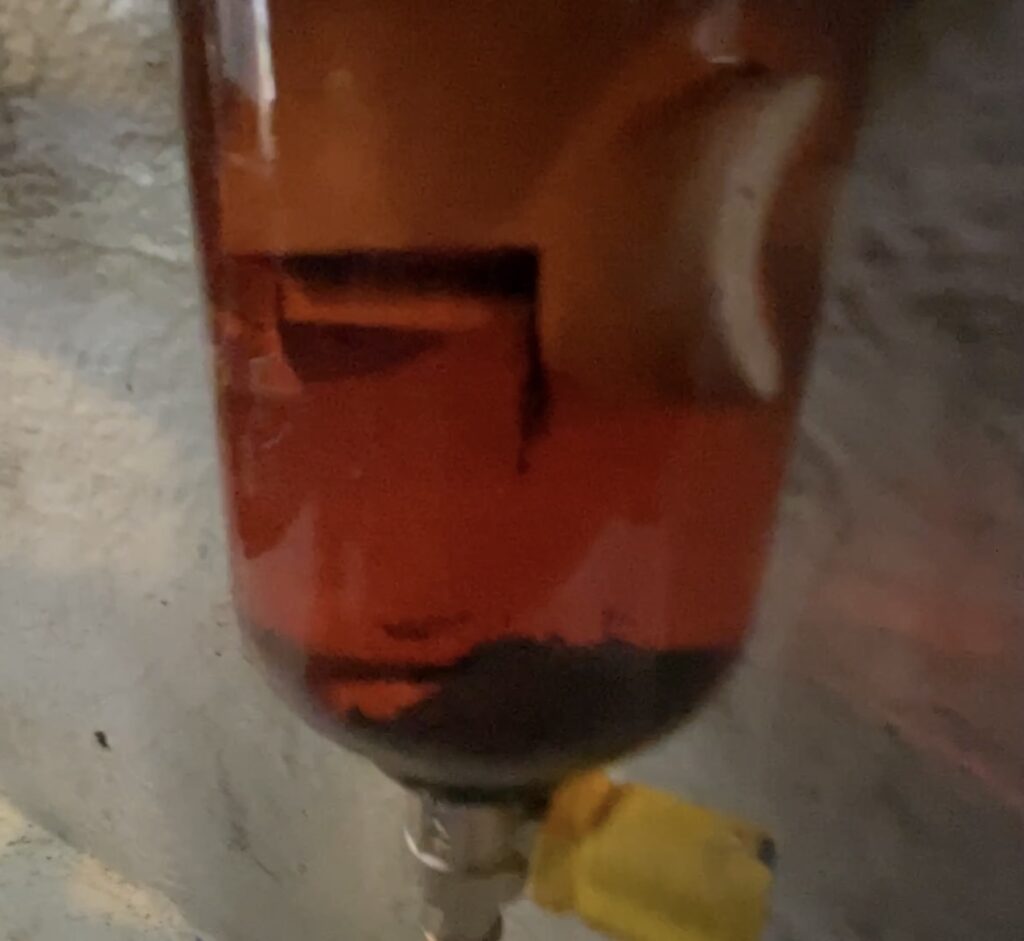
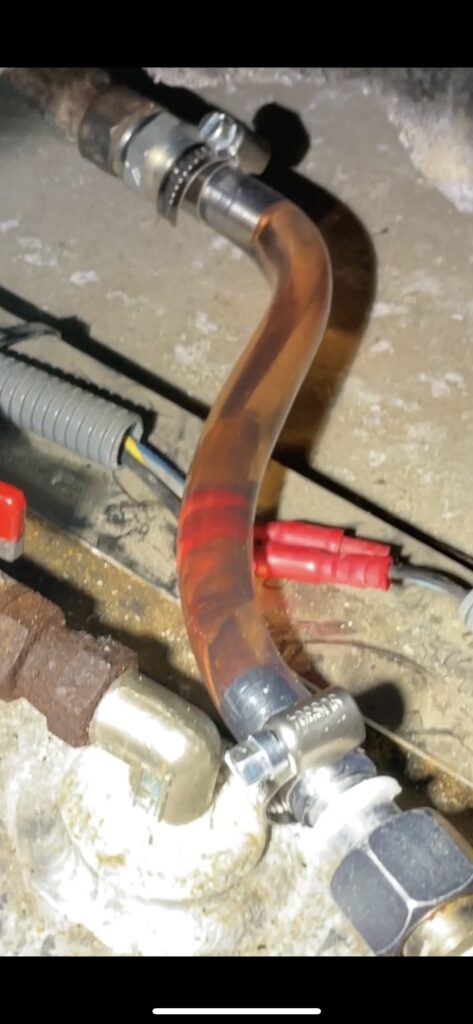
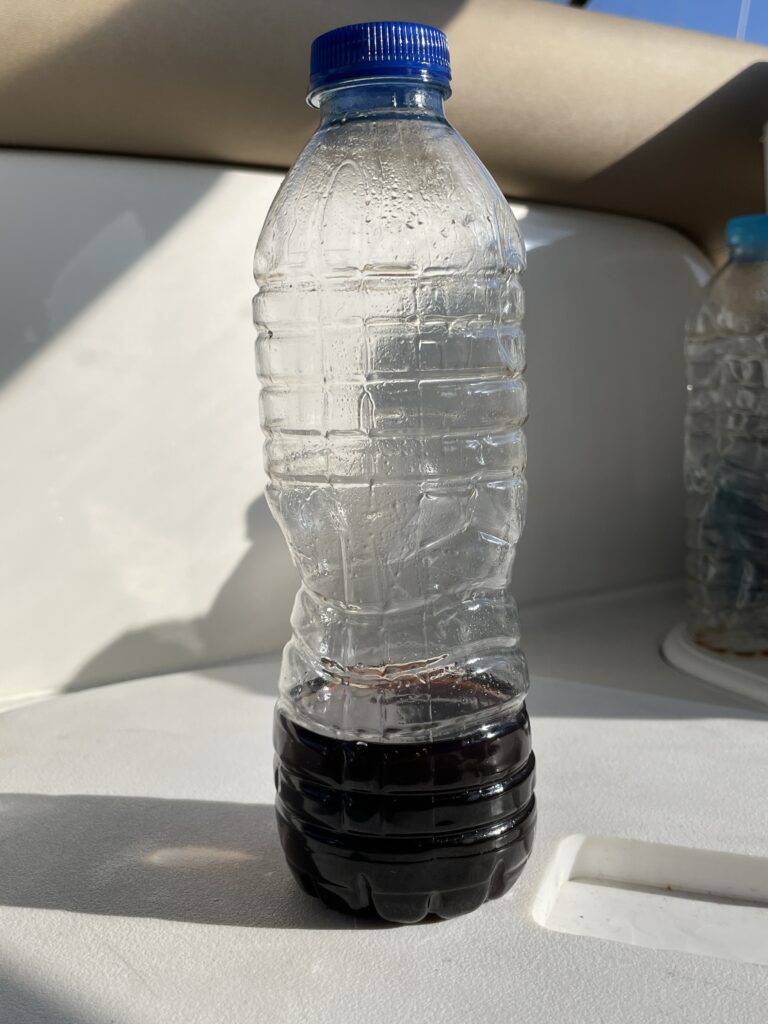
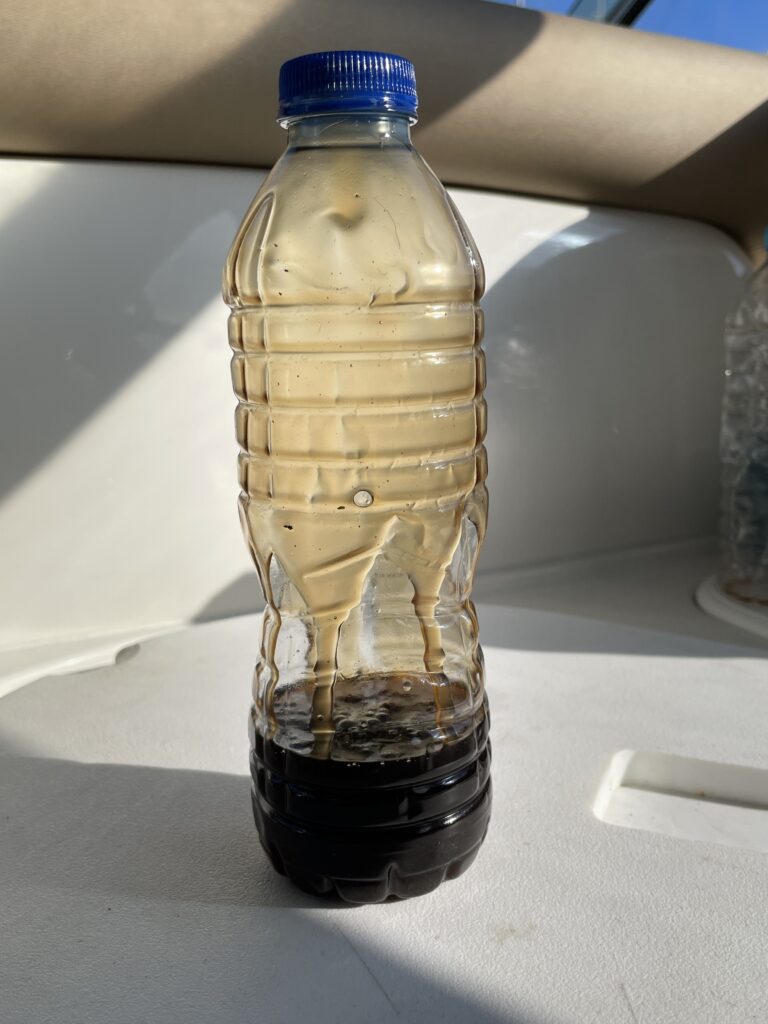
Unfortunately, I’d already dosed the tank up with a product called Fuelset that came with the boat. This is an additive that essentially absorbs water into the diesel which is counter to what we are trying to achieve with the dipper which is to remove it!! By absorbing it into the diesel, the idea is it deprives the bug from the water it needs to thrive, but it can’t be good for the injectors, modern diesel is sulphur free which removes the lubricity anyway so the water won’t help with that(the Marine 16 Diesel Injector Cleaner does provide lubricity to them) and it is possible for the Diesel to become saturated with water. While I’m experimenting with my dipper tube fittings above, I hoover some swarf up and accidentally suck a load of diesel up the dip tube. I immediately turn the hoover off, and the contents are still in the tube, pouring this into a bottle you can see this saturated fuel. On the left is diesel straight from the Separ primary on the right from 10mm off the bottom of the tank!! I won’t be using or recommending the water absorbing additive going forwards and will stick to the Marine 16 stuff.
The idea behind the dipper is that it doesn’t just remove water, it is also supposed to remove sludge, the dead bug that the Marine 16 biocide will hopefully kill as well as any gunk that has built up over the years that may be lining the walls and floor of the tank. The filters on both engines were quite clogged, the engine that was cutting out seemed ironically better filter wise than the one which was behaving. This leads me to believe that my problem is with the end of the fuel pickup tube which should have some sort of strainer on the end, this is possibly being starved of fuel as diesel bug wraps around it. Perhaps this tube is at a slightly different height to the other. I’ve also noticed that the problem rears its head after a manoeuvre to port, which possibly causes sloshing in the tank and debris to affect these feed pipe. That’s the theory anyway. The dipper is more effective at sea because it relies on the sloshing about to dislodge and mobilise the accumulated sludge.
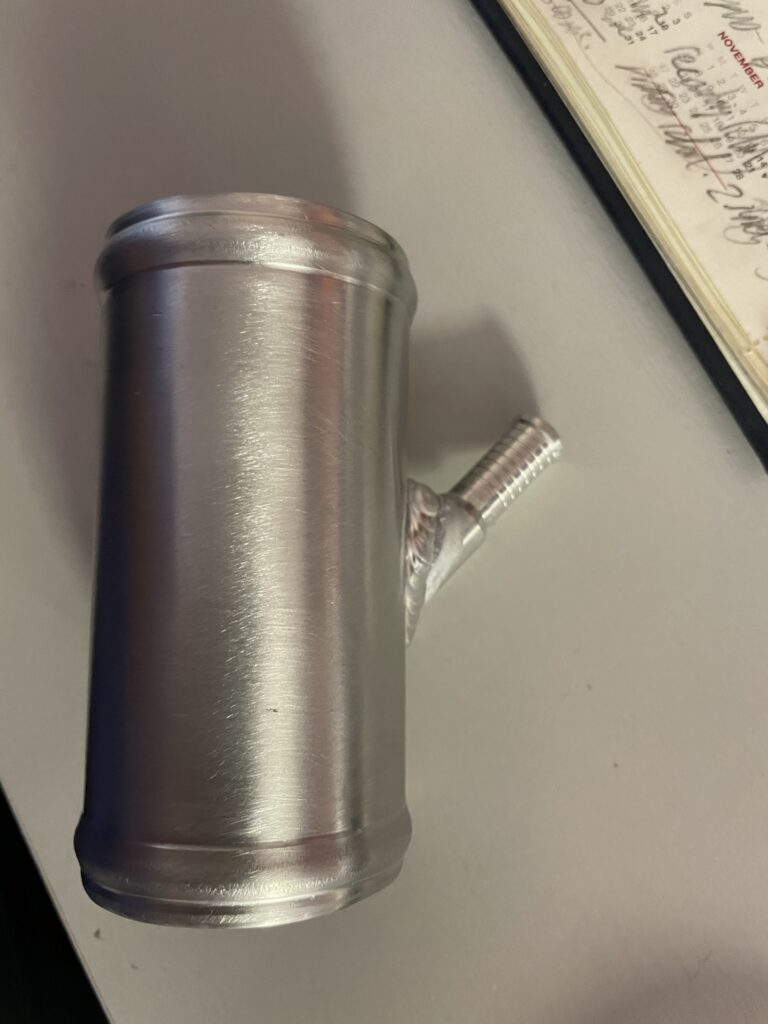
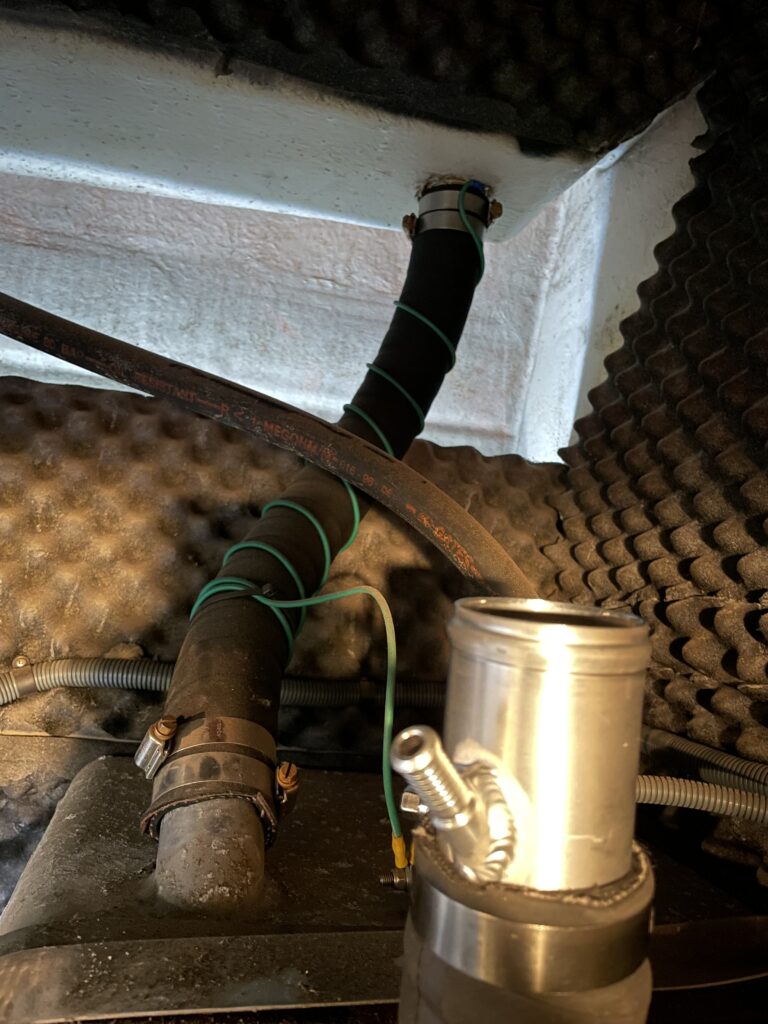
After resolving how to get the diesel into the dipper, I now need to look at return line options. All the returns above on the tank top are used, I could tee it into the seldom used generator return line but again I’m reluctant to disturb any of the original fittings. Instead I decide I’m going to tee the return into the 51mm fuel filler hose. I can’t find a suitable fitting for this, so I commission one from a fabricator on ebay who has similar products listed after an exchange of messages. It’s made from aluminium, 51mm with a 3/8 barb.
The plan is to introduce this on the return line of the slave tank because it is more effective to have the return as far away from the feed as possible. Of course, both tank filler hoses are a pig to get to. It’s not an easy job to cut these reinforced hoses, especially in situ, so I buy some new Vetus fuel filler hose to replace these original hoses.
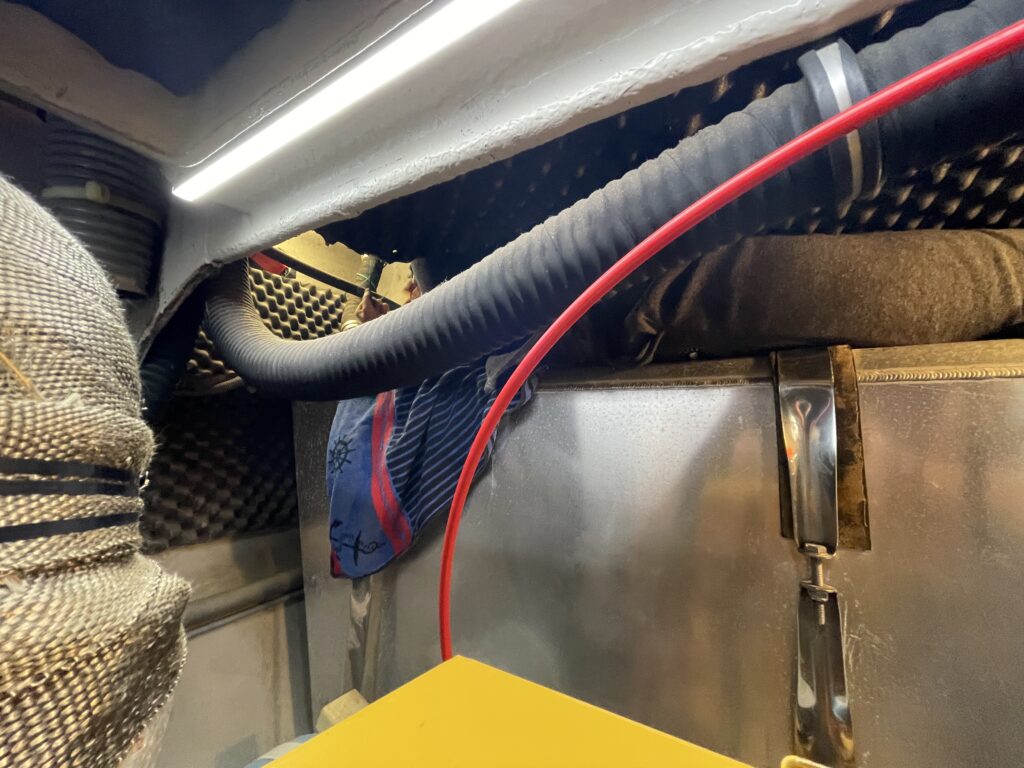
This is the pipe that will need to be replaced. The photo above is taken on zoom with arm at full stretch. There is no way I can get to the top of that hose! I put this out of my mind to deal with later. I have a temporary line rigged up to the generator return as a plan B until I can get to this return. More pressing is where to mount the dipper, there isn‘t much space, I don’t want to relocate anything original, I’m trying to avoid drilling or fixing into the bulkhead and it should be mounted somewhere accessible and close to the pickup that doesn’t interfere with anything.
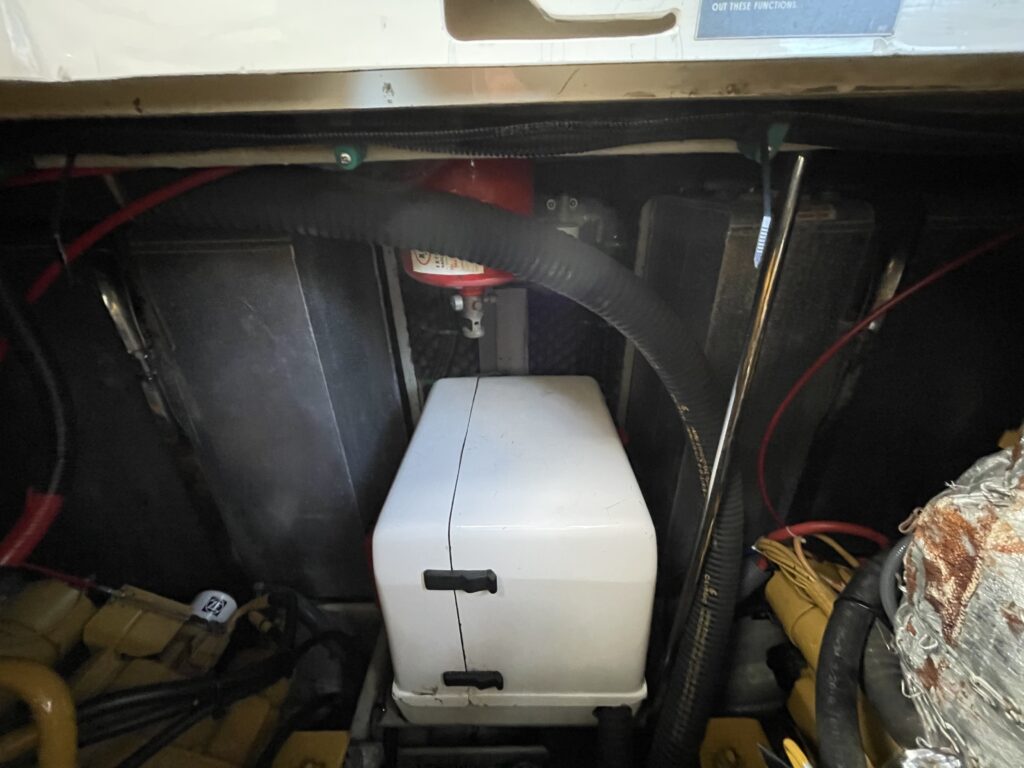
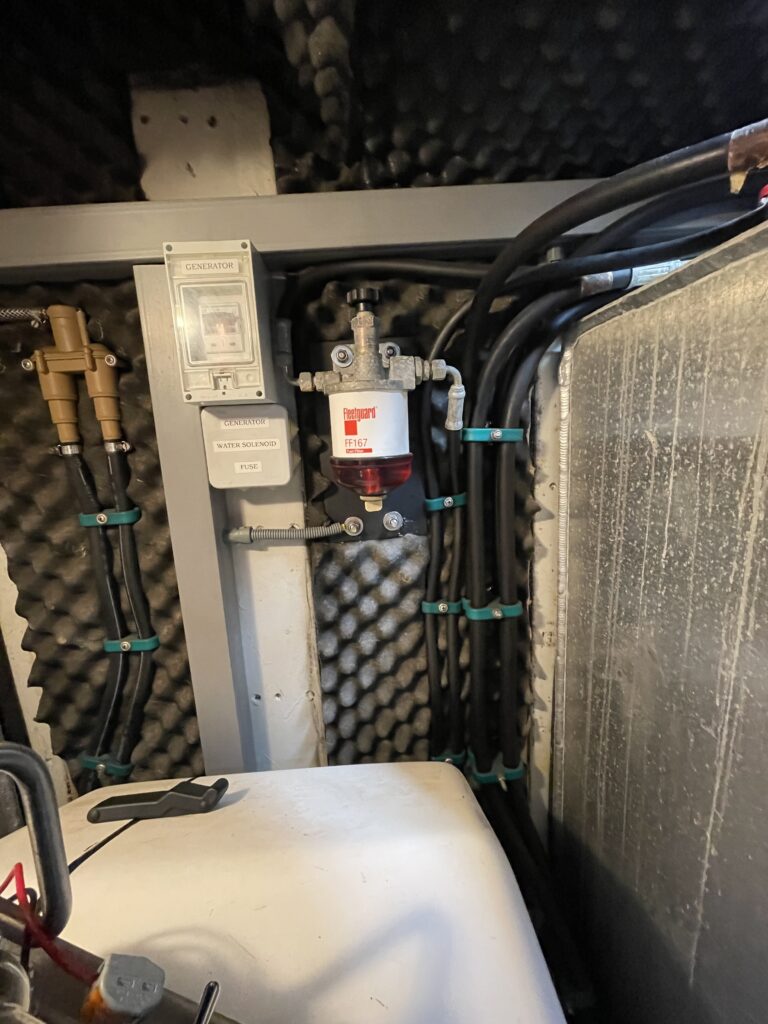
In between the two fuel tanks is the generator, above it on the bulkhead is an antisiphon to the left, and the generator primary fuel filter to the right. There are vertical timber ribs along the bulkhead which are thicker than the recessed bulkead to which trunking and the generator electrics are fixed to. I contemplated moving the filter because it already has fixings in place and is in an ideal position. After much head scratching, I come up with a solution involving custom brackets. I take some measurements and send it off to the fabricators. Once they are back I offer them up and drill the relevant holes and order proper fixings.
In the interim I look at the electrics. There is trunking in place, and the nearest power feed and fortunately the most convenient is the generator starter motor. The generator has its own isolator switch and its own battery. I prefer to have the dipper running independently from the engines and also to not be draining the starter battery bank on the main engines or have it running off the house battery. I order the proper cable sheaths and marine grade wiring and fuse. The dipper has its own fuse but I fit an additional one next to the positive take off so its properly protected. I then run the cabling up the existing conduit.
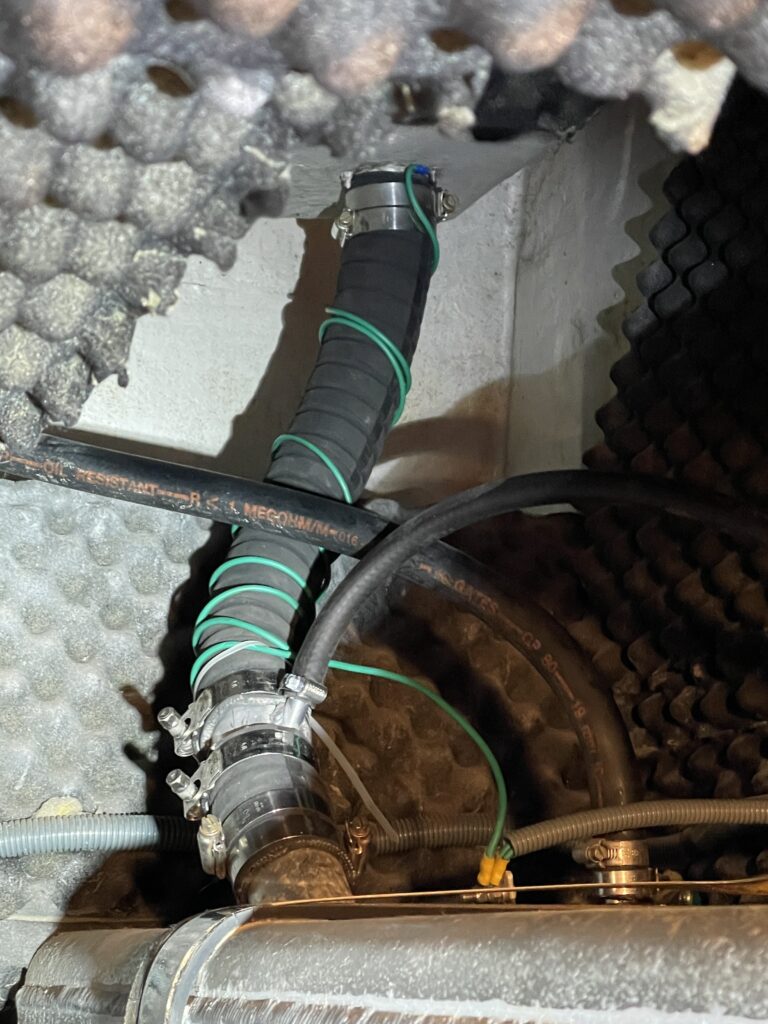
The brackets allow the dipper to be spaced over the anti siphon for the generator. It’s not a an item that needs to be serviced and the brackets themselves are secured to the more substantial vertical ribs on 12nr fixings. The fixings are 30mm long M6 stainless steel machine screws which are perfect for being tapped into the hard wood. They tighten up very reassuringly and are further secured with very expensive Nordlock washers to stop them loosening. The dipper is then secured to the brackets and the whole assembly is very sturdily installed.
Back to the return line, we decide to replace the fuel hose. I enlist my youngest who did a sterling job. Dad was on hand to help him passing tools back and forth and he did me very proud. We managed to remove the old one, which had 1996 stamped on it, and use this to measure the new introducing the T piece into it.
On top of the fuel tank is a well camouflaged child! Fortunately he’s able to just get in there but it’s tight.
The assembly is completed. New hose fitted, (the cable tie excess did get snipped!) and we’re all up and running…
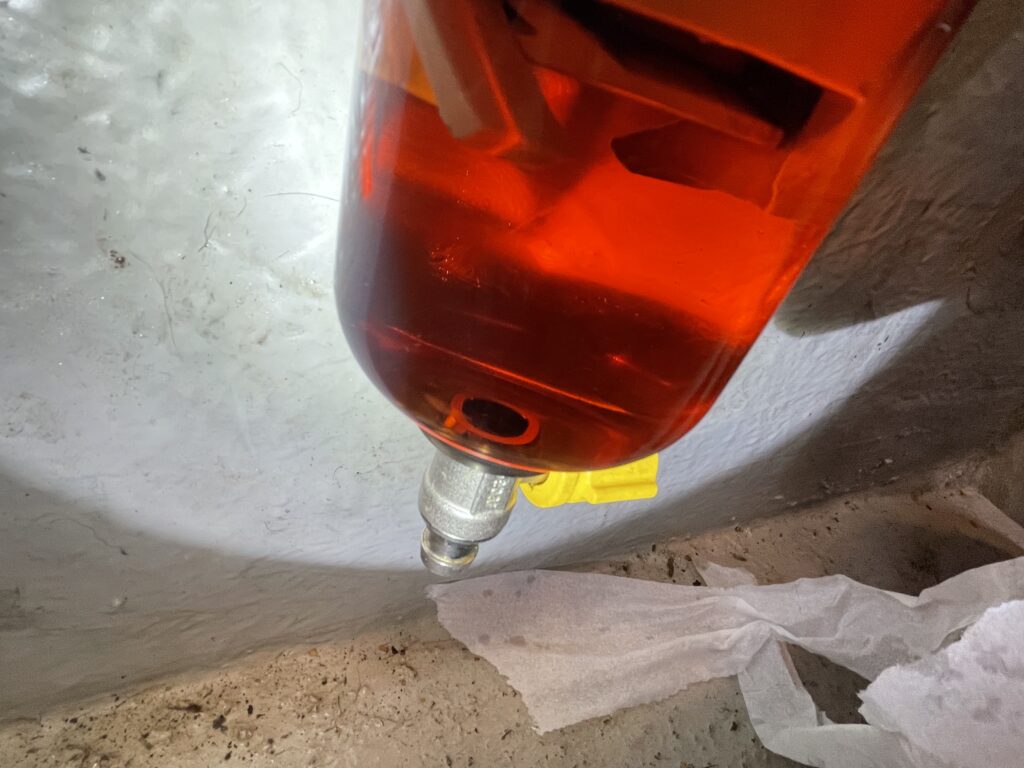
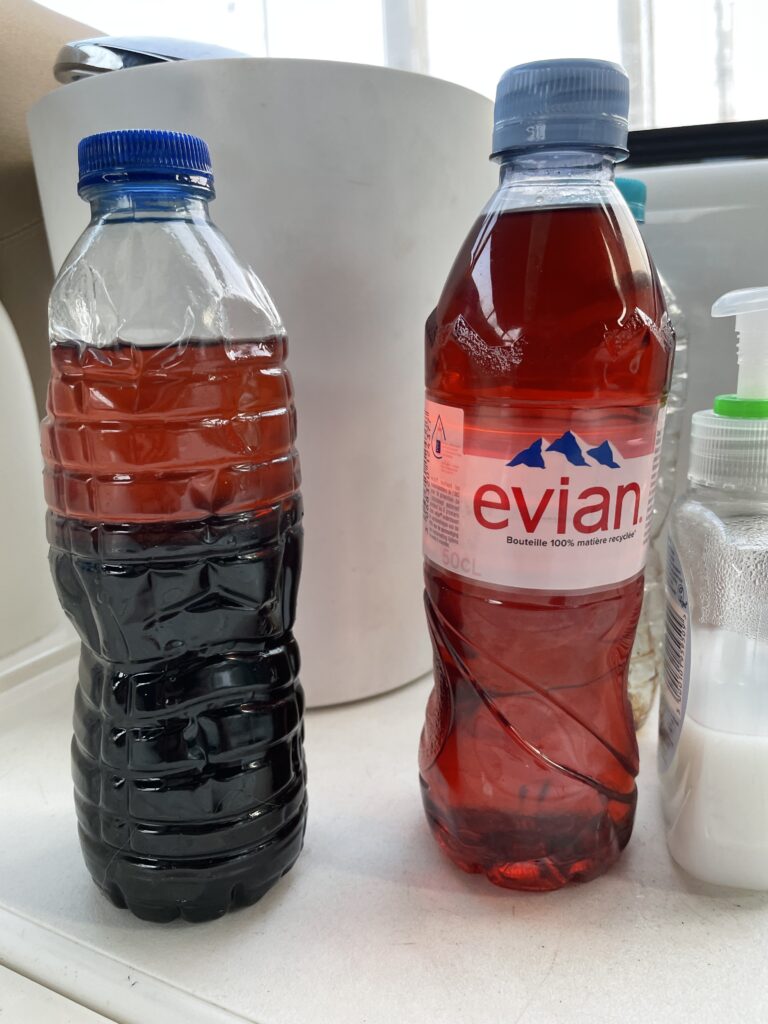
I cycle the tank for 4.5 hours in port, at 2 litres per minute flow rate, this will be sufficient to cycle the remaining 500 litres of diesel in the tank at least once. Above shows the gloop that it collected. The best way to describe it is like a thick gravy.
Shake it up and watch it slowly slime down the bottle. Gloopy, thick and something that will easily block filters. I presume it could limit flow if it clings around the strainers on the end of the fuel delivery pipe. I’m hoping this is the solution to our problem. Peter tells me that it’s out at sea that it really comes into its own, the movement of diesel sloshing around the tank at sea should unsettle much more. I ran it in port for curiosity and to give it a head start. Another hour running with the engines on too to create some turbulence in the tank and the dipper is running clean for the moment. I look forward to seeing what will happen at sea…this to be updated as it happens. For now, I’d say this is a good start for the dipper, whether it cures the issue or not remains to be seen but with the ongoing issues with diesel these days it will certainly future proof the quality of fuel for many years to come.
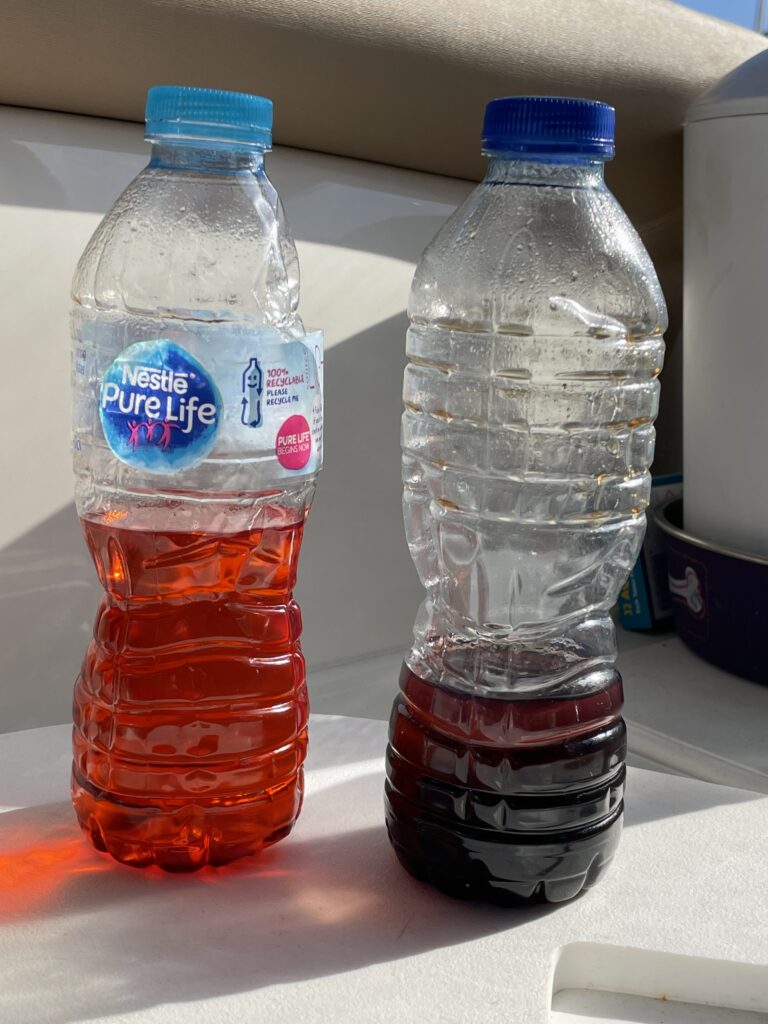
Edit: After our first journey to Sea with the dipper installed and running, it’s a force 3 and we head out for an hour or so. On return, I drain off the dipper. The bottle on the left in the pic below is what the dipper had pulled out in port after cycling the entire contents of the tank more than once whereupon the dipper was running completely clear. The bottle to the right is the additional that the dipper pulled out after an hour at sea. The movement in the tank allowing the gunk trapped by the baffles and edges of the tank to be sucked up.
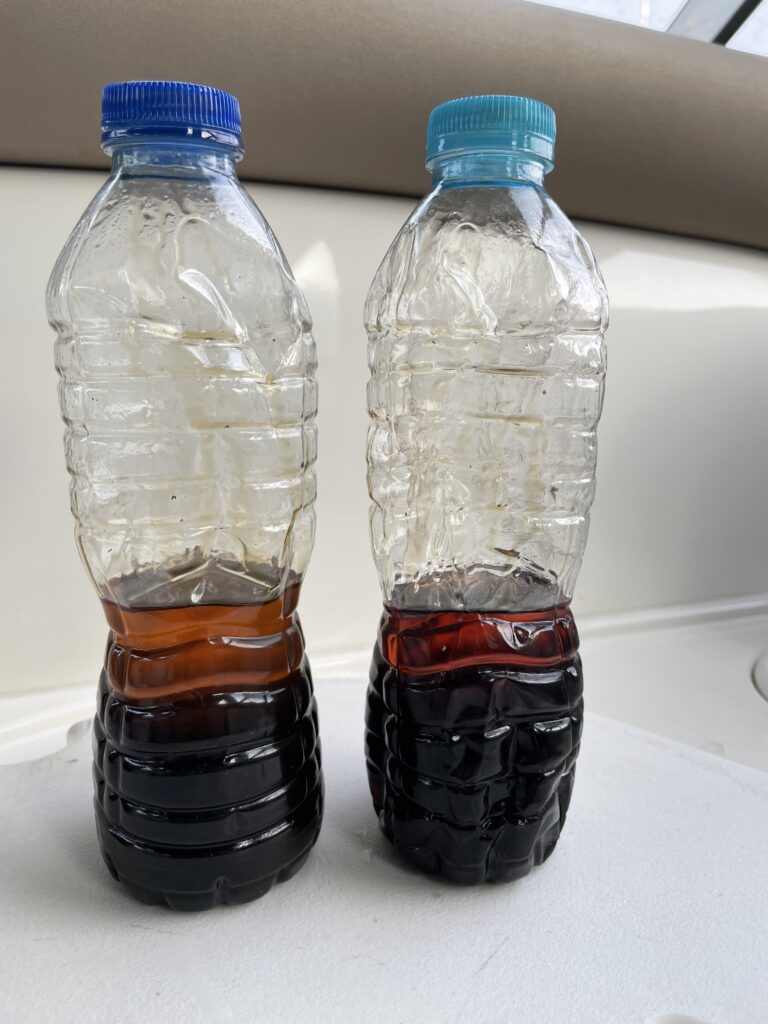
The picture below shows the total contamination that the dipper has pulled out in the left hand bottle. The right bottle is it once again running clean. I expect for the next few journeys to see a similar story as the harder to get to deposits are sucked from the bottom of the tank as it all gets stirred up.
In the meantime, I notice that when the revs refuse to go above 1600rpm on the stbd engine, if I open the throttle wide open, I get what I would call whisps of black smoke, albeit very light in nature and not so easy to spot. I have also noticed that the aftercooler on the same engine is running hot at the outlet, rather than completely cool as on the other side. This has me wondering if it’s not a fuel related issue after all, but rather an ‘overloading’ situation with the engine struggling to get over the hump. I have since noticed that with a little assistance from the other engine, it gets over the hump and runs at normal revs and power is restored. This could mean a restriction in the aftercooler waterway causing the elevated temps, which in turn might be harming the performance as a result of hot air being delivered to the engine, or perhaps some sort of prop fouling (maybe a loose net) causing the engine to be under more load than normal, resulting in higher boost/egt’s causing the increase in temps. The aftercooler will be getting some attention next and the boat is due to be hauled out for its annual anti foul soon too.
In the meantime, the engines have sounded much smoother and happier on its latest outing and I feel much happier knowing that the dipper is doing it’s job admirably with regards to pulling contaminants out of the diesel. The diesel has been treated with Marine 16 Diesel Bug Treatment and M16 Diesel Injector Cleaner for good measure and I shall be adding Marine 16’s Diesel Fuel Complete following fill ups going forth.
Even if this turns out not to be our problem necessarily, or indeed in full, at least our fuel supply situation has been largely future proofed against any diesel related issues lying ahead, experiencing this problem was just the push I needed to take the Dipper off the long term to do list and onto the immediate one!
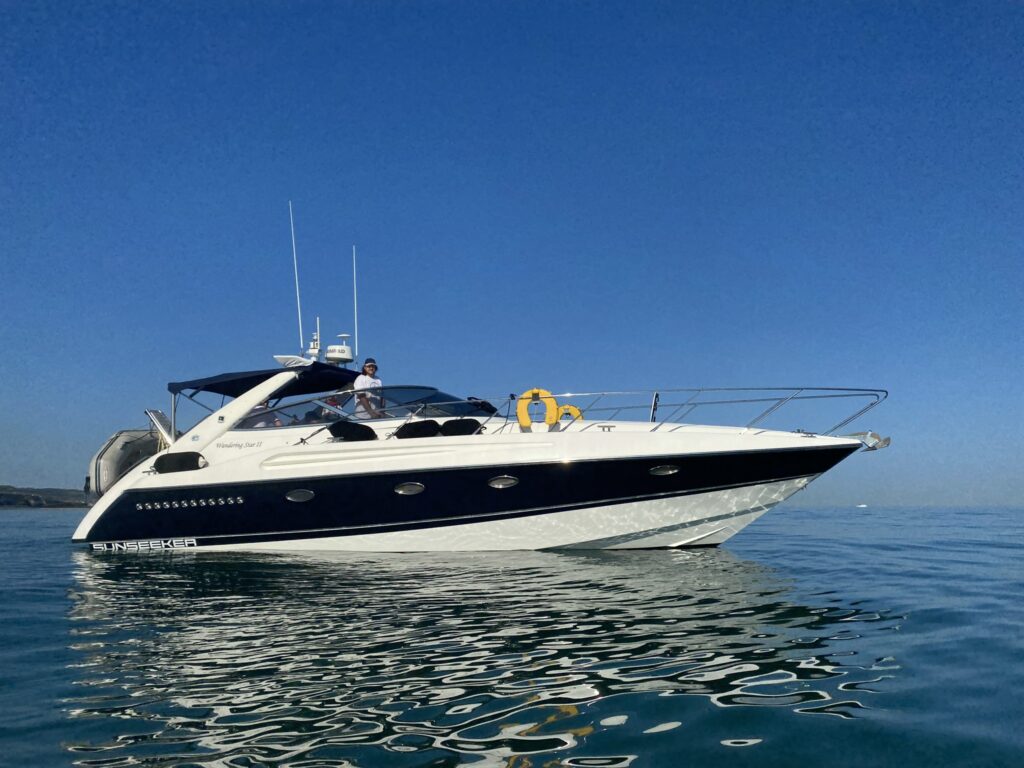
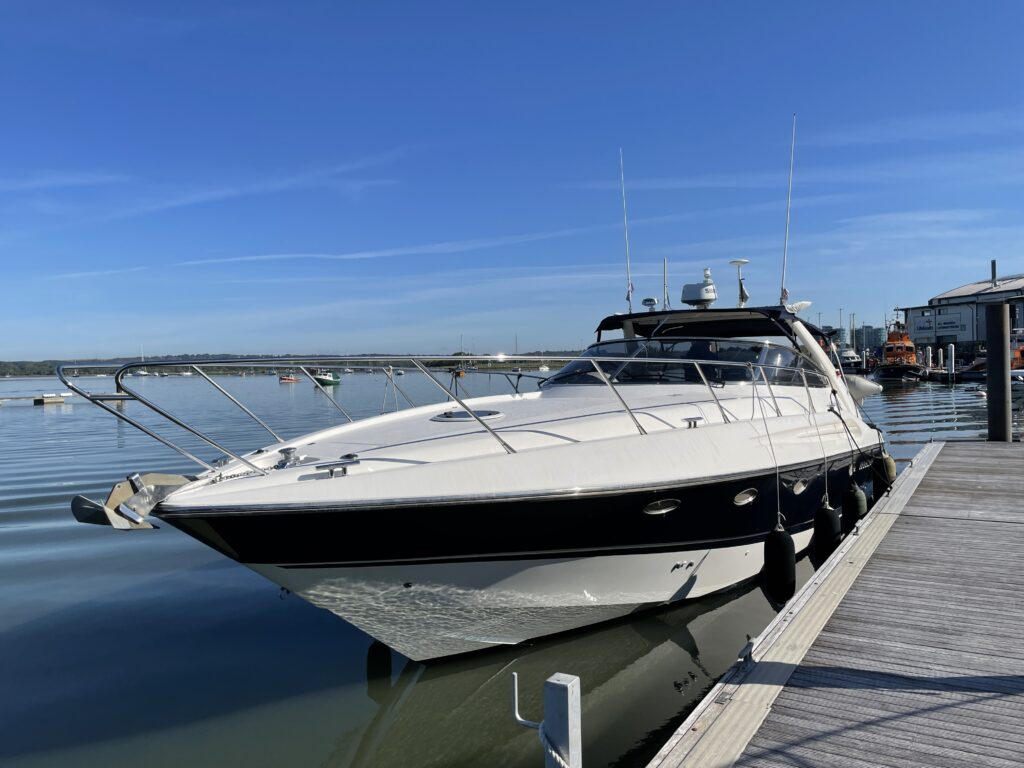
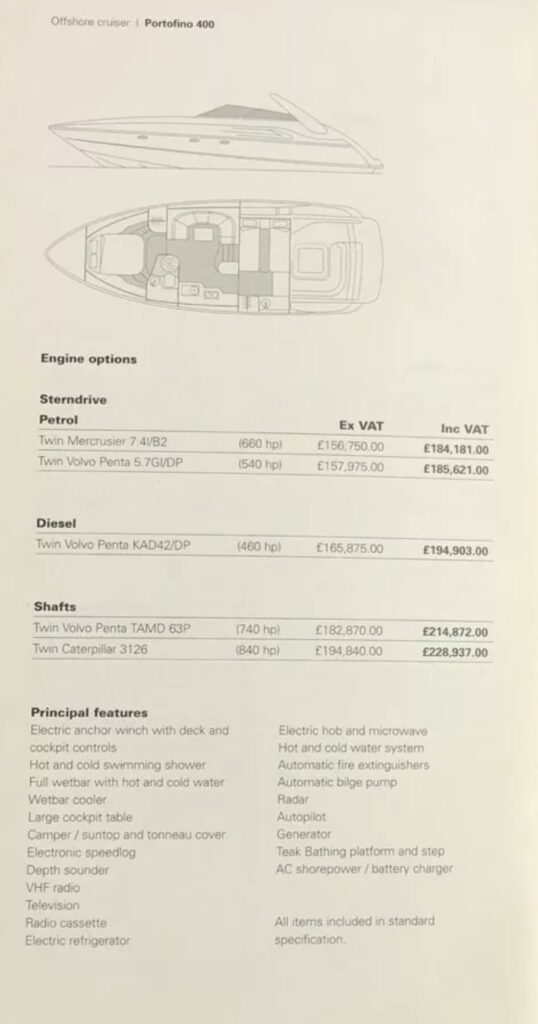
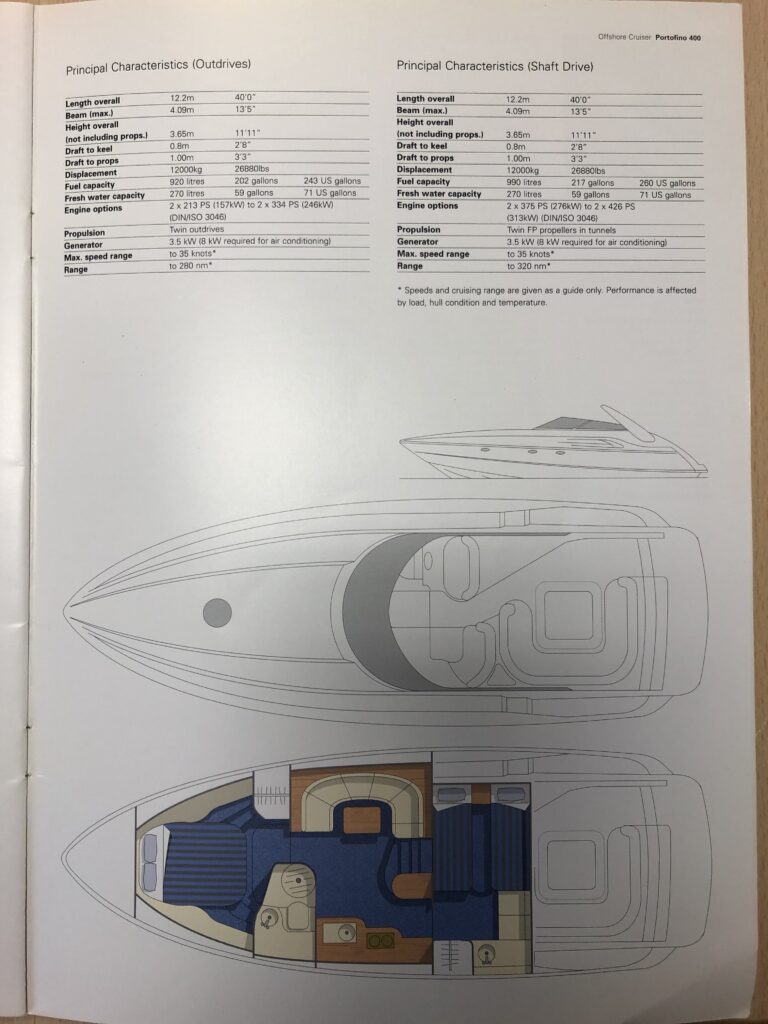
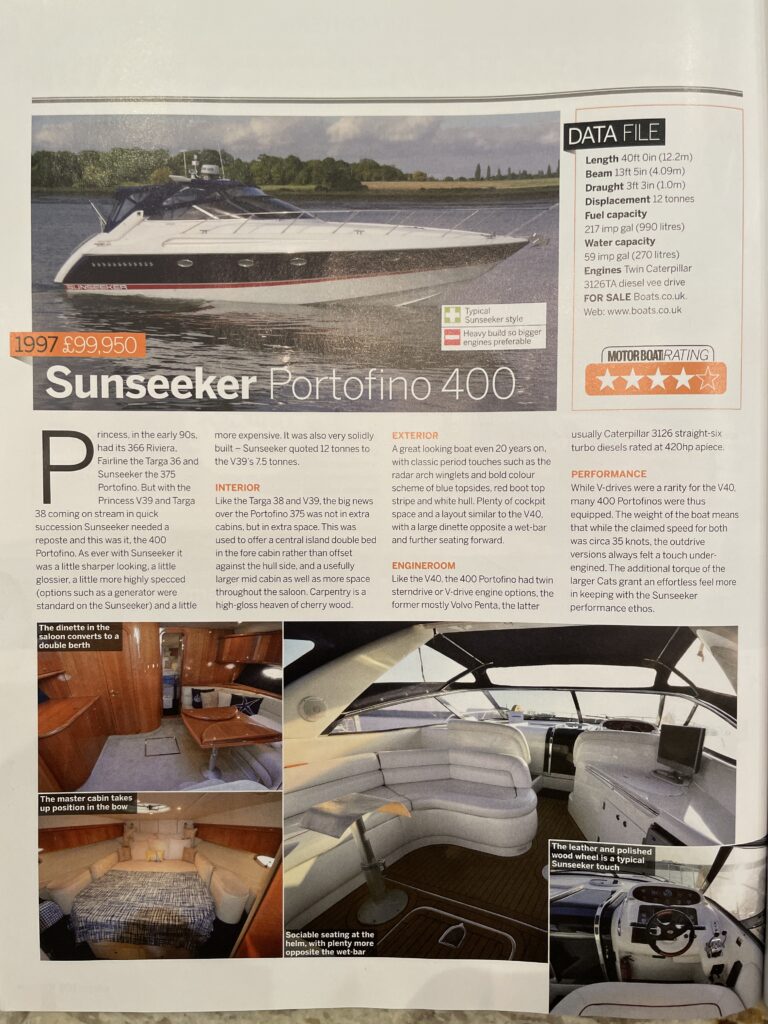
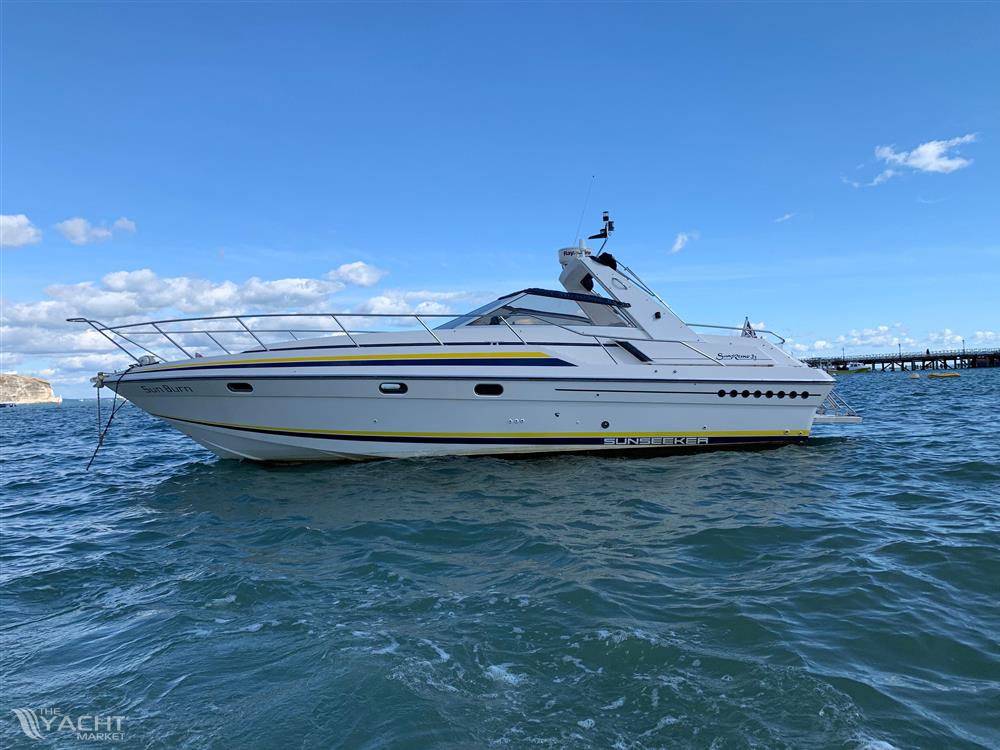
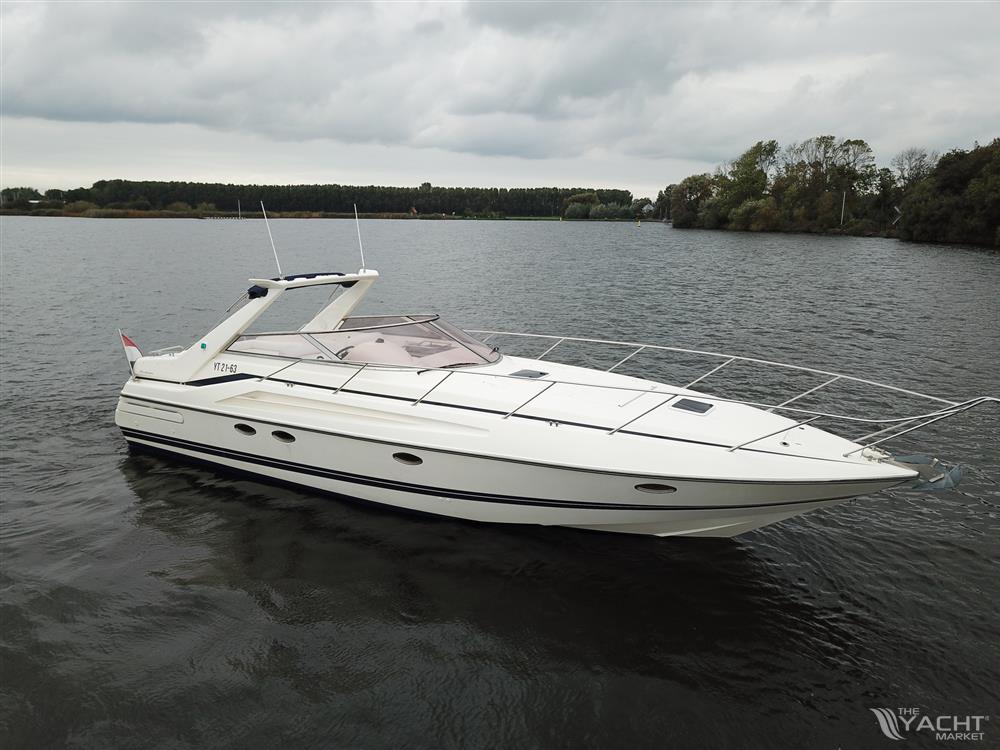
The Portofino 400, launched in 1995 was designated by Sunseeker as an ‘Offshore Cruiser’ featuring the now infamous Don Shead designed deep V planing hull with a generous beam. To quote the brochure “Comfort and convenience are the hallmarks of the Portofino 400, her large hull helping her to perform well in the open sea, giving a smooth and comfortable ride and excellent performance”.
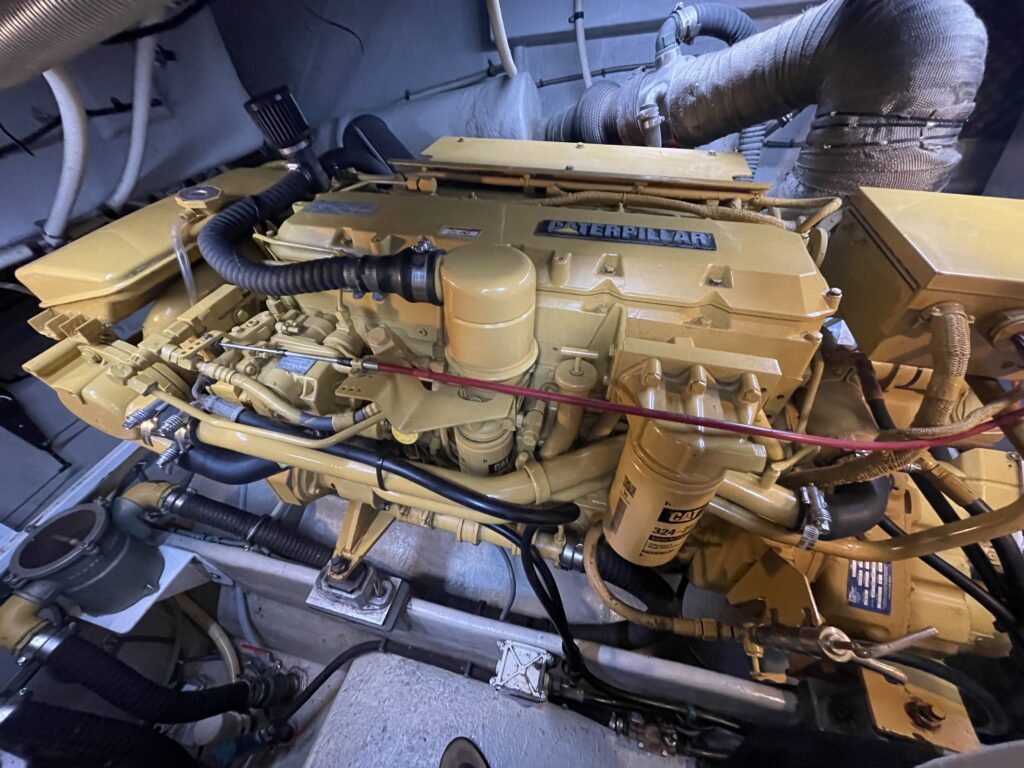
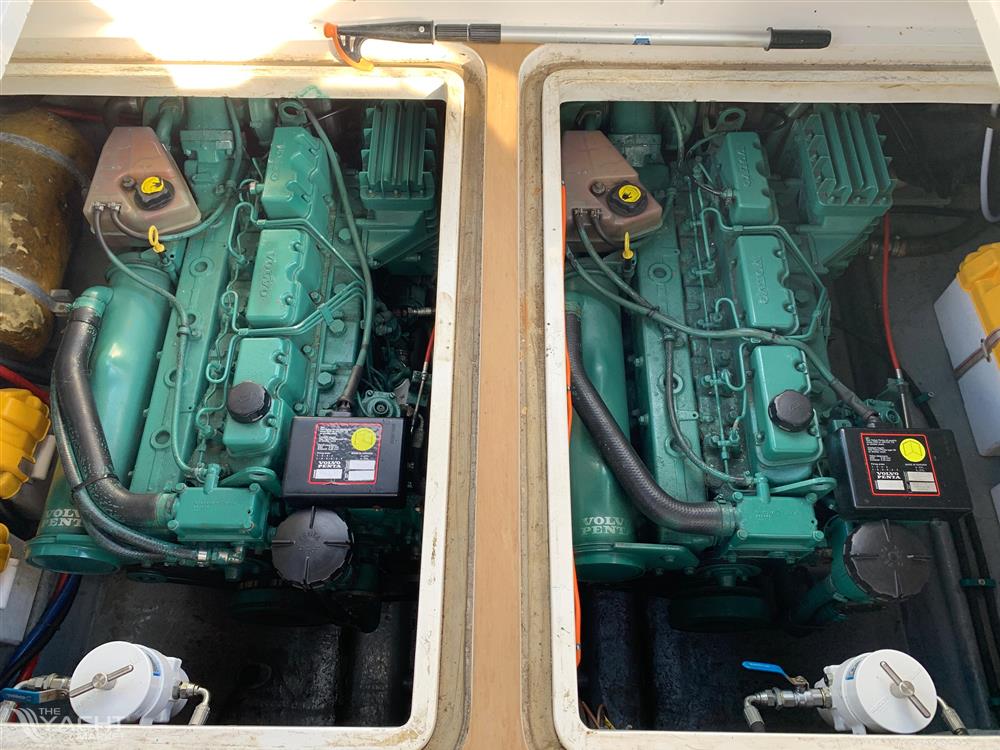
The P400 was unusual in that it was offered with either outdrives or shaft drives. Engine options for the former were diesel 460hp total, or two petrol alternatives with 540hp or 660hp. The shaft drive version was diesel only, with the much larger and more powerful Volvo Penta 740hp TAMD 63P or the range topping Caterpillar 3126 840hp variant.
Continuing on from the 80’s tradition, the Portofino 400 brought Sunseeker into the next decade, combining the best features of classic Sunseekers; bullet hole air intakes, large party decks, and the affectionately nicknamed Coca Cola ‘Coke bottle’ sheerline.
These iconic styling cues were now blended with their latest design direction, the forward leaning radar arch featuring upswept winglets while the front windscreen now incorporated a beautiful curved screen providing a sleek powerboat look coupled with the deep X Wing Fighter style sculpted side strakes.
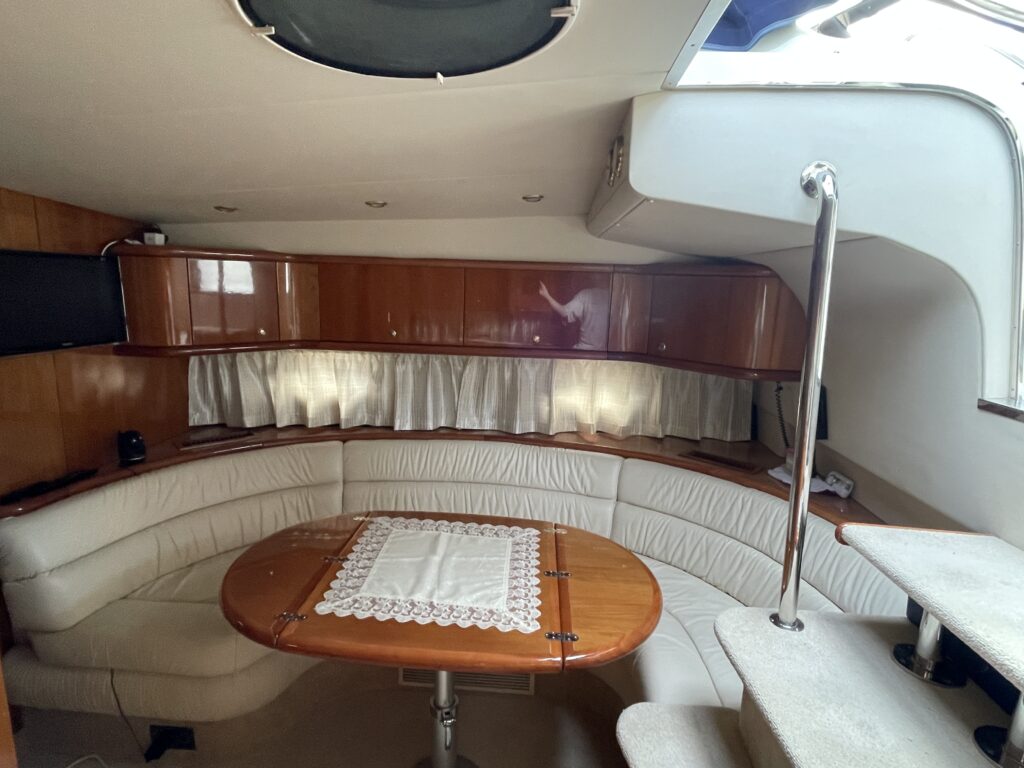
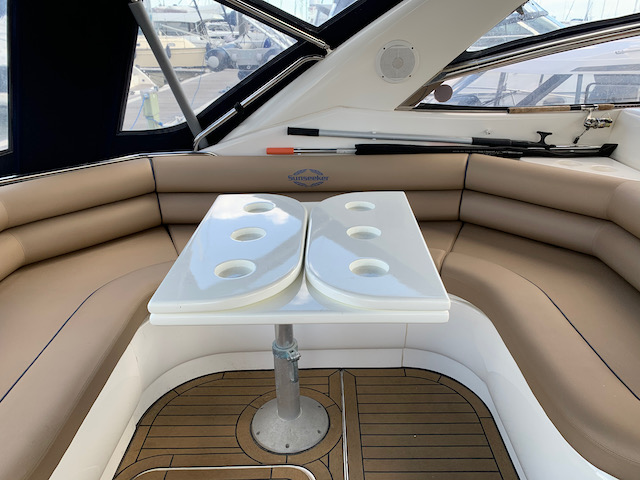
Cherry Oak and sumptuous leather featured internally,
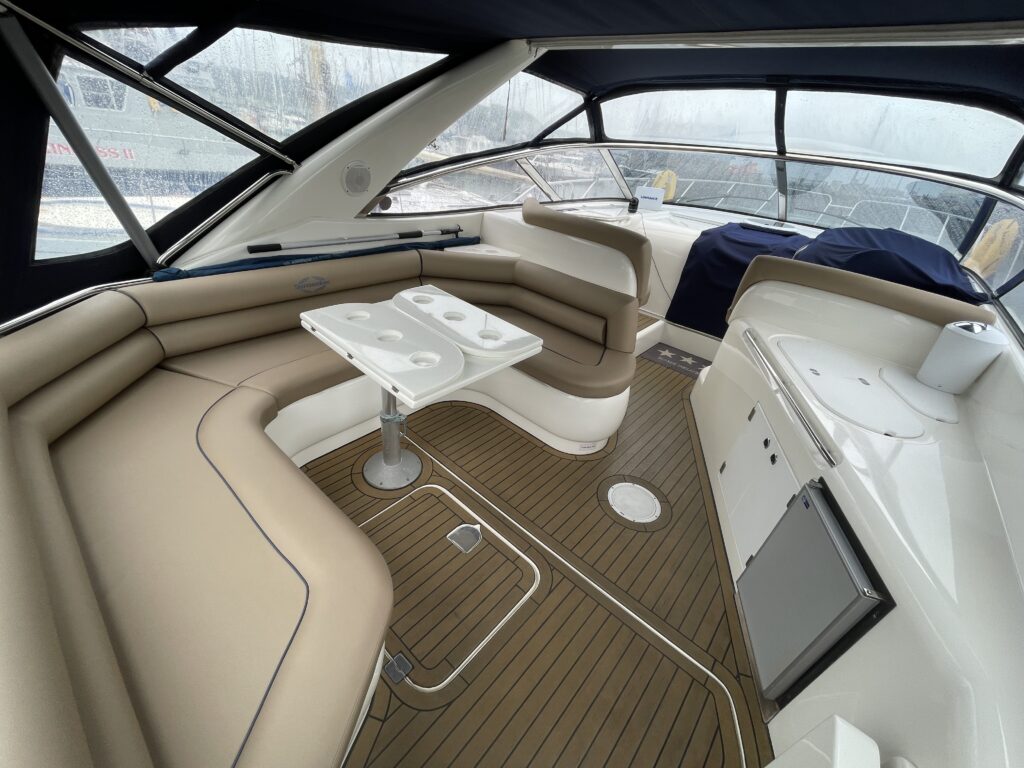
while the entertainment deck now incorporated a wet bar and fridge.
The large hungry Caterpillars good for a book speed of 35 knots with effortless torque, thrusting the P400 onto the plane at a lowly 12 knots.
The specification level was high, befitting its offshore cruiser status. Able to house six in comfort with her double bed master with semi ensuite, twin bed rear cabin featuring its own sink and a convertible saloon. Fully specced she would sport air conditioning, television, oven, hob, microwave, generator, fridge, ice maker and cooler, camping cover, bow sunbed cushions convertible table to sunbed on deck, transom shower, anchor with windlass, calorifier and much more. Her comfortable dimensions afforded large 990L fuel tanks and 270 litres of water, sufficient for 320nm range and self sufficient days at sea while the spacious top ‘party’ deck can accommodate 12 in comfort.
On the technical side, in usual Sunseeker tradition only the best brands feature, Bennett trim tabs, Vetus bow thruster, Morse MT3 controls, ZF V drives, Guidi strainers, Bomar hatches, HFL Generator, Barry Controls engine mounts, Lewmar windlass, Separ water separators, all still widely available some 25 years later, meanwhile the Caterpillar engines remain fully supported.
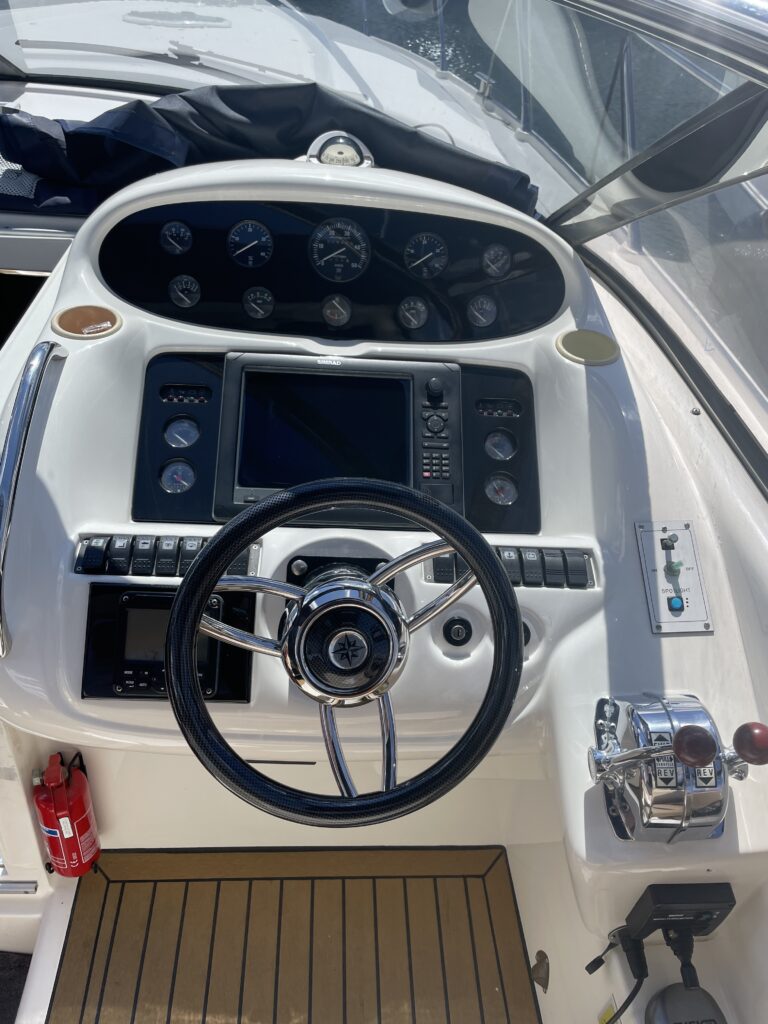
MT3 Morse controls are a pleasure to use…
The hull itself is hand laid GRP with an isophtalic gel coat, featuring an isopthalic resin initial layup with powder bound glassfibre mat, an Orthophthalic resin main lay up with woven rovings and unidirectional glassfibre reinforcement, 12mm balsa core topsides and a bonded foam girder system reinforcing the hull bottom.
This particular vessel has had 7 previous owners, originally commissioned to med spec (including Besenzoni passarelle and Air Conditioning) in 1997, she never ended up in the med having spent her whole life in the UK. Over the years upgrades include a Simrad NSE main screen for navigation with matching radar, autopilot, depth sounder as well as an auxiliary Lowrance navigation system for the co-pilot with side scanner.
Simrad navigation system incorporating Navico mapping, auto pilot, radar, depth sounder and more…
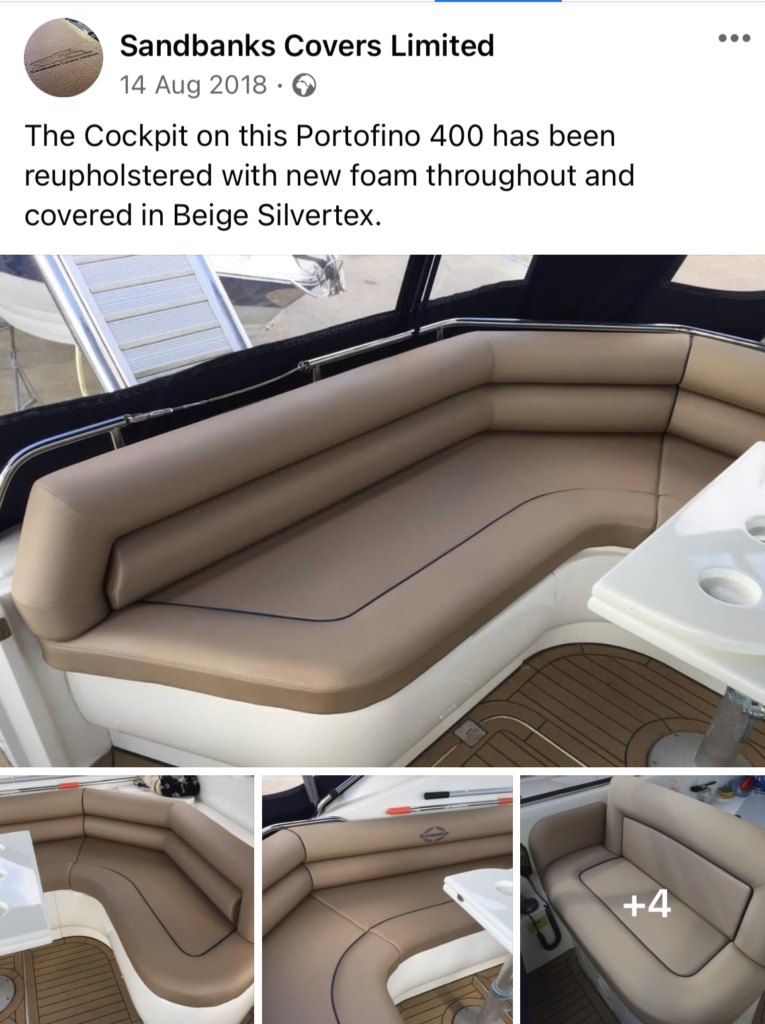
The deck has been reupholstered in Champagne Silvertex, while the helm has been refinished in carbon effect, a Teak deck and rear platform provides the classy finish. An overhaul to the charging system sees a Victron setup providing battery charging as well as a convenient 240v inverter through a 1600w Victron Multiplus unit for the twin house batteries as well as an additional 30A three way charger for the dual battery starter banks for each engine and the generator battery. Battery monitoring gauges are fitted internally, along with a Fusion bluetooth stereo married to Alpine speakers.
The Victron Multiplus 1600 is the heart of the twin house battery charging system (70A) with integrated 1600w inverter. It’s baby brother, the Victron Blue Power charger with 3x30A outputs takes cars of all the starter batteries featuring 2x2nr batteries for each engine and a single battery for the HFL Generator.
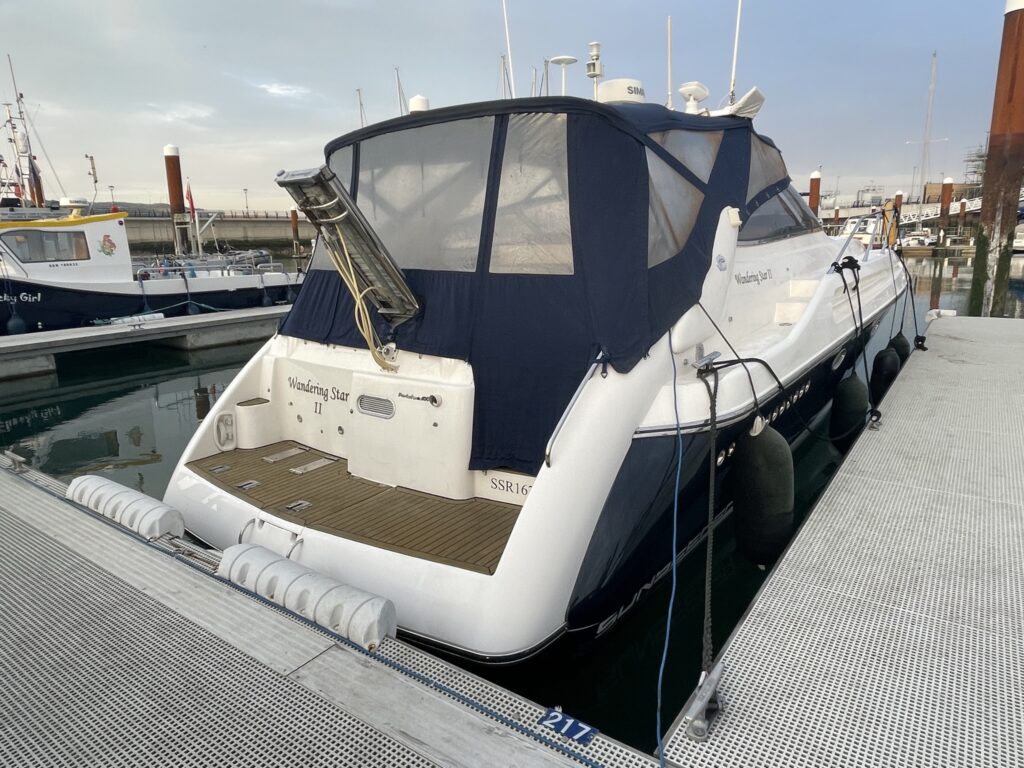
Initially built by Sunseeker for the first owner as ‘Lady in Red’ sporting a red hull and cream leather with red piping, (sadly I have no photos of this, the latter still original on the bow mattresses) it is purported that this owner never actually took delivery. The second owner purchased from Sunseeker and kept her for 2 years. The third owner kept her for 9 years, and renamed the boat Brad Air. At some point she was professionally repainted blue, leaving only a red boot stripe. The fourth owner had her for just under 3 years before being purchased and renamed by the fifth owner as Kandoo IV albeit he flipped it 3 months later to the sixth owner who had her for just under 3 years, renaming her Assassin II in the process. She featured in the May 2015 edition of Motorboat magazine, resplendent still with her red boot stripe and cream leather upholstery finished with her original ‘Lady in Red’ red piping .
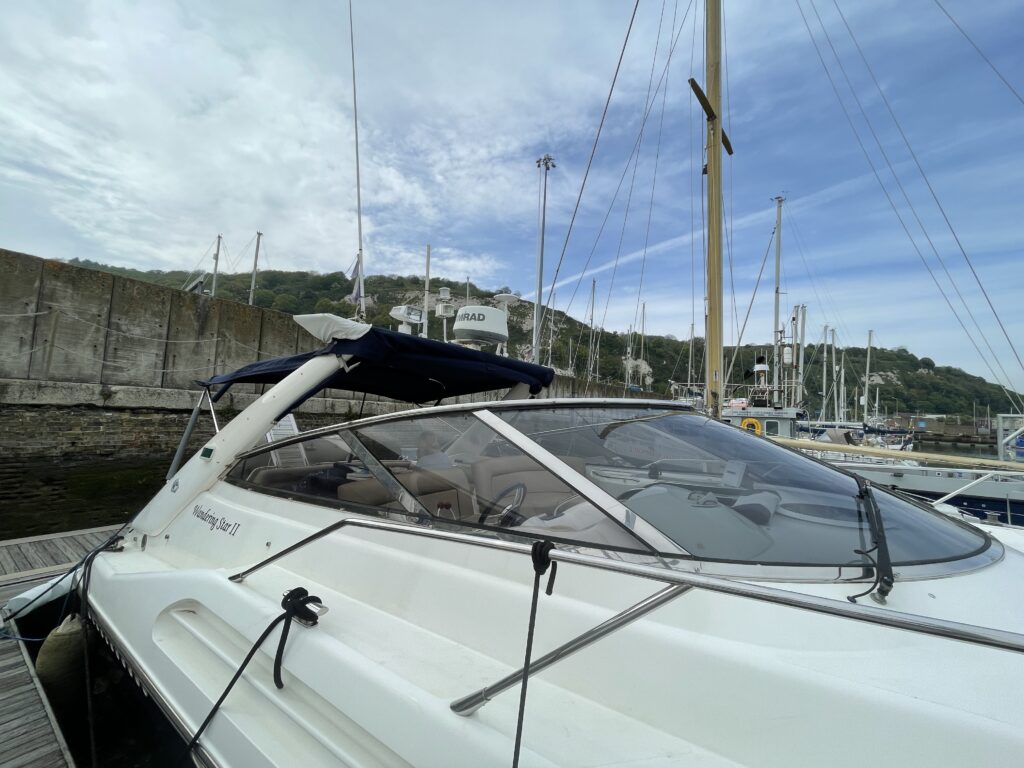
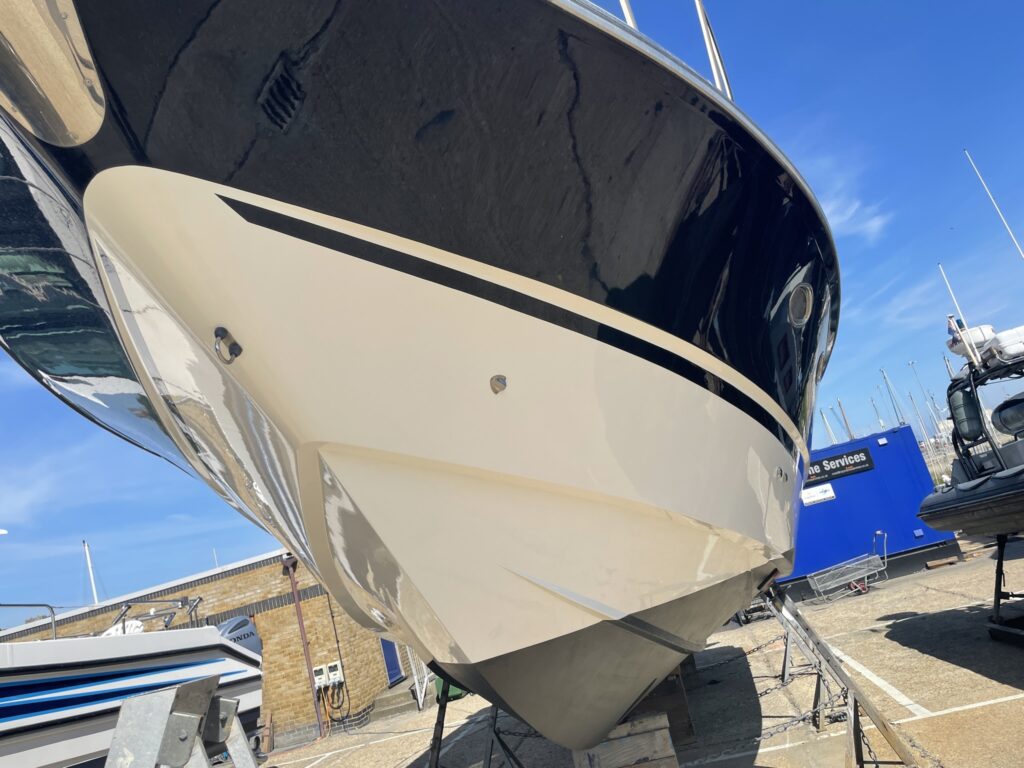
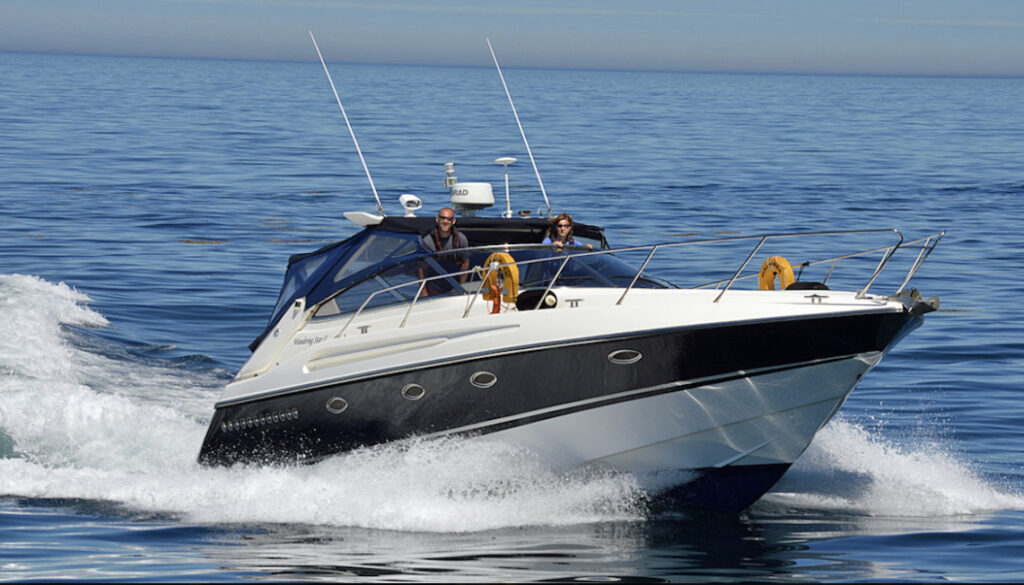
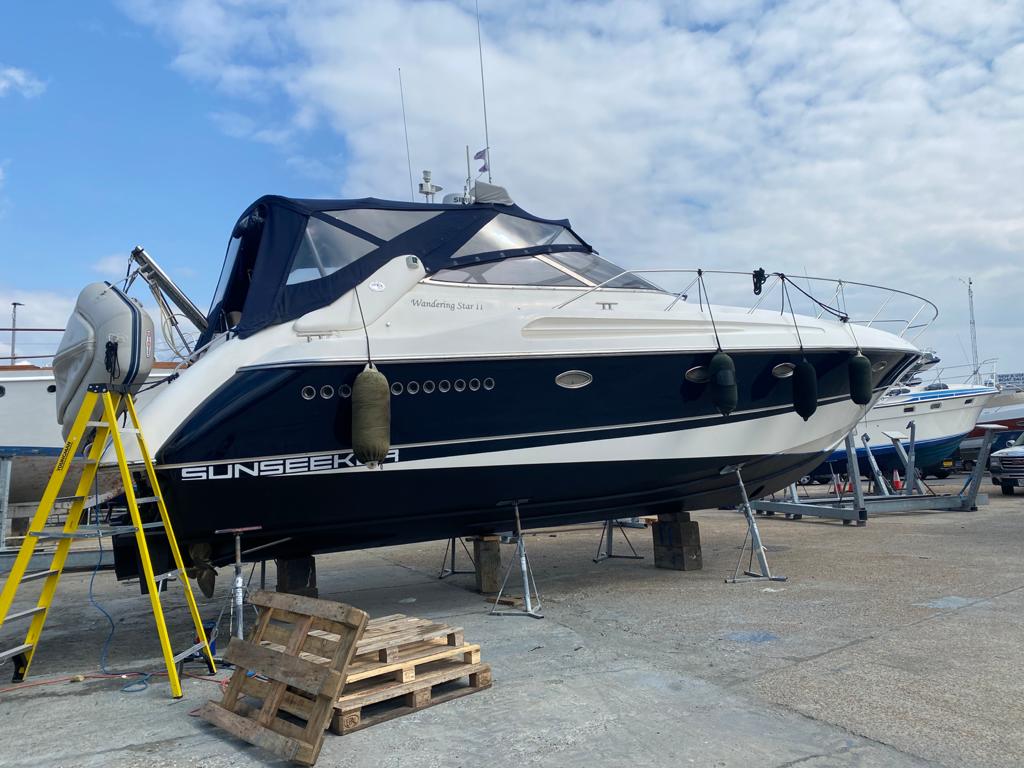
The seventh owners, purchased her and renamed her Wandering Star II (their previous fishing vessel being Wandering Star) named after her fathers favourite song. A scratch to the paintwork in the boat yard from a scaffold tube resulted in an insurance job to Desty Marine for a complete respray of the hull band, where the owners additionally requested and paid for the boot stripe to be refinished in the same matching Awlcraft 2000 “Majestic Blue” paintwork.
As advertised by Moore Yachts in 2021.
They also had her reupholstered in Champagne Silvertex fabric with blue piping by Sandbanks Covers Limited, to replace the now defunct red piping on the cream leather.
Other improvements included a visit to Jim Baumann at JB Yacht Services where she received a new camping cover canopy complete with an extended head room rear and stitched grab rails along the roof line. She was owned for six years by this couple where her adventures included a trip down to La Rochelle and a few months spent out motoring around France, before we took her on, which takes her up to the present time and her 8th owner in 24 years.
First a prelude to getting on the water. Covid 19 has had an affect on everyone’s lives in terms of freedoms, plans, health, work, relationships. It has very much been a gamechanger. For many this meant no more holidays for a while, very limited socialising, lack of ability to enjoy public spaces and so much more. It would seem that many have decided to explore those things they always fancied doing, to stop putting things off because you truly never know what is around the corner. The indiscriminate manner in which Covid exploded into our lives is a stark reminder of this.
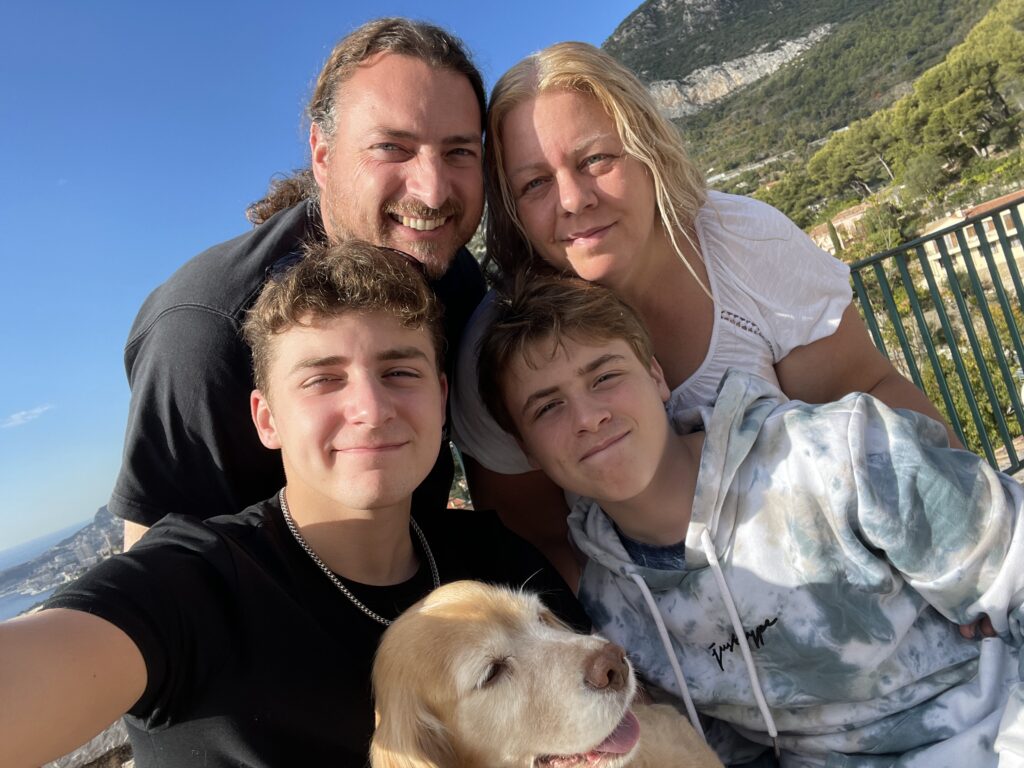
For us as a family of four and a doggy, it has been no different and has certainly spurred us into considering an escape to the water a lot sooner than we would have anticipated otherwise. Both myself and my wife were fortunate to have grown up around boats. My Grandfather owned a little Sunseeker Daycab 23 sport cruiser which I used to accompany him and help him with all the time, and my wife’s father always had fishing boats.
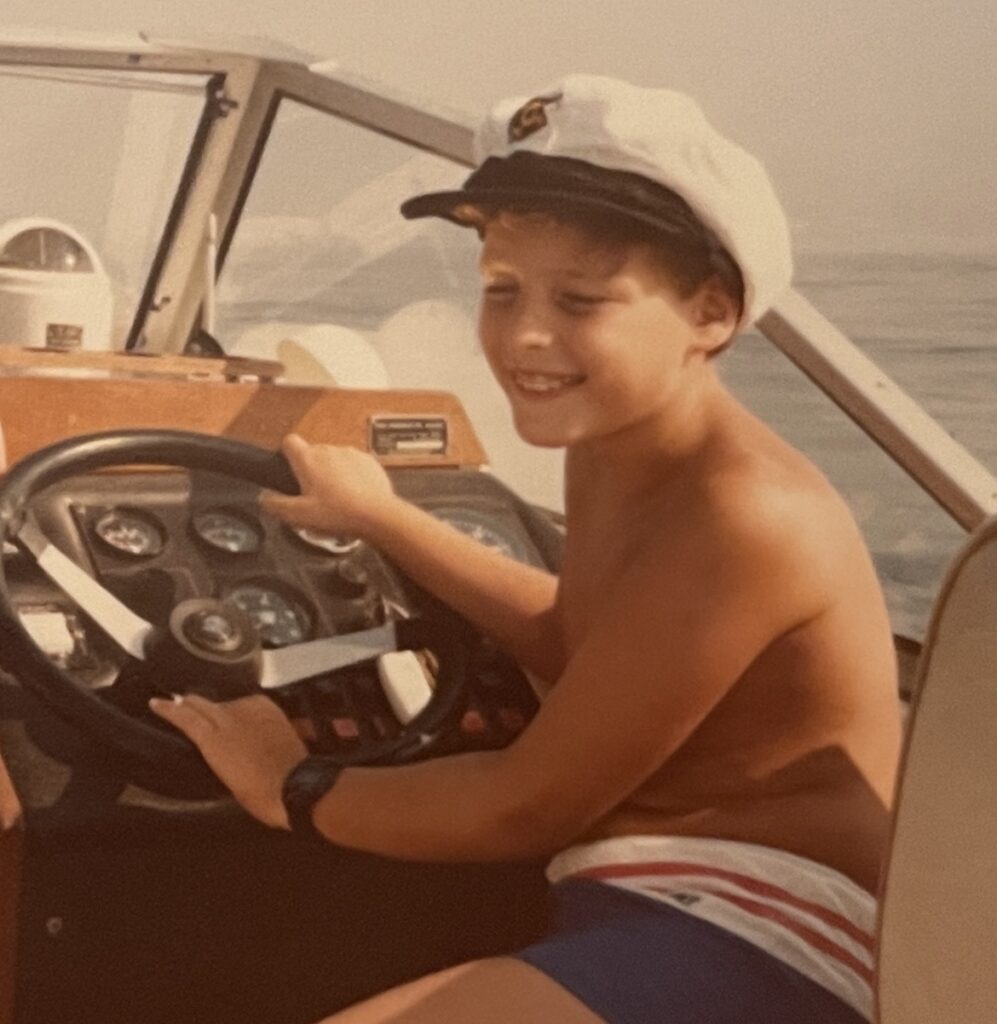
At the helm of my Grandfather’s Sunseeker Daycab 23 sport cruiser circa 1985.
This gave us enough insight to appreciate how much work they can be and the level of commitment and dedication it requires. Unlike most other vehicles, you can’t just park a boat up throw a cover over it and forget about it (unless it’s a trailer boat!!), it needs feeding all the time, mooring fees, insurance, anti foul, anodes regardless of use or lack of. However you never truly realise the full extent of it when you’re merely perusing glossy adverts from the side-lines.
The search is on…
Our search started fairly modestly, looking at trailer boats or a river boat kept on a river mooring. After much reading we decided against a trailer boat, research taught us that those weekend days when the weather is good, every one will be heading to the slipways with the same idea, with the likelihood of queuing for ages! We strongly considered a Shetland 4+2 to keep at our local river but the thought of only going up and down the same patch each time felt like the novelty may soon wear off. We looked at lots of adverts, combined with research of all sorts every evening, reading as many noob forum posts and the advice dished out by seasoned boaters as much as possible. I even posted a couple of topics of my own.
Contender Number 1
As the search continued my interest is piqued by an advert that has captured my imagination, after which there is no turning back. A 1985 Sunseeker San Remo 33 with twin inboard Volvo Penta AD41 200hp engines on outdrives, a beautiful little example with much recent and high quality work carried out.
I first saw it on ebay and started conversing with the owner to get an idea of running costs and fuel consumption. If we are going to get a boat, it was going to have to be a Sunseeker!
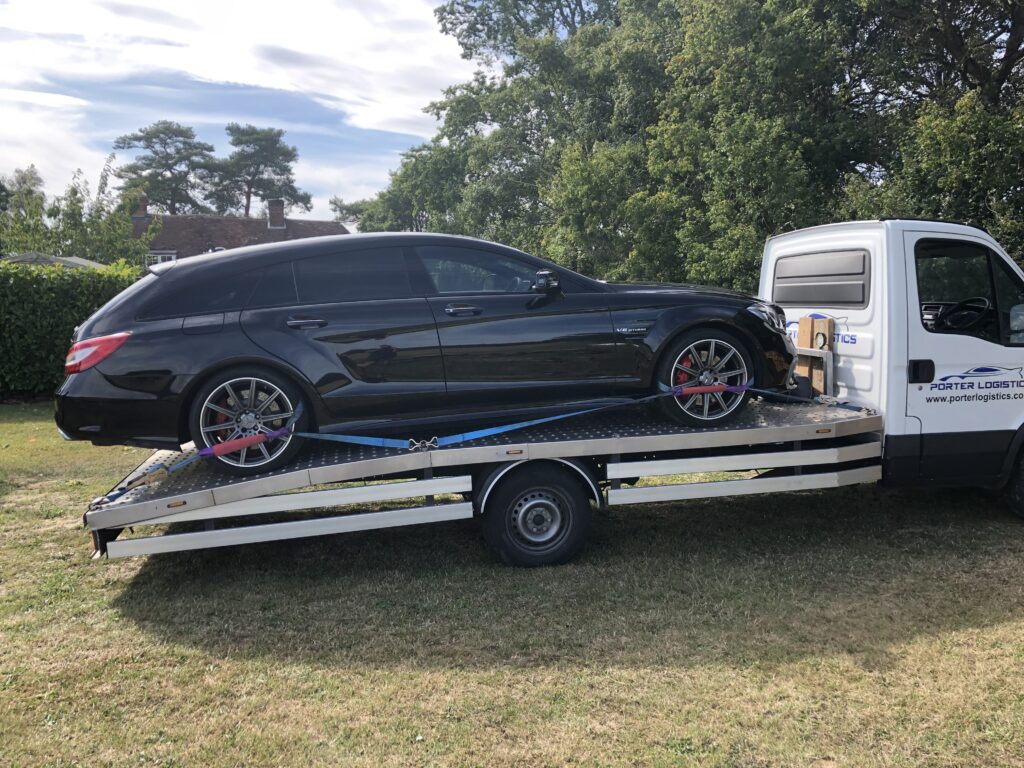
The reasoning for this is thus; If I’m going to be putting this amount of time and effort into something, it simply has to be something that my heart is into. The juice has to be worth the squeeze and for me, I had never really thought that I would seriously ever get a boat, but there is only one brand of boat that has always and consistently appealed to me, possibly from a culmination of my idolisation of my Grandfather and an early indoctrination into the brand followed by a trip out on a relatives beautiful Sunseeker Travado in the 80’s which seemed like something from Miami Vice compared to my Grandfather’s one not to mention of course all the Bond movies that featured them over the years. This would mean upping the budget which meant that the flash car (which was only covering about 2500 miles a year) had to go.
I’m gradually getting drawn in more and more, this leads to both wider and more focused research where all sorts of things to look out for start coming out of the woodwork …Osmosis….Outdrives….I’m downloading engine and outdrive manuals, reading up all about osmosis, transom shields, bellows, skin fittings, sea cocks, anything below the waterline, rotten bulkheads etc etc. My head is literally exploding, but we continue somewhat undeterred but perhaps allowing for a certain amount of leeway or forgiveness toward the right boat. I’ve fallen in love with this one, it’s the first boat that we we go to look at, the only downside is what appears to be osmosis coming through its copper coated hull. After thoroughly researching and putting in my mind that it’s going to take some time to tackle the issue, we talk the price down considerably. Once we’re almost there, we then find out through the grapevine that a previous potential buyers surveyors report had picked up a rotted section of the main bulkhead between the engines and rear cabin. We adjust the offer accordingly, but we’re a couple of grand adrift. I just can’t forgive any more issues, it’s already becoming too much, it wasn’t a project boat that we set out to buy and the costs and time it would incur to bring the boat to the same standard that the rest of it was prepared to were already starting to stack up. So we had to say goodbye to number 1 which was a shame because I’d fallen for that one. We then looked at a couple of Martinique 36 footers, these gave some pause for thought but neither were at the high standard of maintenance that we were targeting, we even looked the other way at a local Riva 38 Special, ironically it was snapped up by the folks who originally had the San Remo 33 surveyed.
Contender number 2
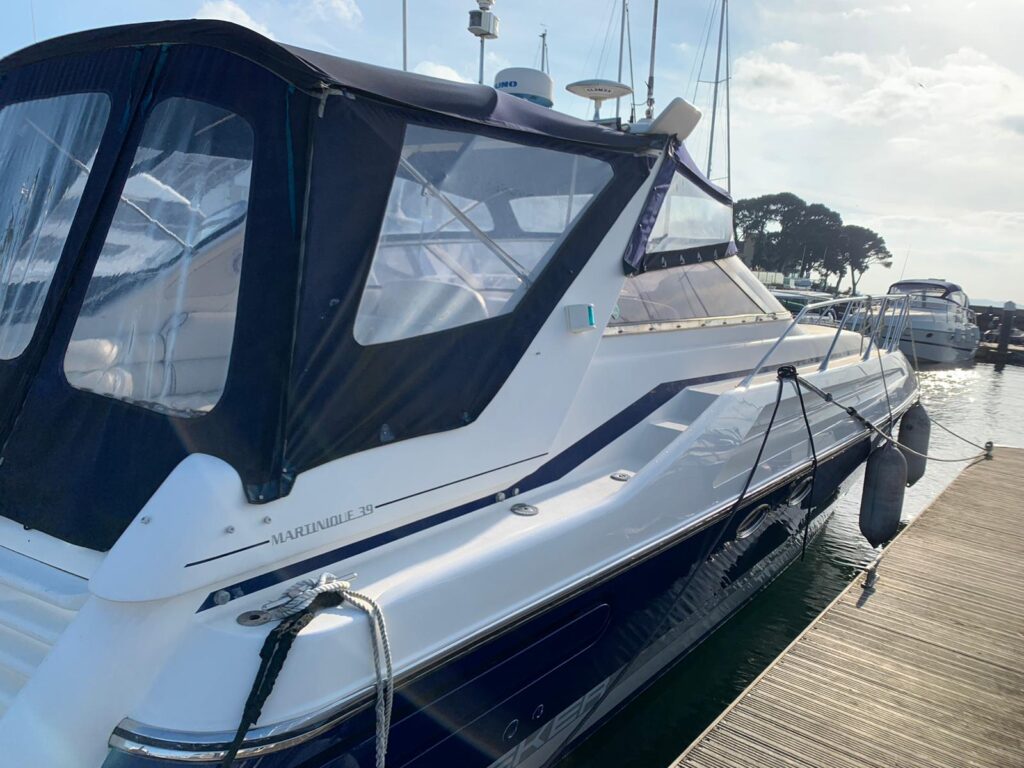
Along comes number 2 of the serious contenders, a Martinique 39 in the Netherlands (we’re up to 39 foot now)!
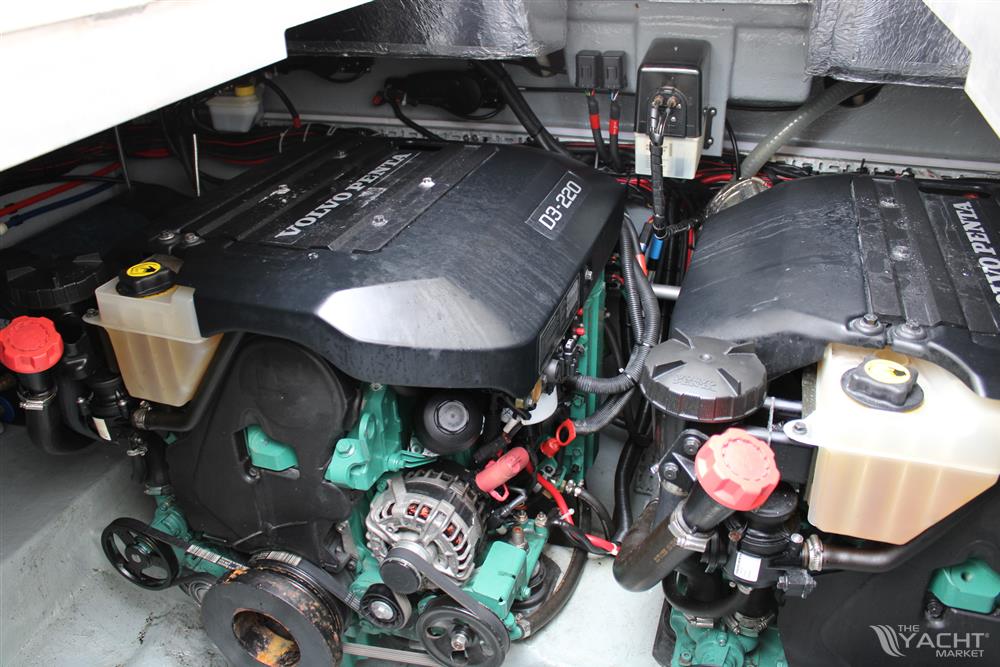
The boat has recently had more than the asking price spent on it, it has been repowered with new Volvo D3 engines (220hp each).
Lots of pictures and dialogue later, we’re nearly at a deal, offers have been discussed and we are getting towards an acceptable figure for both sides…
but it sells the very day before we make our formal offer. To our frustration, some 3 months later the deal still isn’t concluded and Brexit has since happened, making this unfeasible even if it did fall through, however it doesn’t. Forumites tell me this is a blessing in disguise. The D3 engines are slated by so many, although I had read this before there were also benefits, although they are lightweight aluminium car derived blocks, they represent a huge weight saving, they are quiet, efficient and easy to get around to work on since they are so small. Still, some scathing forum posts follow about them which helps me to move on from this one. We have been looking since June 2020 and we’re now at the beginning of 2021. We briefly consider a Mustique 42 on shafts and even a Camargue 46, but after much research on the noisy and thirsty Detroit 2 stroke diesels again I feel along with their increased length that we would be getting far to carried away for a first boat. We consider a Portofino 375 that has been for sale for ages, then a nice 400, only the broker can’t produce any receipts for the repowered and mismatched Yamaha 420STi engines, but it sells virtually straight away anyway. Another Martinique 36 turns up, no good, a Martinique 38, again no good.
Contender number 3
Then out of nowhere, No.3 turns up purely by accident.
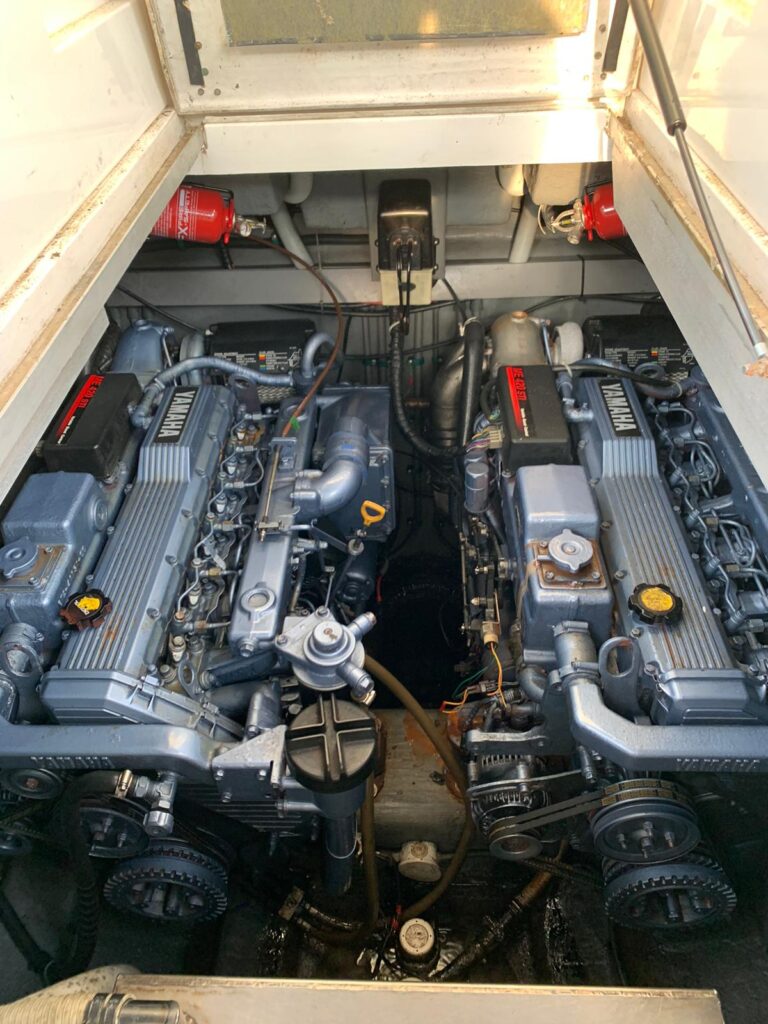
It’s another Martinique 39, only this time, it’s powered by a pair of very nice Yamaha 420 STi 240hp each engines.
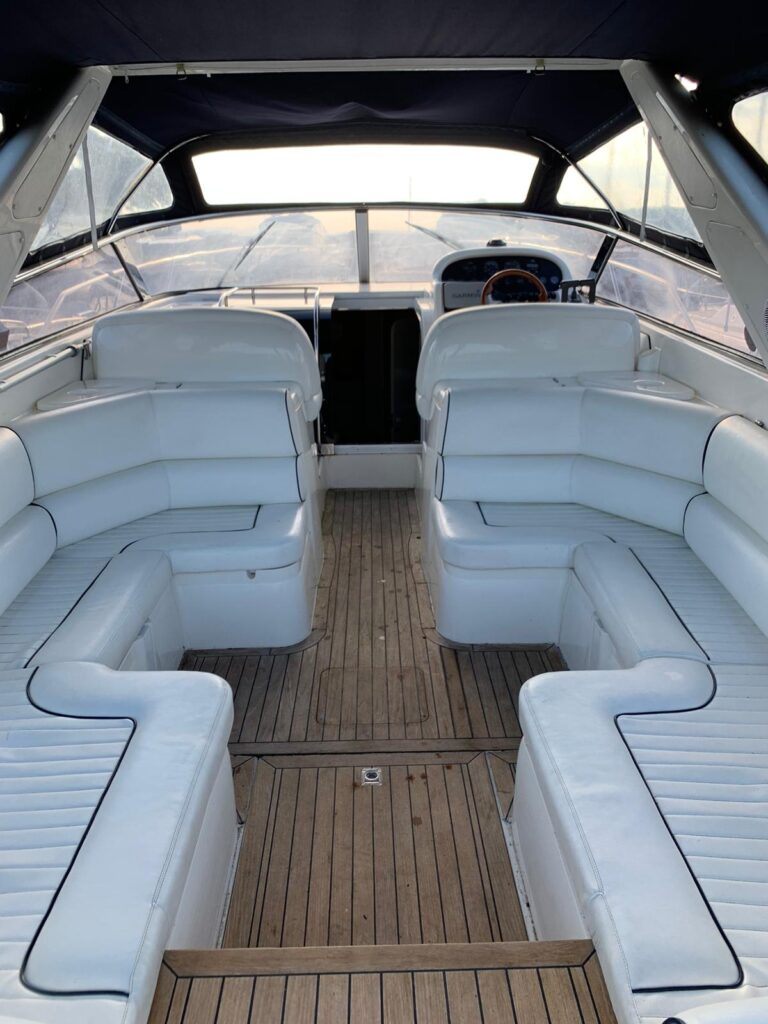
These are the same 4.2L engine fitted to the Toyota Landcruiser of which we have experience…perhaps this is meant to be. We have the idyllic viewing, the weather is beautiful, and we get taken out to sea on it across Studland Bay. This is the best sales technique of all. The engines are quiet, refined, there is decent speed and power, the party cabin can accommodate 10 easily the whole thing just feels right and it’s a decent price leaving us with funds to play with.
My wife is smiling away. It needs some minor bits of attention, but a very long ownership spell with all the receipts bodes well. We go away and make an offer and it’s accepted. The dream may be turning into a reality. Only upon arranging the survey the seller gets cold feet and pulls out. He can’t find a replacement and doesn’t want to be boatless for the season.
Just how hard can it be to buy a boat? It’s getting almost depressing at this stage, we have driven around the country, we’ve been trawling adverts, engaged with sellers and brokers, spoken to workshops and specialists, surveyors, I’ve read up on all sorts of engines, having swotted up on VP AD41’s, VP D3’s,Yamaha 420STi’s, different outdrives, Detroit Diesels and shaft drives and we just can’t find anything. In the meantime the overheated market place means anything decent is selling immediately. As a cautious buyer, there is no time to make lengthy purchasing decisions and there will be no bargains for a nice boat.
Contender number 4
Then along comes No.4, a 1997 Sunseeker Portofino 400. These were available with either outdrives or shaft drives. This particular model is equipped with the higher specified and sought after shaft drive format.
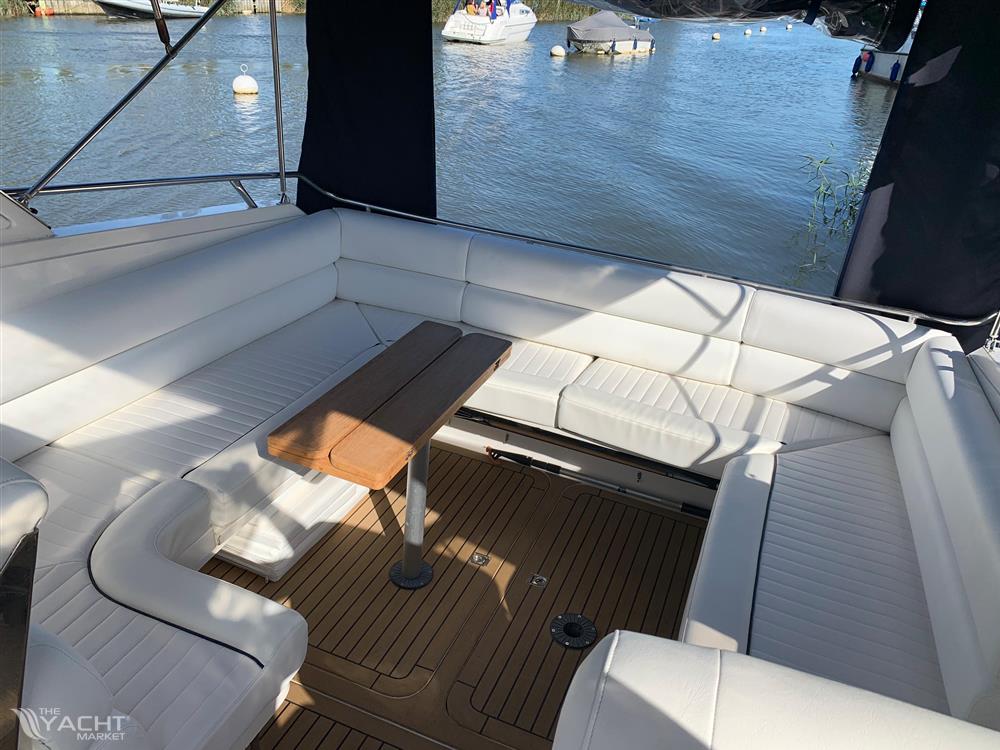
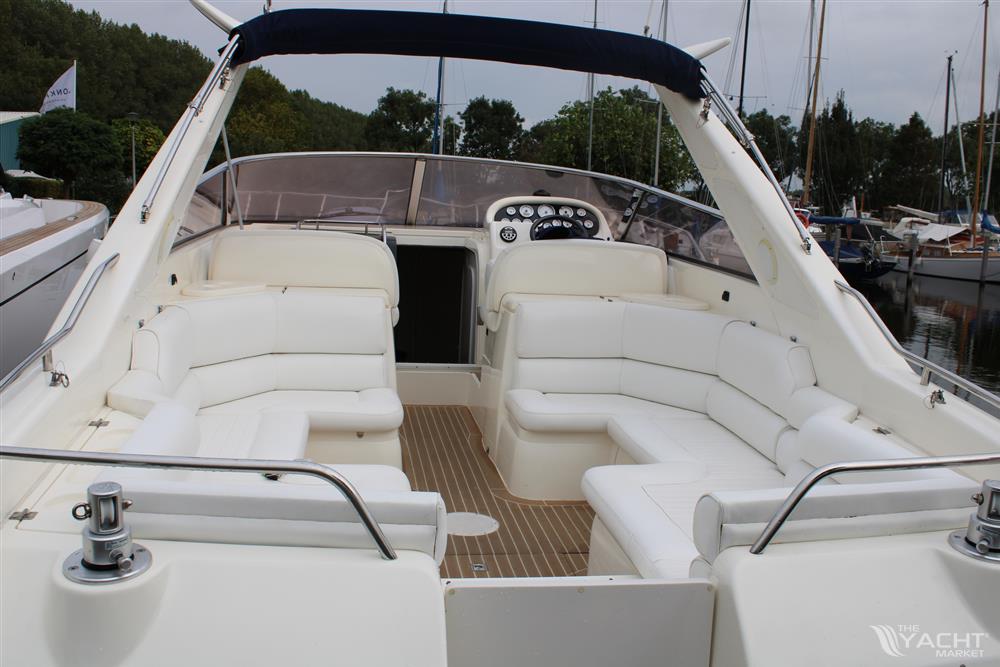
The advert goes up, it looks stunning and my wife is on the phone to the broker immediately, it’s a lot dearer than the Martinique 39, and appears to have a horseshoe seating arrangement with a wetbar whereas the Martinique had seating all around.
I’m reluctant to traipse all the way back down to Poole to look at another boat particularly as the seating arrangement looks smaller than the Martinique but the wife wants to look at it, so of course we arrange to do this. At the same time I am searching the helpful YBW forum and I put 2 & 2 together and come across the owner on the forum, whom I private message. We get chatting about fuel consumption, boat history and other such likes, armed with the info he has provided I do a load of research on the engines as this throws yet another engine manufacturer into the mix! Heavy duty Caterpillars this time.
We are fortunate to be the first viewers, this is in a different league to everything else we have looked at and for the first time, it looks like a boat that is truly ready to go with seemingly no real spend required to bring it up to standard.
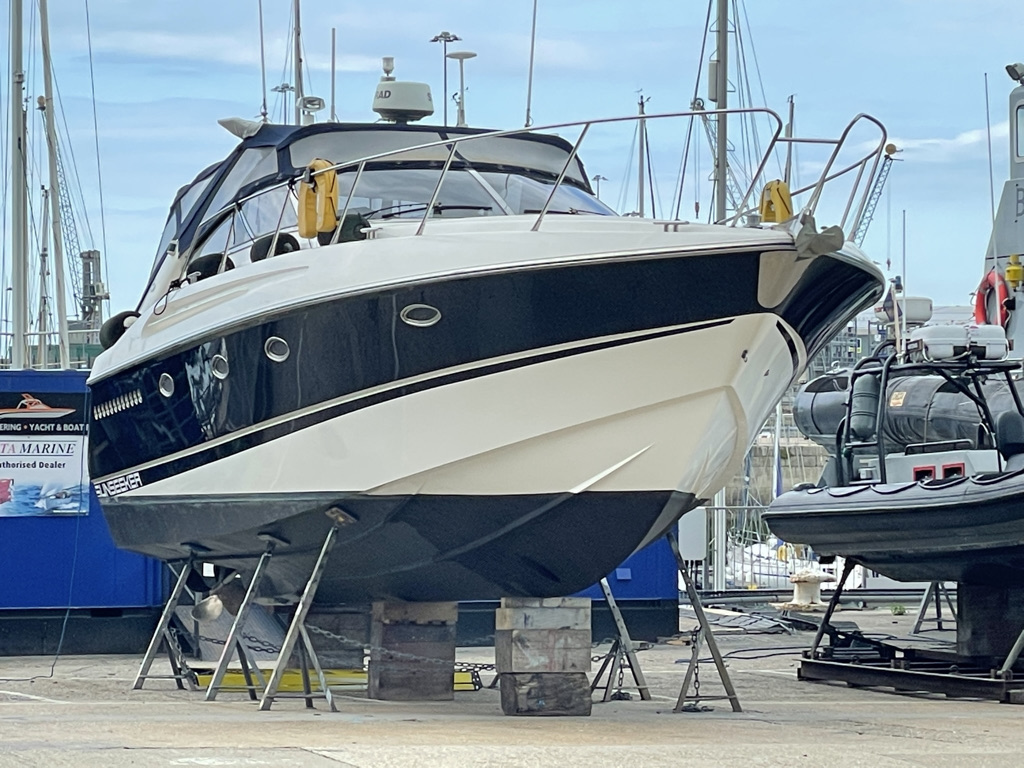
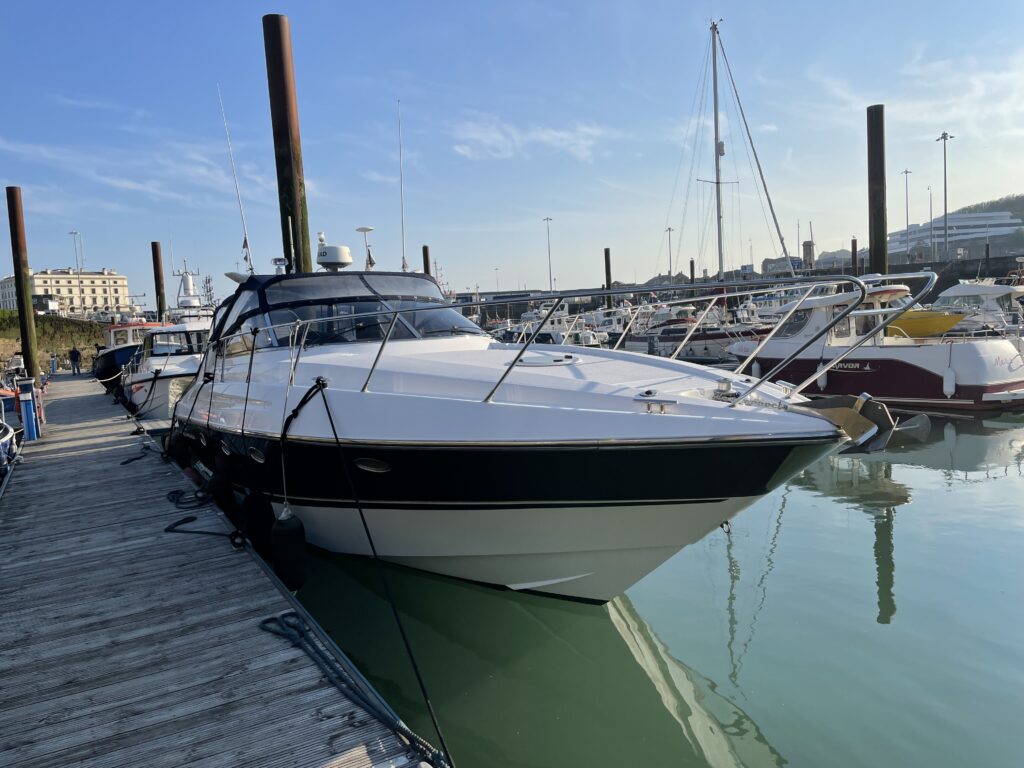
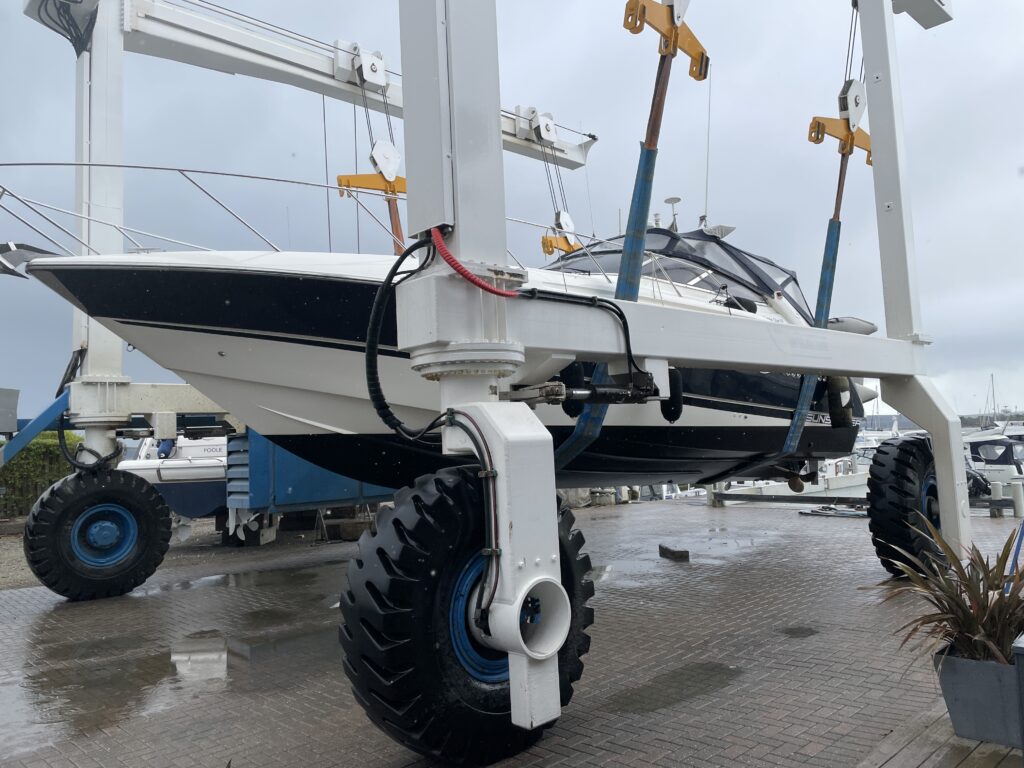
The boat is on the hard when we arrive and it looks immense!
It appears to have been very well looked after by its current owners with lots of recent spend from the last 5 years for updates and maintenace. My concerns over the lack of seating are misplaced, although it is only 1 foot longer than the Martinique, it is also 410mm wider, which may not sound a lot on paper, but in the GRP it is substantially beamier. Volumetrically, that extra foot and nearly half a metre additional beam makes for a massive party cockpit that will easily accommodate 10-12.
I like it very much, not least because I can see that it has been well looked after, which should make my job of maintaining it somewhat easier. There are concerns however. This is the first shaft boat we have viewed, although everyone keeps telling me to avoid outdrives, I had already done so much research on them that I had begun to feel comfortable with maintaining outdrives and I liked the efficiency and agility they afford. Would shafts make the boat a lumbering but well planted sloth? Apparently shafts are virtually maintenance free according to the owner so there are no long term concerns with that.
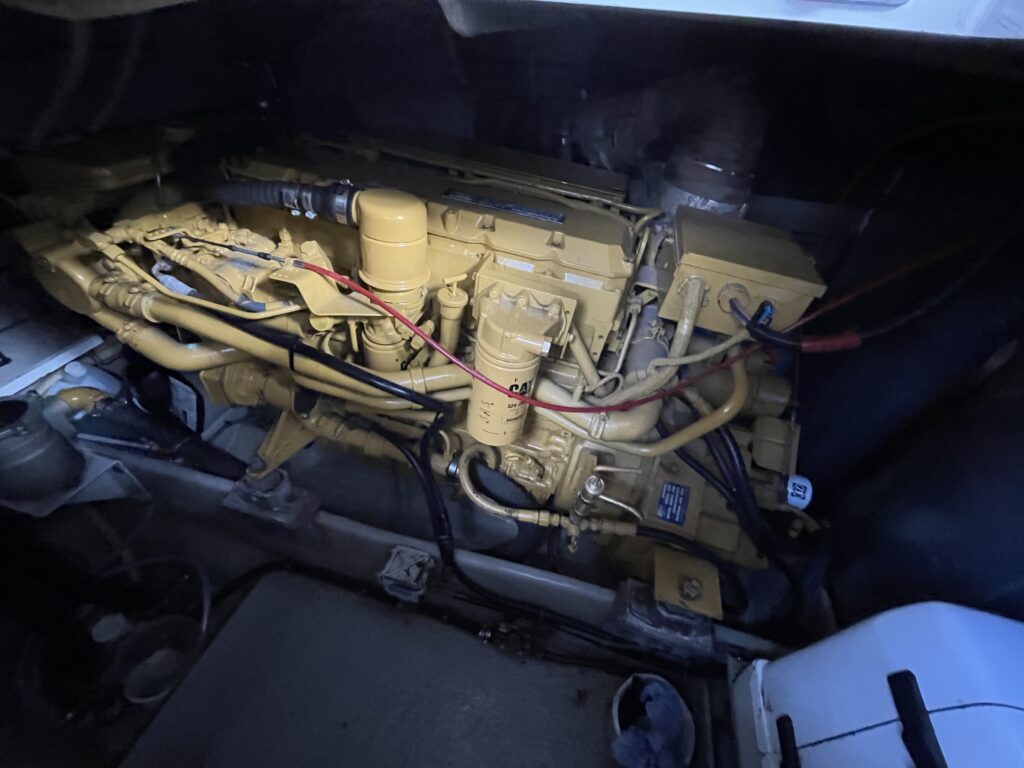
It’s the engines, powered by a pair of monster Caterpillar 3126’s with 420hp each has me panicking about fuel costs. The owner assures me his typical consumption is 70-80L an hour for the pair at cruise, which is similar to the initial and much smaller twin engined San Remo on outdrives which the owner advised was between 60-70L also at a 22 knot cruising speed. Although this seems scarcely believable given the size differential of the boats and the more than doubled power output of each engine. I find some supporting literature from Caterpillar and also read other owners experiences which reassures me as it seems to affirm what the owner has said which gives me some confidence.
With a total of 840hp it is twice the power of the next boat we had viewed, it’s also the largest. The boat is equipped with a generator, air conditioning, hot water, a sophisticated battery management system with inverter, there is an awful lot to take in. Rather than an engine bay, this has an engine room, the first boat to view where you actually climb down via ladder into the engine’s compartment and they are huge! My wife quickly departs back to the car. I’m there for about 3 hours with the broker. She looks quite unimpressed, after a long chat we come to the conclusion that it isn’t that she doesn’t like it, rather that like me, she found the whole thing somewhat overwhelming. From the Martinique 39 that she loved, this was in size and budget a far departure from where we started. The budget and size of boat had been gradually growing and this seemed like another level of complexity along with the on costs of bigger moorings and so forth.
We go away and spend a couple of days discussing amongst ourselves, we’re undecided, it’s a big step, time isn’t on our side, we have learned that lesson, the boat is good, it feels like too serious a boat for us as a first foray into boat ownership, I have doubts about my ability to handle such a big boat, particularly as a first boat and to take on all the liabilities that come with it, it’s some way out of our comfort zone, but we’ve been searching for too long, in the end, I left it to fate, calling on a 10p coin on my desk, tails we go for it….(and on the first flip 😉 ) tails it is!!
We call up to make an offer, the Broker explains to me that it’s not that easy, the second viewers are also considering making an offer and he has to wait for them to come back. I suggest so what if we were to offer the full asking price? He tells me it doesn’t matter, the seller has to accept our offer. Ok, so now we wait with bated breath for the other viewers to come back as we can feel the next one slipping through our fingers. I decide to stick to our guns of what we feel it’s worth and put that in as a formal offer, it means we are disadvantaged by moving first because the other viewers could be played off against our figure. As it transpires, the other viewers can’t secure the financing. Having been viewing for almost a year, we are literally ready to go, chomping at the bit and I explain to the broker that we can move as quickly as the seller wants. As it happens, they want a fast sale having been messed about and strung along earlier in the year before the boat was officially advertised. They want to try their hand at sailing and are keen to move on to their next adventure before the season kicks in. They come back with a mid way counter offer. Considering the condition and the work that has been done to the boat in their ownership, we’re happy to come up to this figure.
Contractnegotiation
What follows are some contractual complications, I don’t like the ABY contract wording in respect of risks/damage to the boat pertaining to the buyer on sea trial, in my view the boat is insured by the seller at this stage and any risks shouldn’t be born by an uninsured potential buyer particularly when the sea trial isn’t an unaccompanied event, the seller or his representative will be present at all times and will be conducting most of the piloting. We propose some amendments which fortunately the seller pragmatically accepts because this could have frustrated the whole deal, no one likes to think of the ‘what ifs’ but the wording in the contract is just too open ended in the event of any damage. A survey is suitably arranged and the props are in motion! From viewing the boat on the 14th April to an offer made on the 18th April, counter offer and acceptance on the 23rd April, deposit paid the same day and survey arranged for May 4th which was postponed to 5th May due to bad weather.
Sea Trial& Survey
The 5th of May comes around, we have only seen the boat out of the water, it’s now back in, sadly my wife can’t make it as she has school runs to tend to. The comfort of the ABY contract is that the parties are all somewhat committed, barring any major faults with the vessel, or the buyer can pull out for whatever reason if not happy with anything on sea trial, if notified within a certain time window. I’m confident that the boat is good having already gone through it carefully. However I hadn’t heard the engines yet or seen how it would perform so there is fortunately scope to back out if we really aren’t happy with anything.
The weather is as anticipated but we’re all committed to make it happen. It was almost winded off the day before the sea trial but Studland bay affords certain protection it would seem and they all seemed to have plan of what route to take. There are 4 of us, the seller the buyer the broker and the surveyor. The surveyor was there early with the broker, I was asked to come a bit later to give the surveyor a chance to go through stuff without any distractions. We have been speaking to our chosen surveyor for a few months now since he was the one that had surveyed boat number 1 for the other buyers. He was going to go to the Netherlands to survey no.2 before it sold and he was arranged for boat no.3 before being cancelled, basically he had lived through the process with us and was always helpful and professional. I had every confidence in him. Sure enough, on arrival he talked me through some minor observations, but largely he was impressed with the condition overall. In fact, more than impressed.
We head out from Cobbs Quay towards the bridge to head out toward Studland Bay. The plan is to go out and do the sea trial, then head in to Dorset Lake Yard to have the boat hauled for the hull survey and then head back to Cobbs. Waiting for the bridge has the engines ticking over, my first impressions are that they seem much louder than the Yamahas in the Martinique, there is a rattling come from various places, I put my foot over the engine hatch flap and one rattle stops, the entry door is another one, the wet bar cupboards another. These are all easily remedied but the clattering would drive me mad. As the speed picks up the engines seem to quieten, that annoying frequency causing everything to rattle is gone, when the turbos start to spool the engines sound great. As we settle in to a cruise there is still an amount of engine boom which concerns me because I don’t know how the wife will take that, I’m assured by the surveyor that with the Canvas covers up as they are due to the bad weather, it is amplifying the sound of the engines and that it would be a lot quieter when the boat is ‘open’.
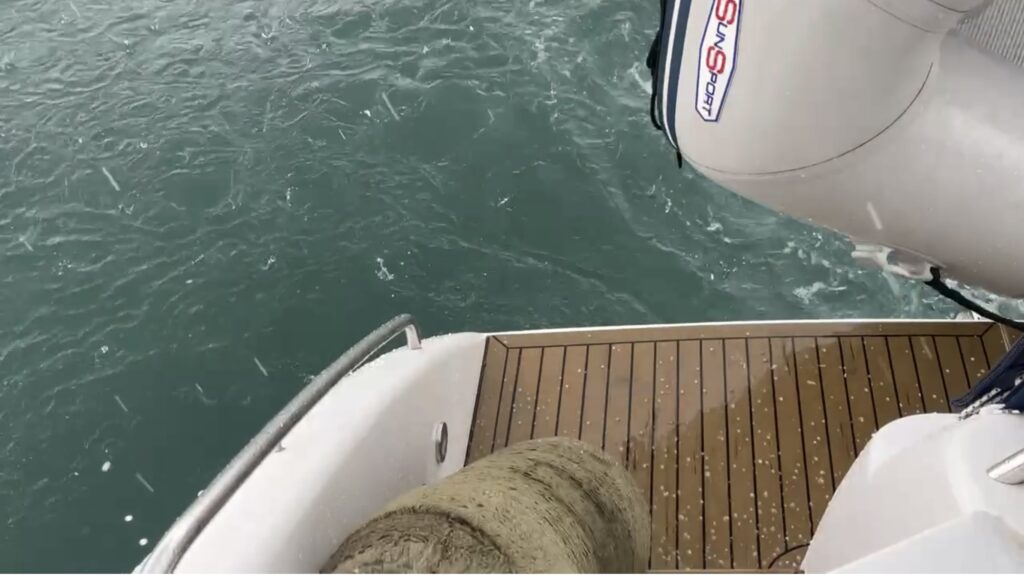
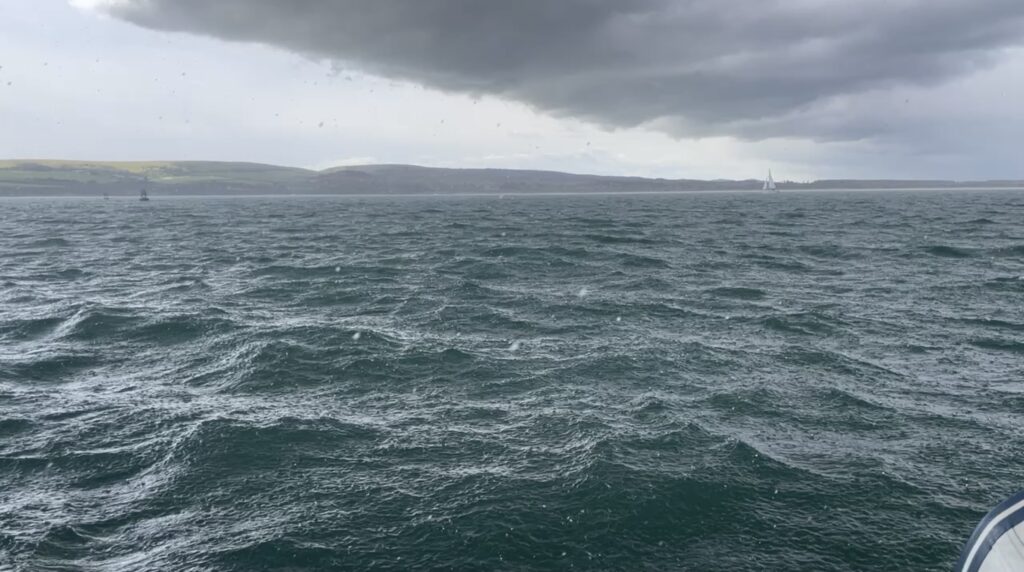
The weather conditions couldn’t have been much worse. The sea is choppy and hailstones rain down noisily pelting the canvas and even the one screen at the helm that was open needs buttoning back up due to hailstones coming in!
The boat sits beautifully in the water, it’s very planted, smooth and feels reassuringly stable. We hit 30 odd knots at 2750-2800rpm when we go through the revs and it’s fantastic to see that the temps don’t exceed 80 odd degrees. We are carrying a full tank of diesel and water and the 4 of us on a choppy sea. The Martinique had the temp needles heading to just under 100 and the same speeds. The under stressed nature of the Caterpillars with their huge 7,200cc capacity and massive turbo’s all playing their part to provide effortless torque and stable temperature consistency. The Portofino is on the plane at around 12 knots, those engines thrusting the bow and the stern to rise up over the ocean. A nice turn shows the boat is still suitably agile maintaining it’s stability. It’s a very comfortable platform. What looks huge in the marina feels very comfortable out on choppy waters.
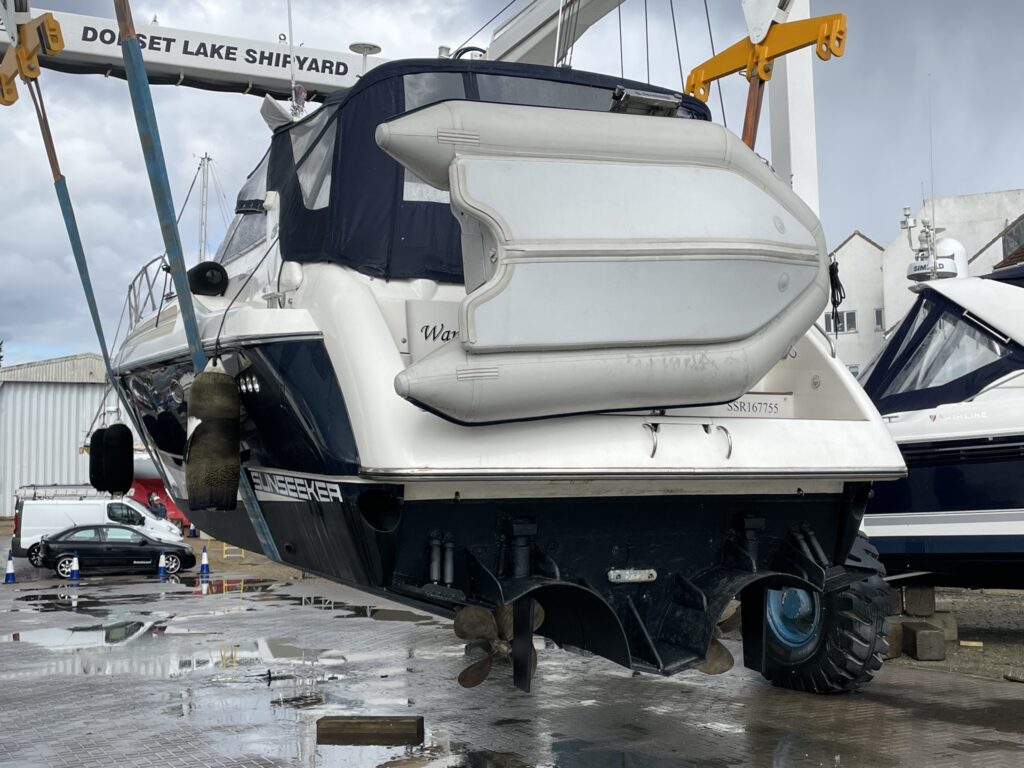
We arrive to Dorset Lake Shipyard to have the boat lifted.
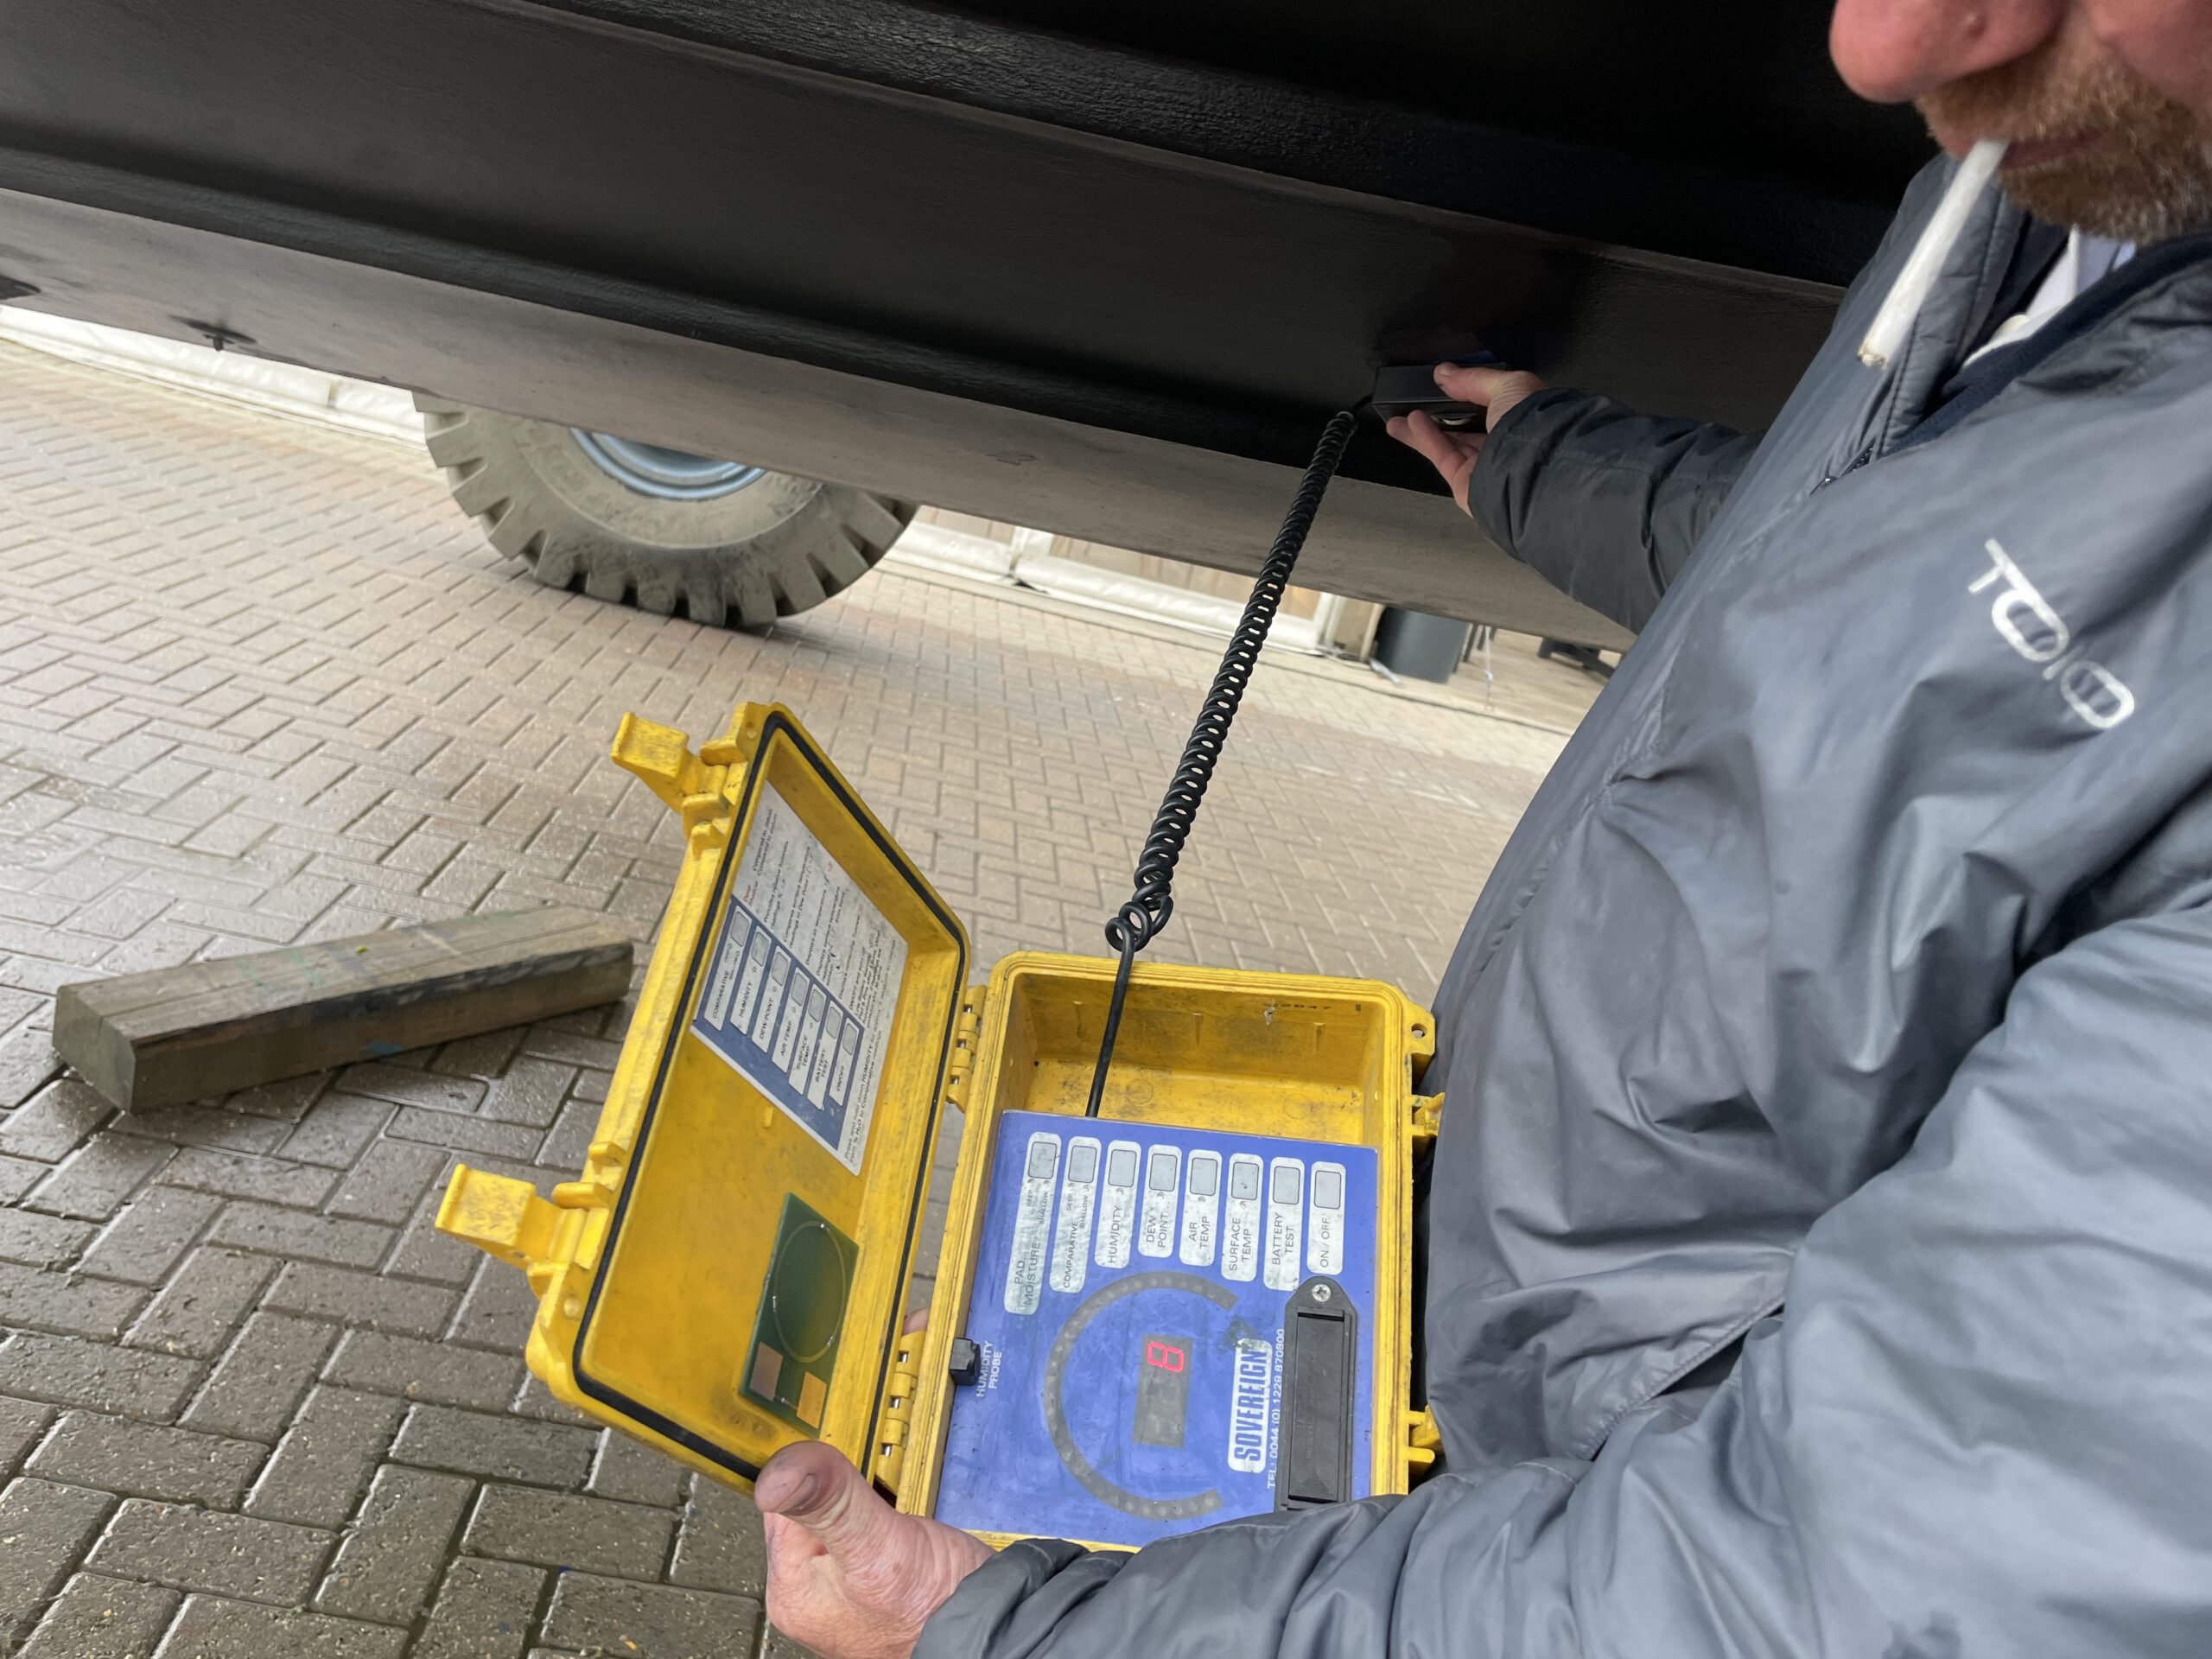
The surveyor does his thing with his moisture tester. The boat is giving off nice low readings “considered to be at the bottom of the range and of no concern”. The only real finding of any consequence is a tiny bit of lateral movement from the starboard cutlass bearing but nothing that required immediate attention, some exhaust lagging to be remade which was done prior to handover and the toilet discharge connection required remaking due to a light degree of seepage where the hose is seated, that was pretty much it. During the post survey phone conversation with the surveyor on the way home from the survey, he tells me, there is absolutely no reason why you should not buy that boat, it’s a good one. When the survey report lands the conclusion states “The vessel was found to be in excellent condition, no attention is required and the vessel is considered to be a very good example of her marque.”
Completion & Handover
Following the successful survey, we formally accept the vessel and move on to paying the remainder balance. We are fully paid up for the vessel by the 12th May and we finally complete formalities and handover on the 15th May. From first contact with the owner on the 12th April and subsequent viewing to fully paid in less than 4 weeks and full completion in a touch over 4 weeks. Not bad going at all!
Handover day arrives, once again my wife can’t make it so her Father comes along instead. After signing all the necessary paperwork and exchanging bottles of alcohol, the previous owner kindly goes through all the ships systems in thorough detail. I have brought along a pen and notepad to take notes and I’m armed with a whole load of questions. As the most recent owner, no one knows more about the boats peculiarities than him, having been a hands on owner himself there are many tips I can pick up from him to familiarise myself quicker. There’s a lot to take in but thankfully it all makes perfect sense. Generously and very conveniently for us, the previous owners have given us use of the mooring until the end of the month so essentially we need to vacate by end of May which gives us a 2 week window to get the boat home to her new mooring…
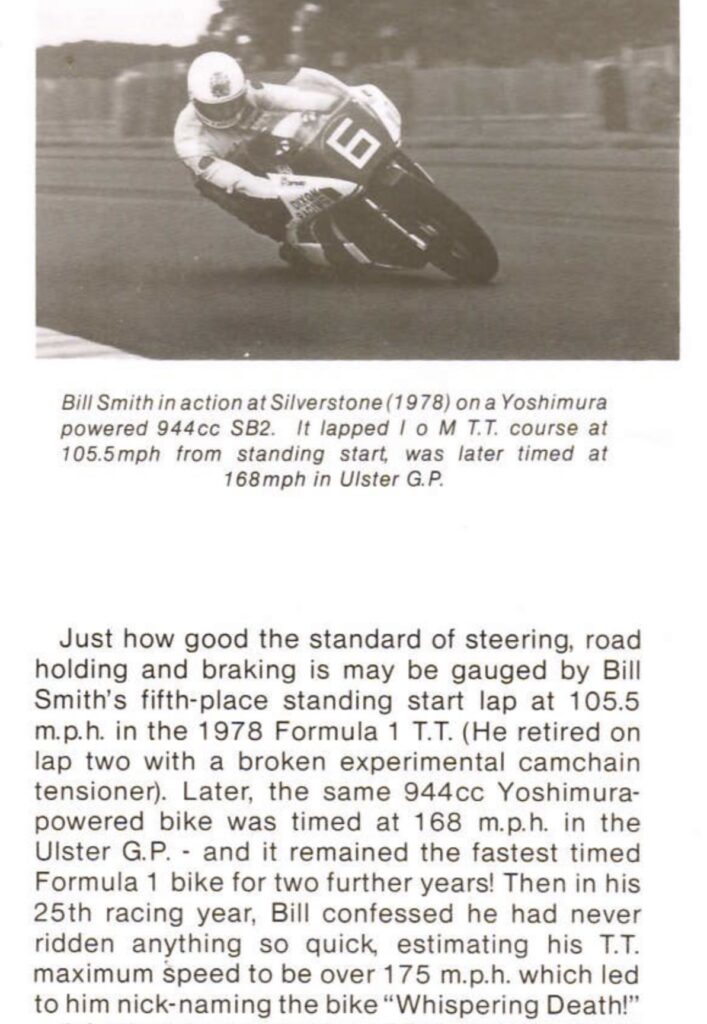
It has been exactly a month since I took delivery of the SB2. Investigating the history has been what I can only describe as a roller coaster ride. Information just keeps on coming in and it is both wonderful and fascinating. I put a post on the Facebook ‘Bimota UK FB page’ asking if anyone knew any information on the Bill Smith 1978 TT F1 SB2 bike. This was before I had made contact with Bill himself. To my surprise, I receive an email to my work address, from Bimota enthusiast Fedor van de Pol who is not on Facebook but had come across the post. He had written a research piece on this very bike merely a year ago. The conclusion to the fantastic article he wrote says “Unfortunately it is unknown what became of the Bimota Suzuki SB2 chassis that took part in the 1978 TT Formula 1.”
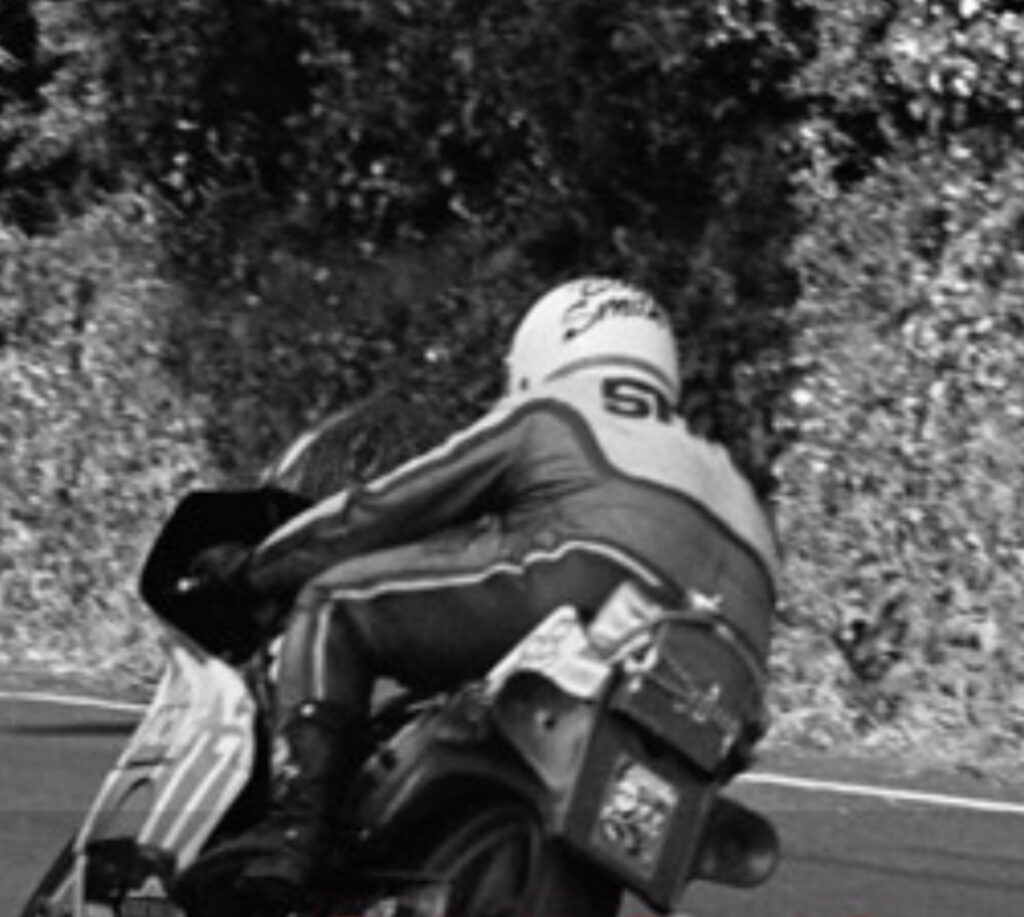
Bill Smith at Governor’s Bridge IOM TT 1978. Photo Source: Paolo Girotti, Facebook.
His piece included many wonderful photos but has never been published due to potential copyright issues with the pictures. Without the photos the article would lose much of its impact. It did point me to some pictures that I hadn’t previously seen that were in the public domain as well as the ones that weren’t.
Bill Smith at Greeba IOM TT 1978. Photo Source: Barry Gollings, Facebook.
Of particular interest, was something I hadn’t previously noticed about the TT bike. With Bill being old school British and weaned on right foot gearshift, this bike had been converted so that the brake pedal and gearchange were on opposite sides.
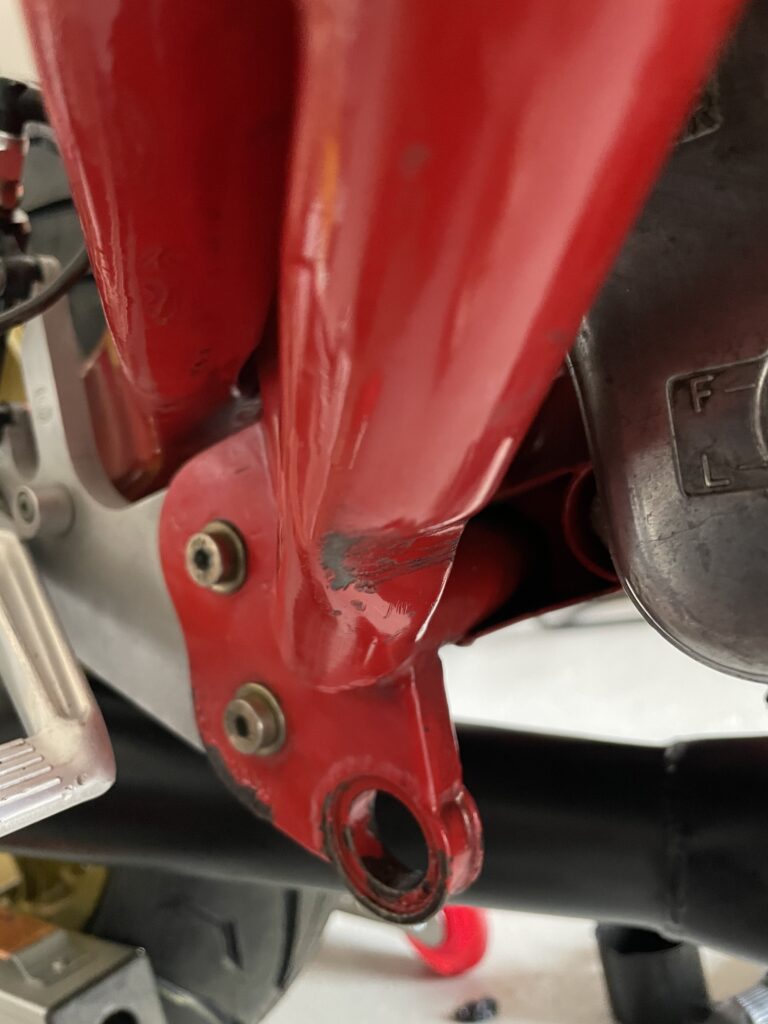
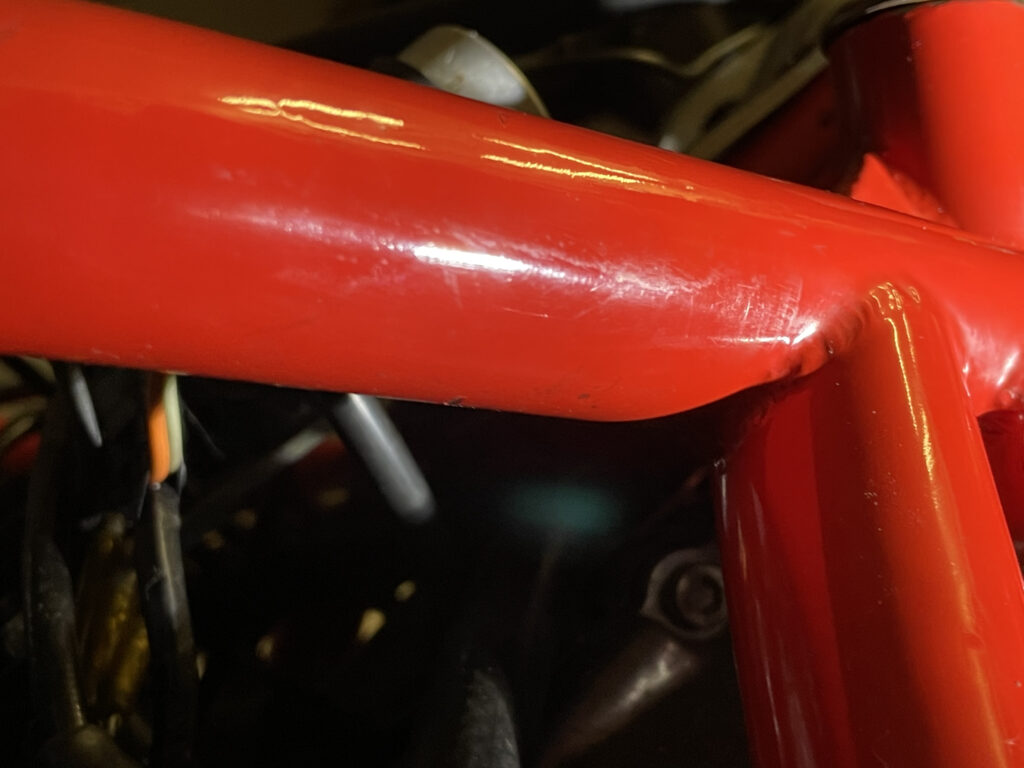
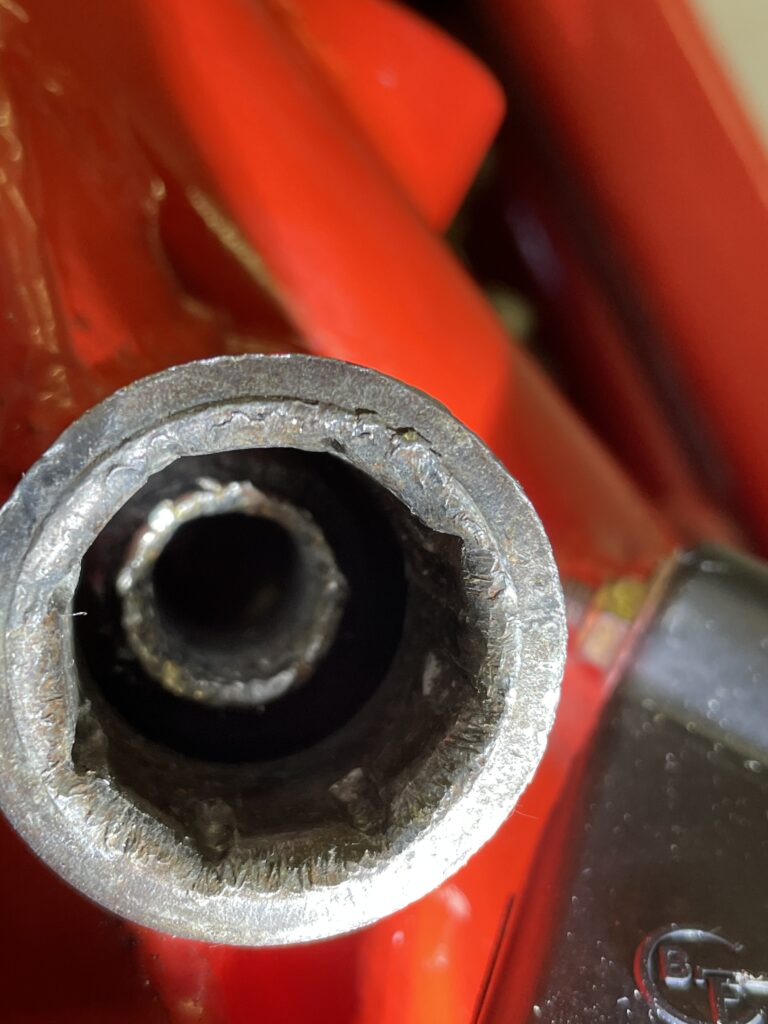
This was incredibly interesting because it explained some damage that I had found on the underside of my frame which at the time of discovery I couldn’t understand how it could have happened.
The brake pedal is a long way away from the damage point. Note the indent features on all SB2’s, the scratches to the finish are from the crossover rod.
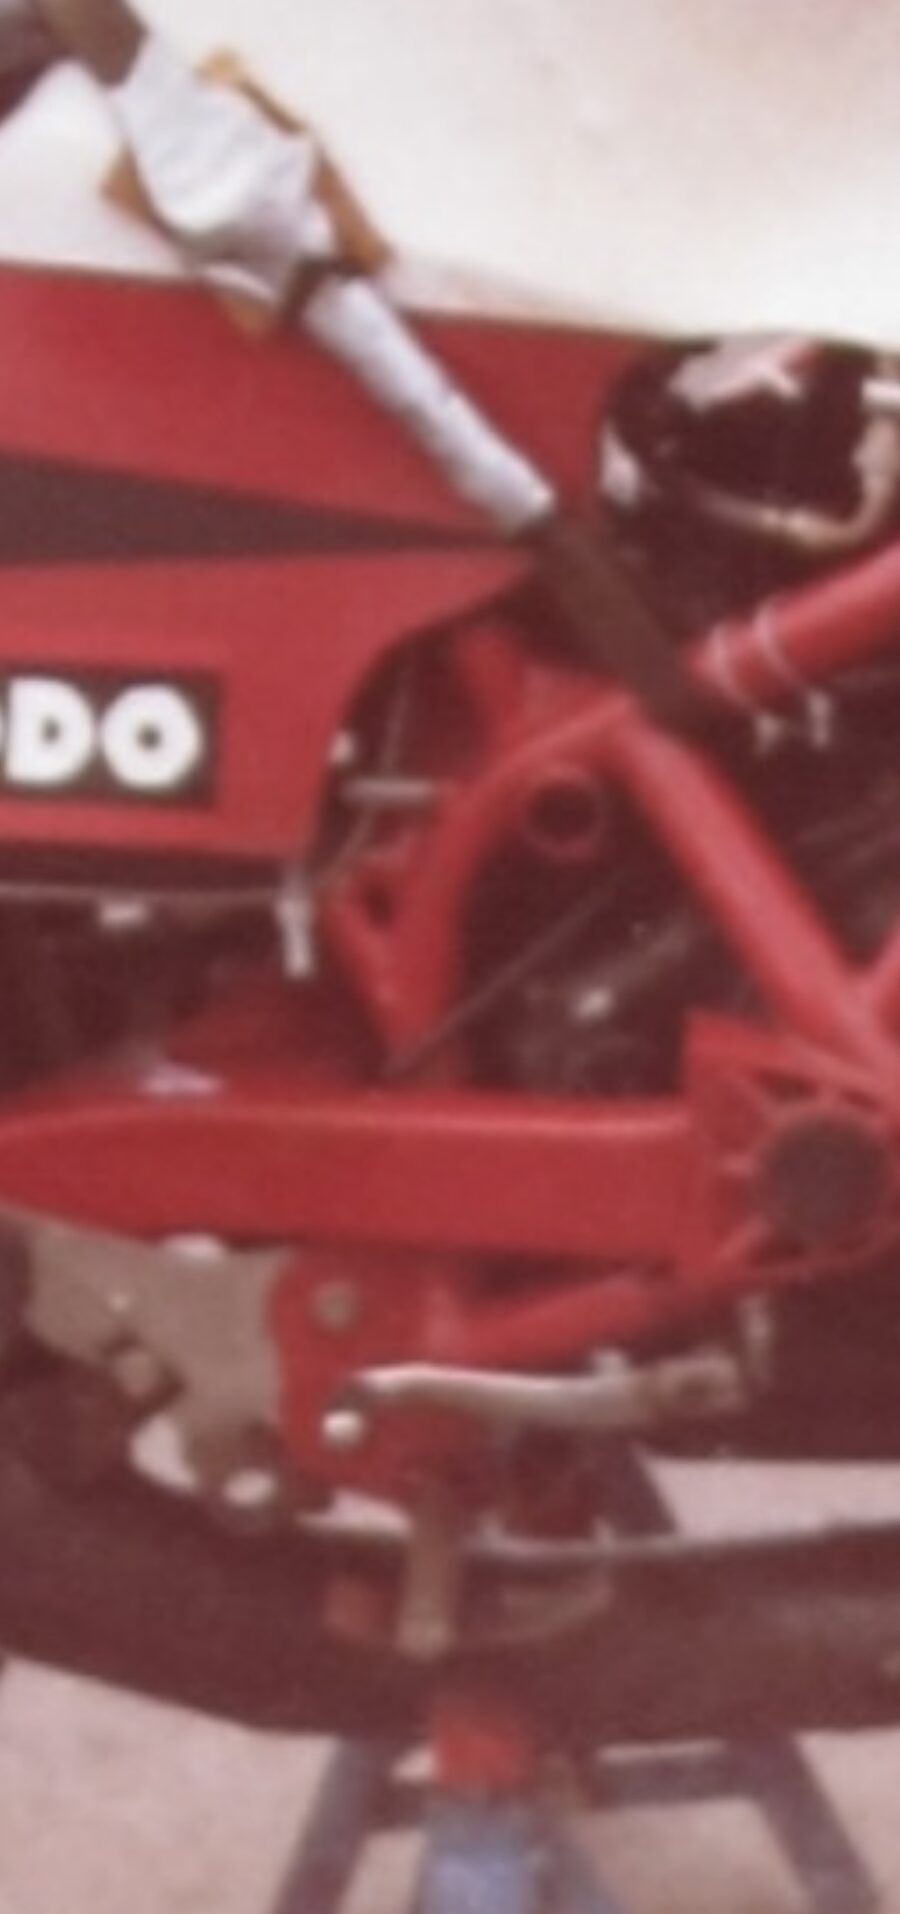
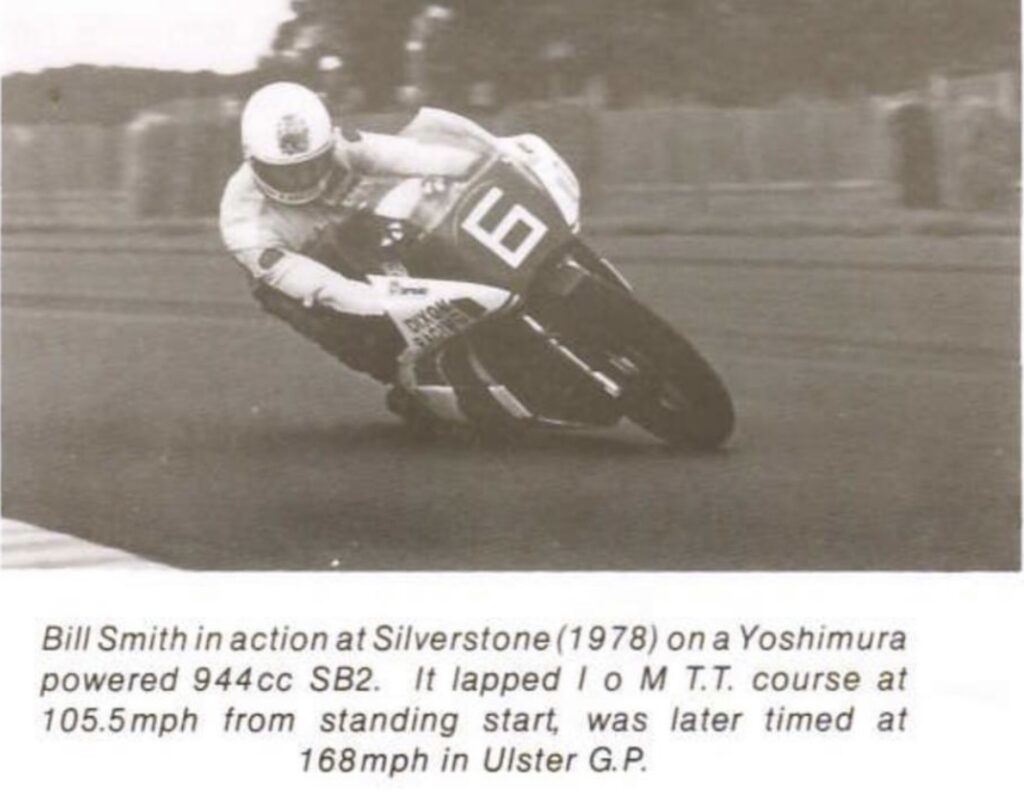
The brake pedal was quite a way from the point of damage and could not have caused it. A close up image of the SB2 in Silverstone trim, reveals the gearchange setup on the right…
A close up of the SB2 in Silverstone trim. Note the gear lever location and the strap fastened around the chassis bar holding the bodywork down.
I imagine that this setup employed a cross over rod. From research I learn that many other SB2 ‘s feature the ‘relieved’ section in the Chromoly chassis tube. It would not surprise me in the least if Tamburini incorporated this by design given his racing chassis design background. Either way, the siting of the gear changer is exactly where the marks occur on the chassis and the marks bear testimony to this day to the right hand shift.
Note the paint flaking where the Axle stand and bar setup was used in the paddock in its racing days.
I’m grateful that the chassis has never been refurbished and is totally original, having these tell tale signs 43 years later, perfectly corroborates the provenance of this machine.
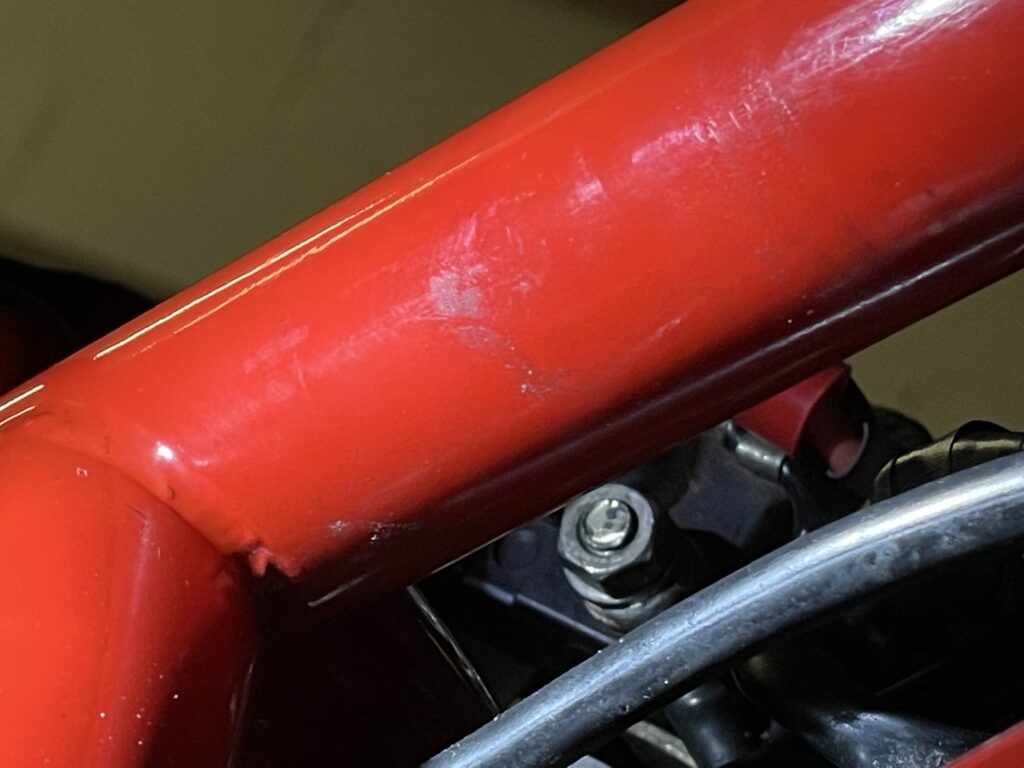
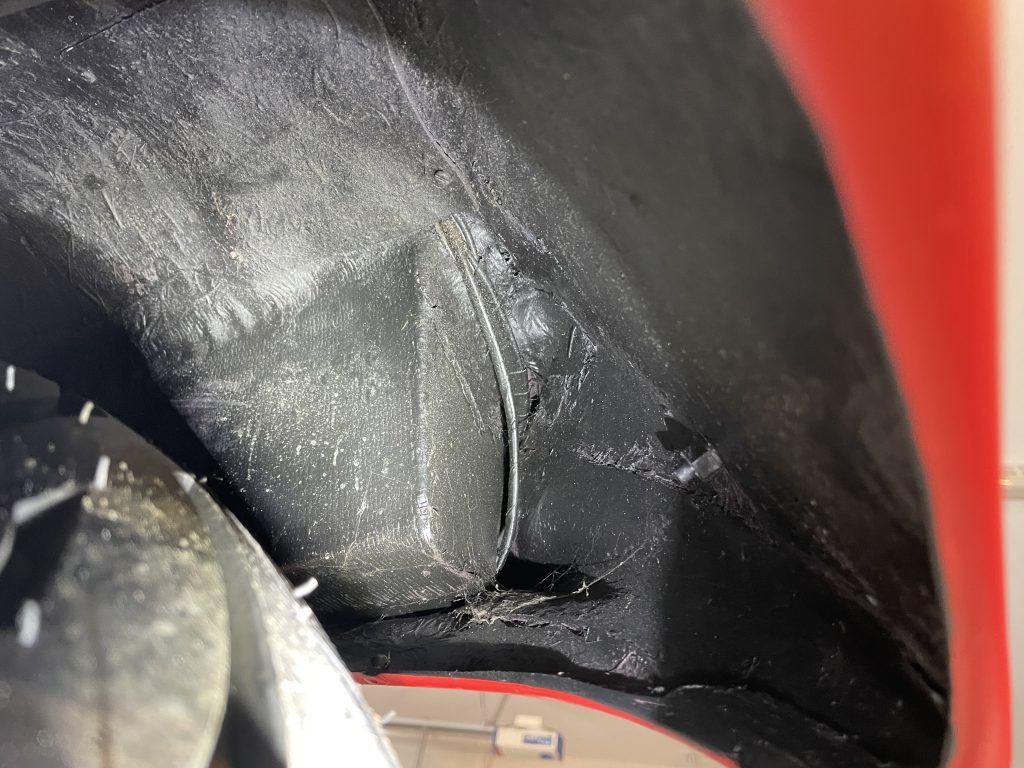
There is further evidence of it’s racing days also. In race trim, the bodywork was fastened down with straps wrapped around the tubular chassis bars.
Note the fastening straps around the chassis wrapping around the base of the seat/tank. Also note the auxiliary tank with filler cap placed on top of the rear tail unit, painted red with a ‘Champion’ decal.The left hand chassis bar showing evidence of the use of straps to secure the bodywork.
Straps marks are still visible to the chassis. These rubbing marks only occur at this point, the rest of the chassis bars are unmarked.
The right hand side strap marks.
The right hand side also has corresponding marks where the straps were positioned.
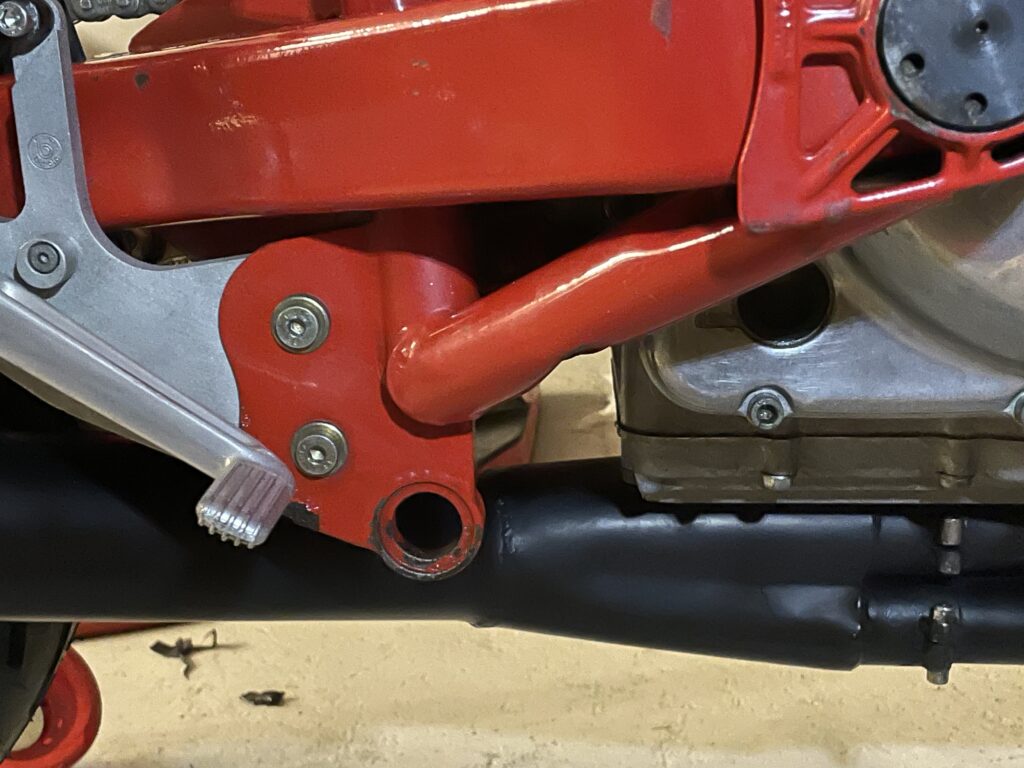
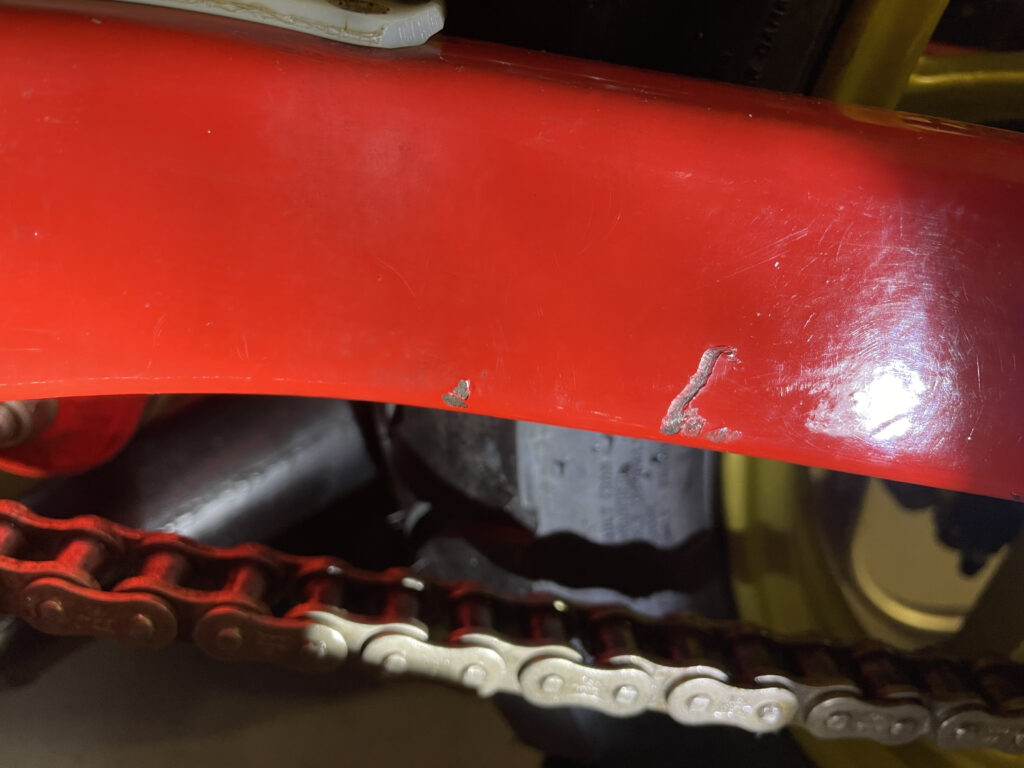
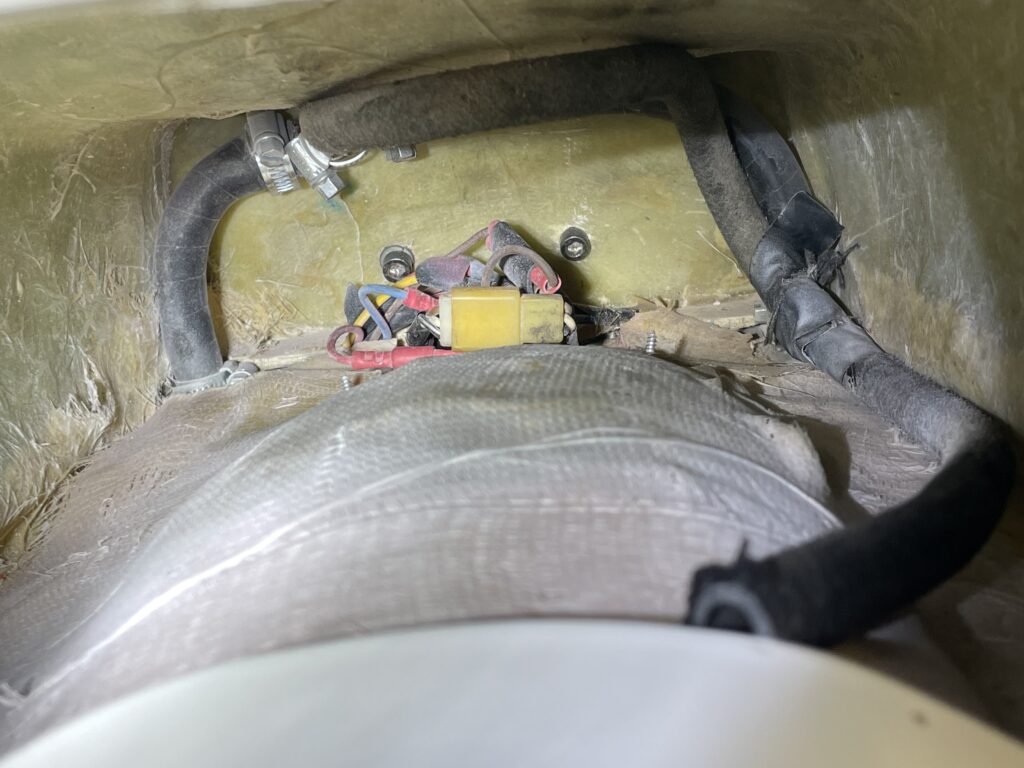
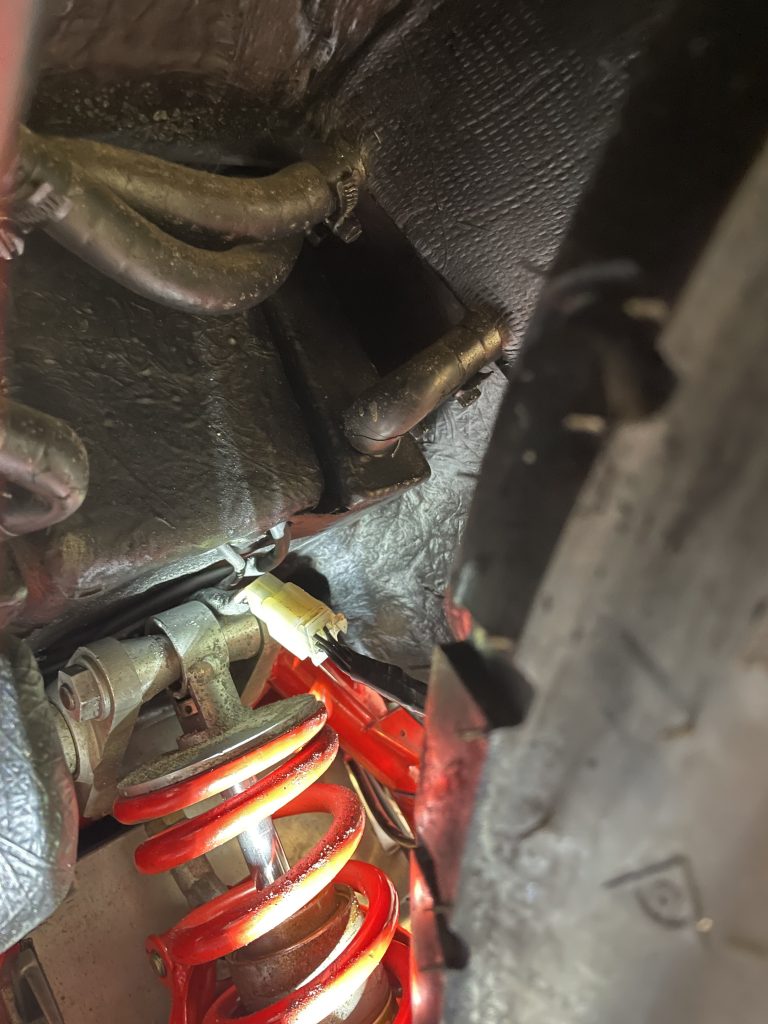
With the rear brake reservoir relocated on its proprietary bracket but on the opposite side now, there is evidence where the mounting bolts for this would have come into contact lightly with the swingarm, likely under compression.
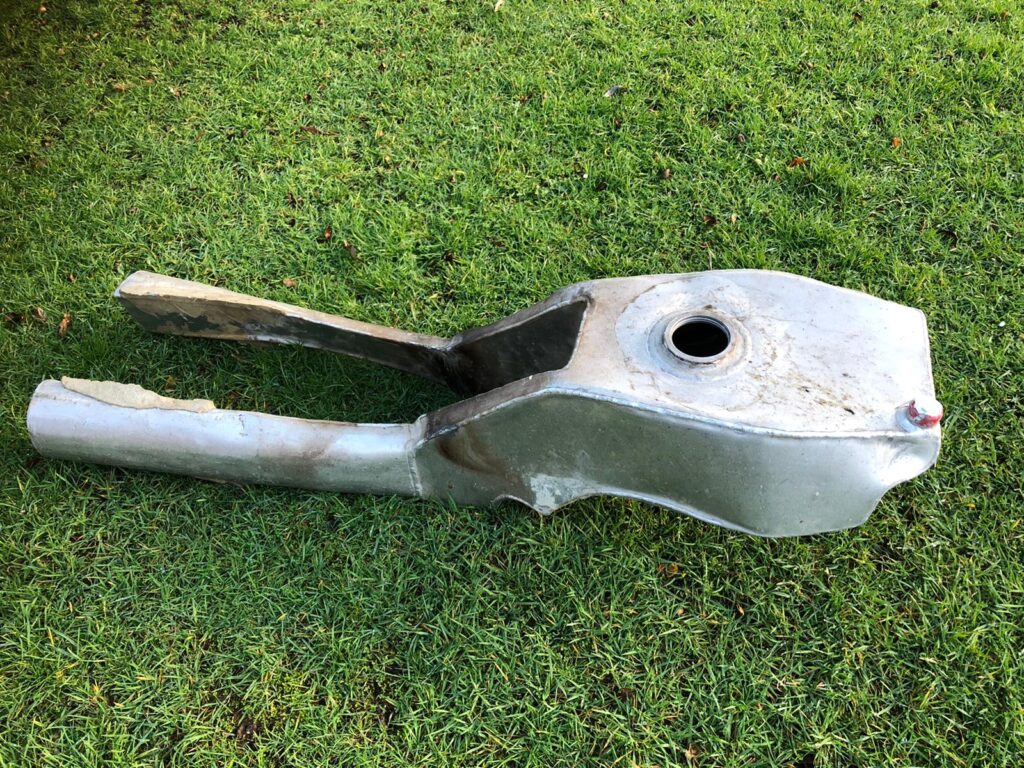
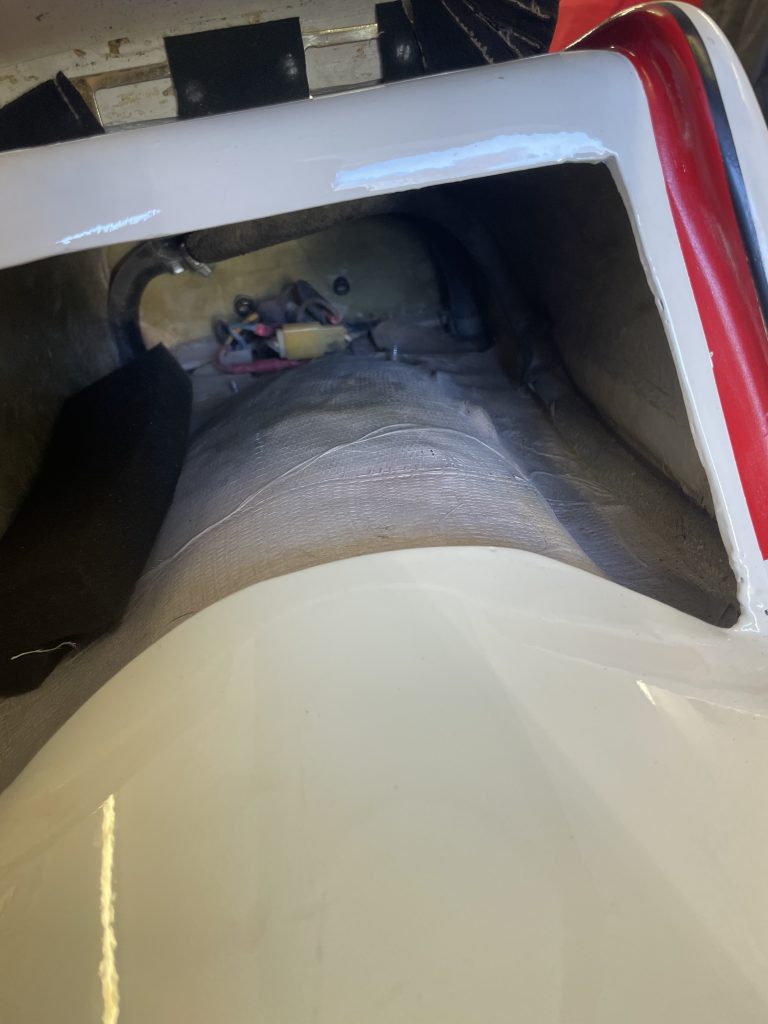
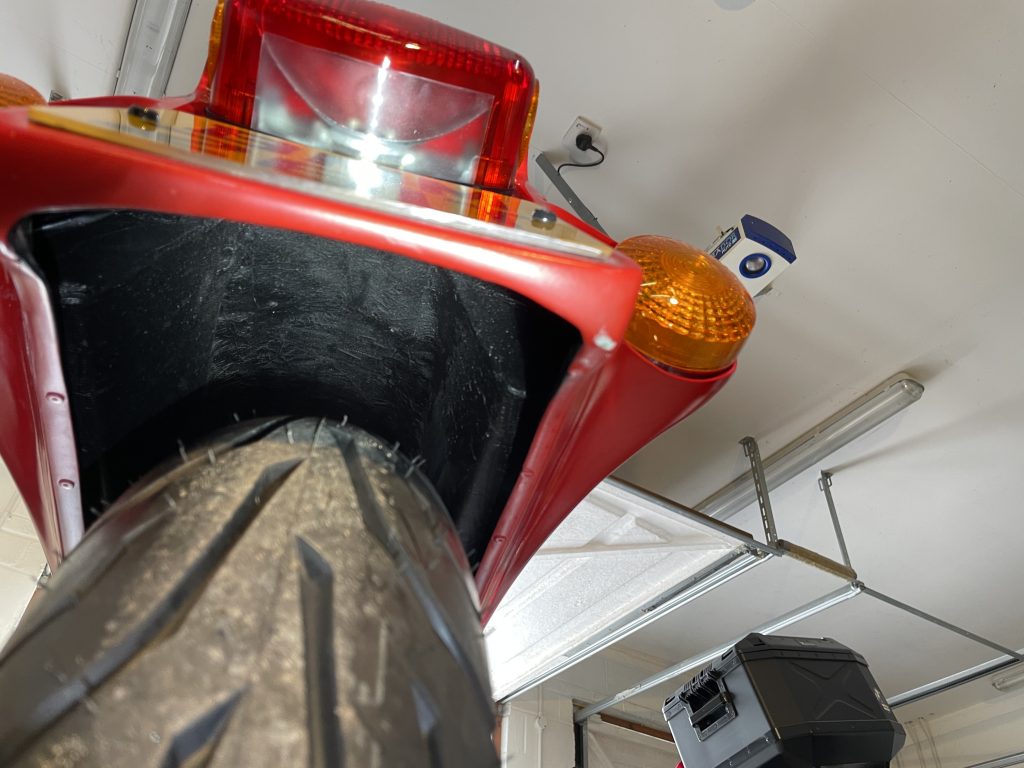
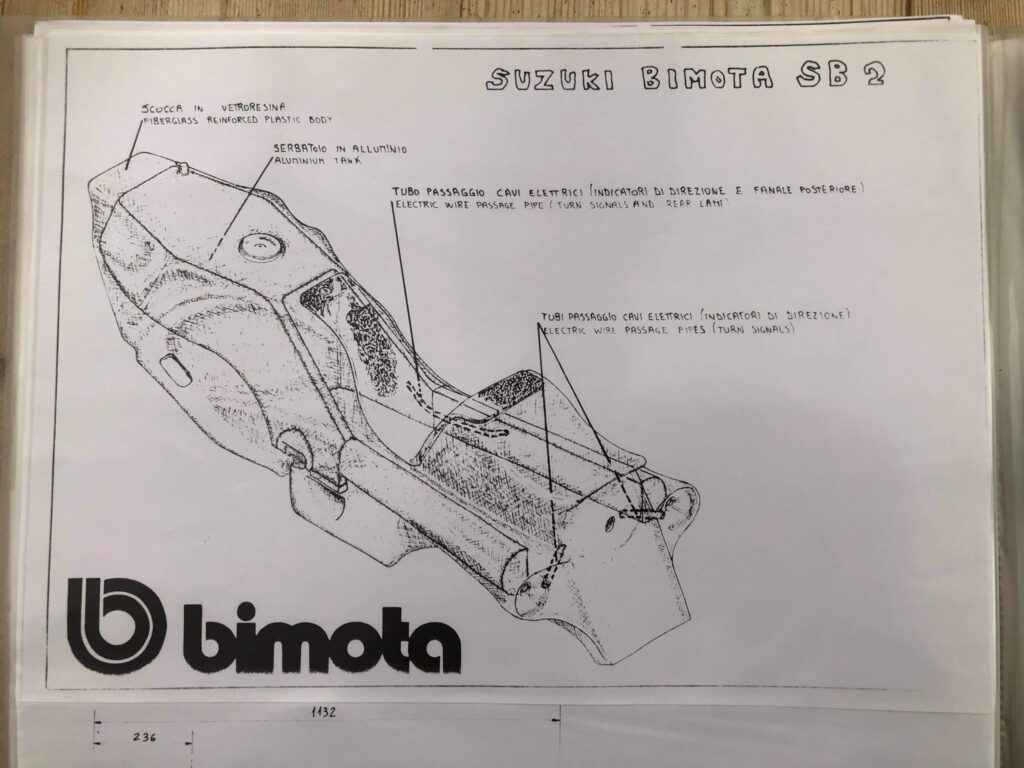
With the tail now removed from the bike and carefully laid on the garage floor, I can now take proper photos of the modified fuel system on this SB2. Below is a reference photo sent to me by a fellow SB2 owner. It shows how the fuel system should have looked…or not…because the one piece main tank with incorporated saddle tanks is totally encased in fibreglass and invisible. You can notice where the rear tyre has contacted with the tail unit and it shows how thick the original tail unit is.
The tail unit of a standard SB2.
This unit would have housed a one piece fuel tank made in aluminium and shaped to include the saddle tanks on either side as a single unit.
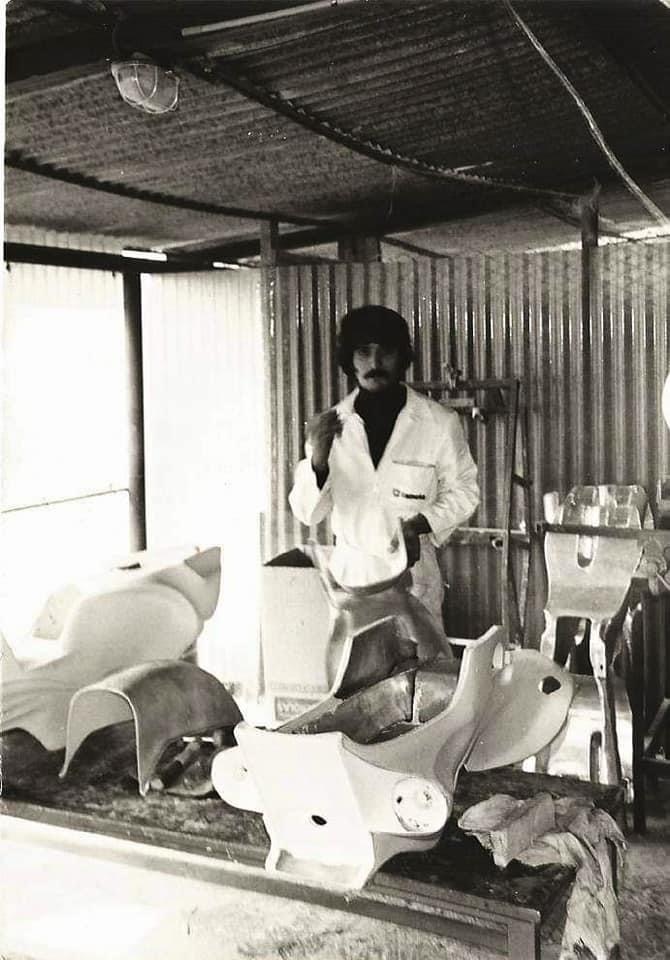
The standard tank unit which would be contained and encased in fibreglass within a standard tail unit.Bimota operative Dervis Macrelli (described by Motorcyclist online as a frame making wizard) preparing the one piece tank/seat unit. Note the metal tank standing up on the far right and the metal seat hump support on the table in between the two seat units. It is purported that Bimota lost money on each SB2 hence the subsequent later SB2 80 and SB3’s had the more simplistic and conventional rear subframes and bodywork.
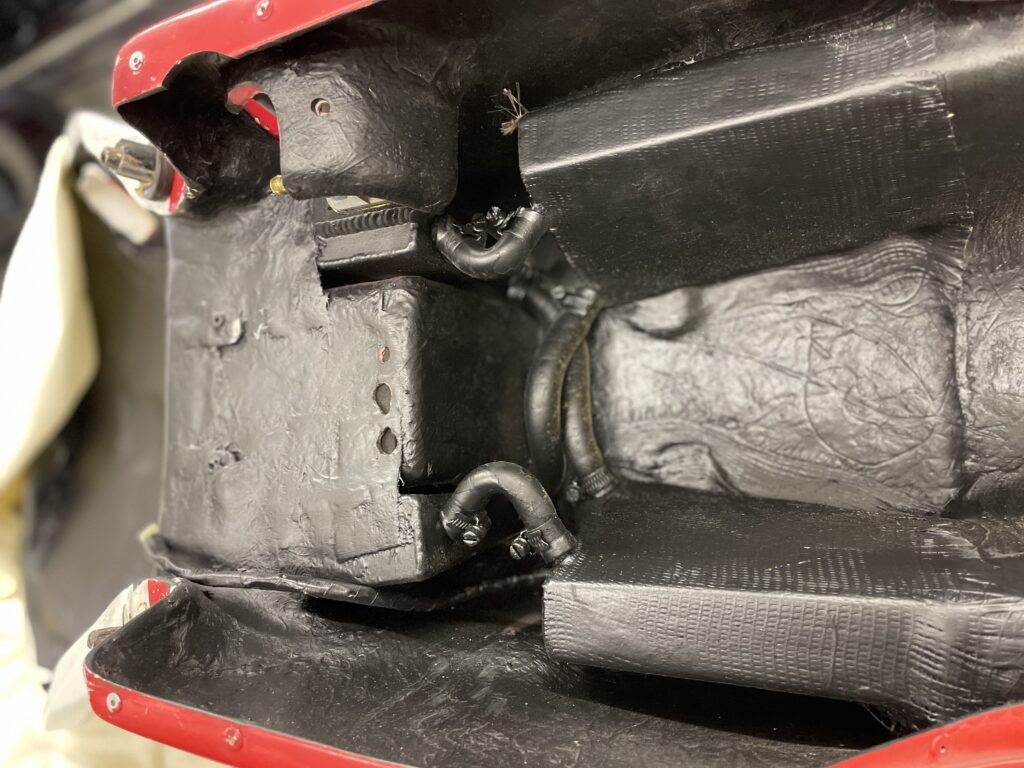
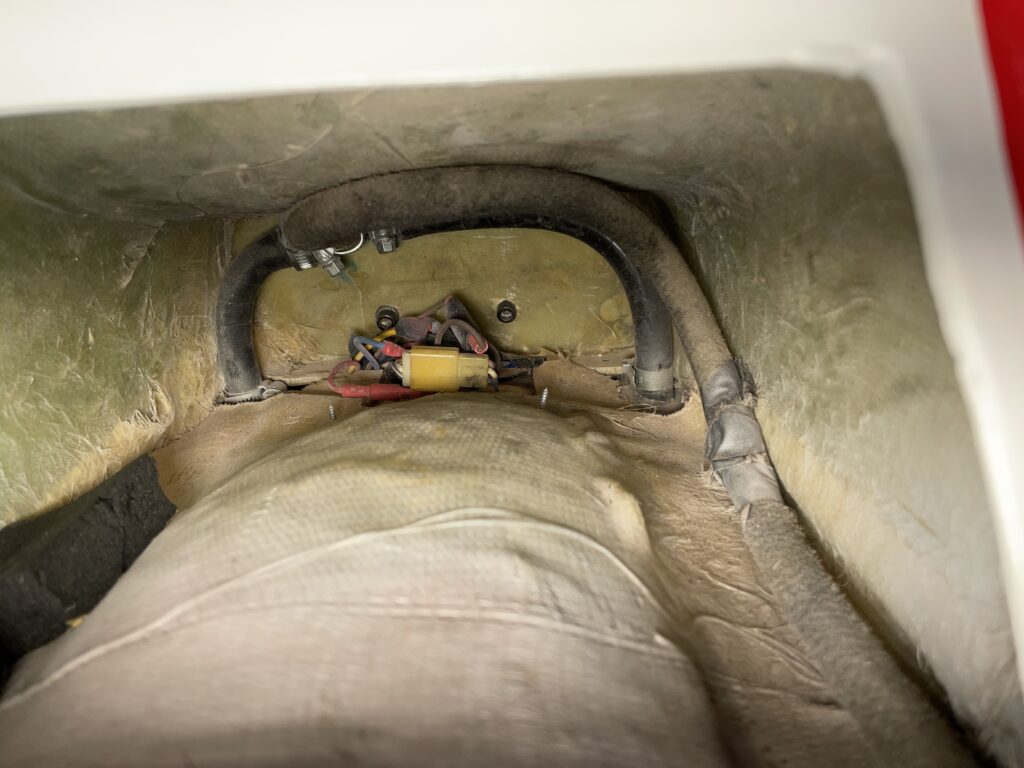
This is the fuel system on SB2 #094
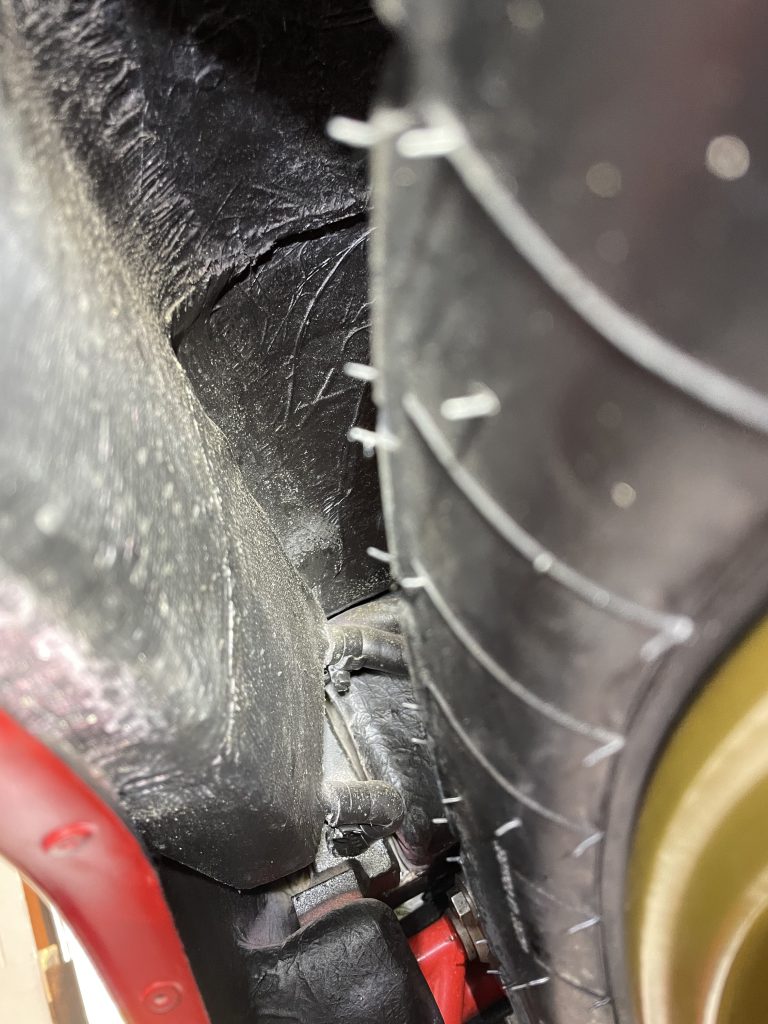
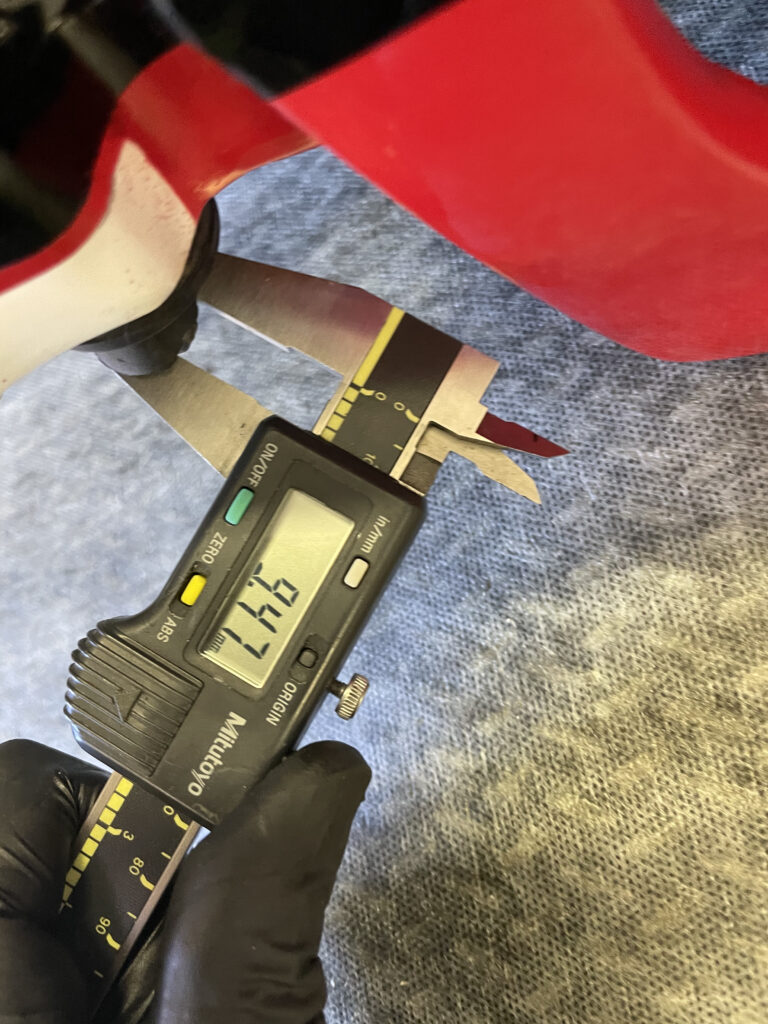
Note the hollowed out rear wheel well. This material is far thinner than the stock item. Perhaps to both reduce weight and provide more tyre clearance.
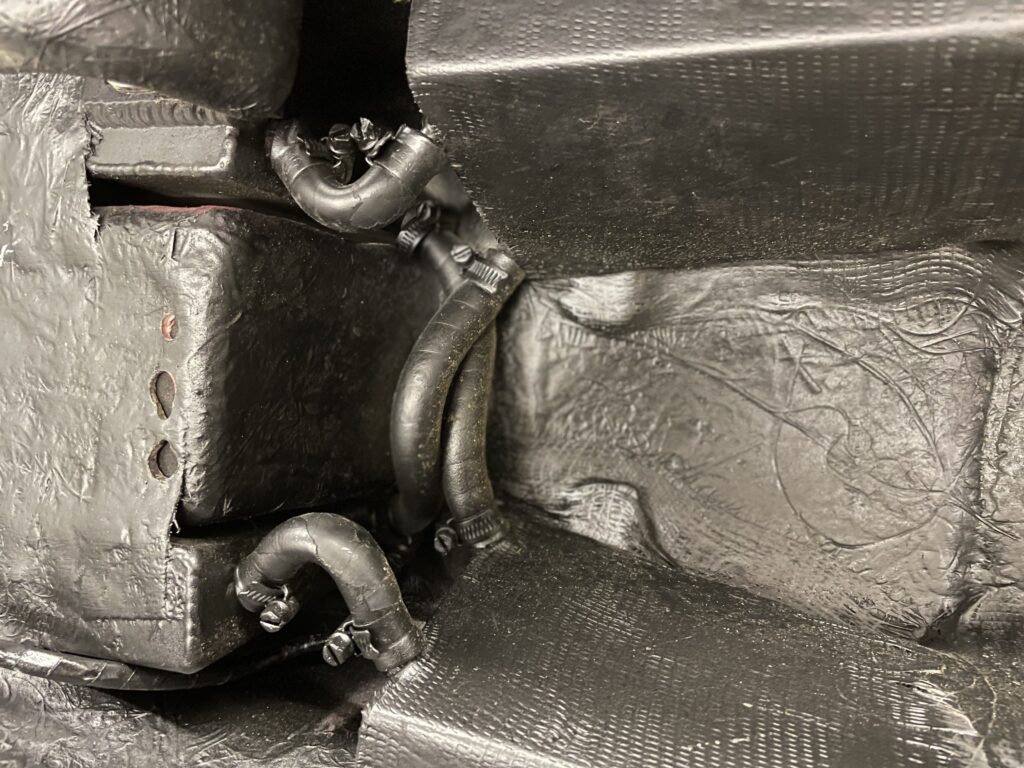
The whole underside is modified from the base of the main tank to the separated saddle tanks that are now detached and incorporate balance pipes at the front and rear between them.
Note the crossover balance pipe array where the saddle tanks join the main tank. Evidence of some fabulous welding around the fuel tap.
The standard tank unit has an inherent weakness where the fuel tank can split at the point that the saddle tanks meet the main unit.
A close up of the fuel pipe arra
By separating the tanks, any flex will not result in a cracked fuel tank while the balance pipes are connecting the saddle tanks to the opposing sumps on the main tank unit.
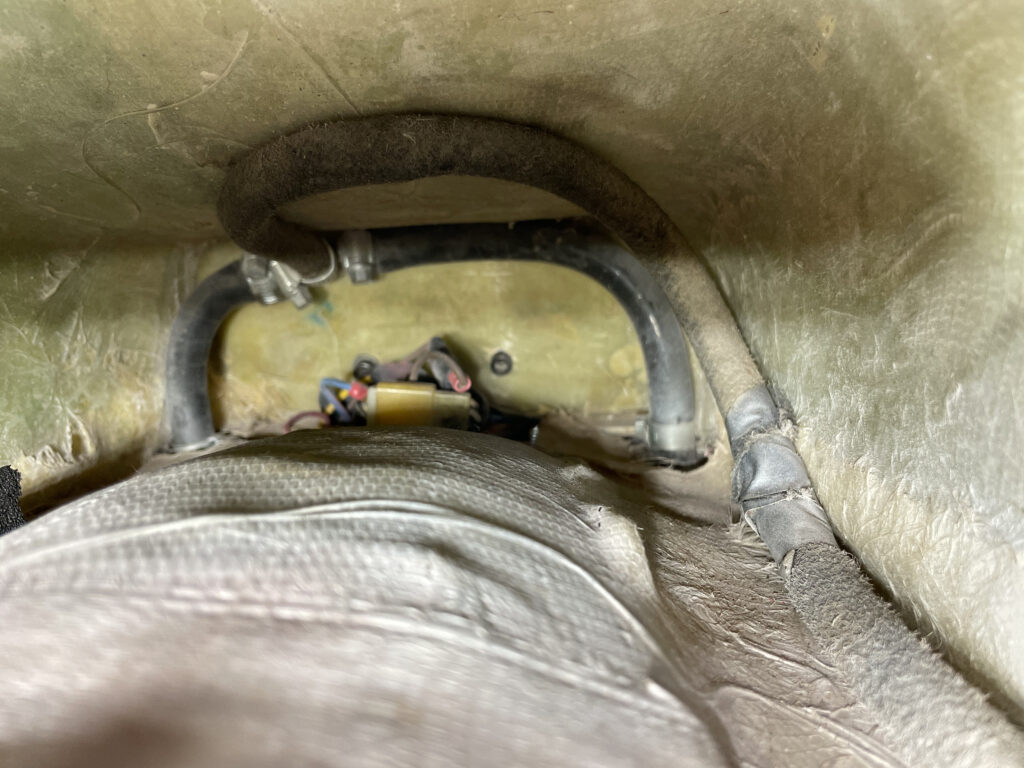
Cross over balance pipes in the rear clam. This pipework would feed the main tank with fuel from the auxiliary tank, The tape most likely protected the hose where it exited the bodywork, for which there are signs of a repair to this area.
In the rear of the tail there are further crossover balance pipes between the saddle tanks. The additional hose that is tee’d in tucks down into the depths of the seat unit but it leads nowhere.
The open pipe would have been connected to a fuel tap on the TT trim bike. How I wish the auxiliary tank was still about!!
I retrieve it and confirm that it is completely open. Blowing compressed air down it send the air straight out of the breather at the front of the main fuel tank.
The auxiliary tank can be seen on the tail of the TT bike, sporting a Champion sponsor decal.
This would have transferred fuel from the tail mounted auxiliary tank and fed it into the saddle tanks back in the day. There is black tape wrapped around the hose still where it would have exited the bodywork.
By another happy coincidence, another line of enquiry on the Bimota forum asking about ‘Galleria Bimota’ in Cranleigh who were the importers in the 90’s and who sold this ex Dixon bike in 1997, yields an unexpected response.
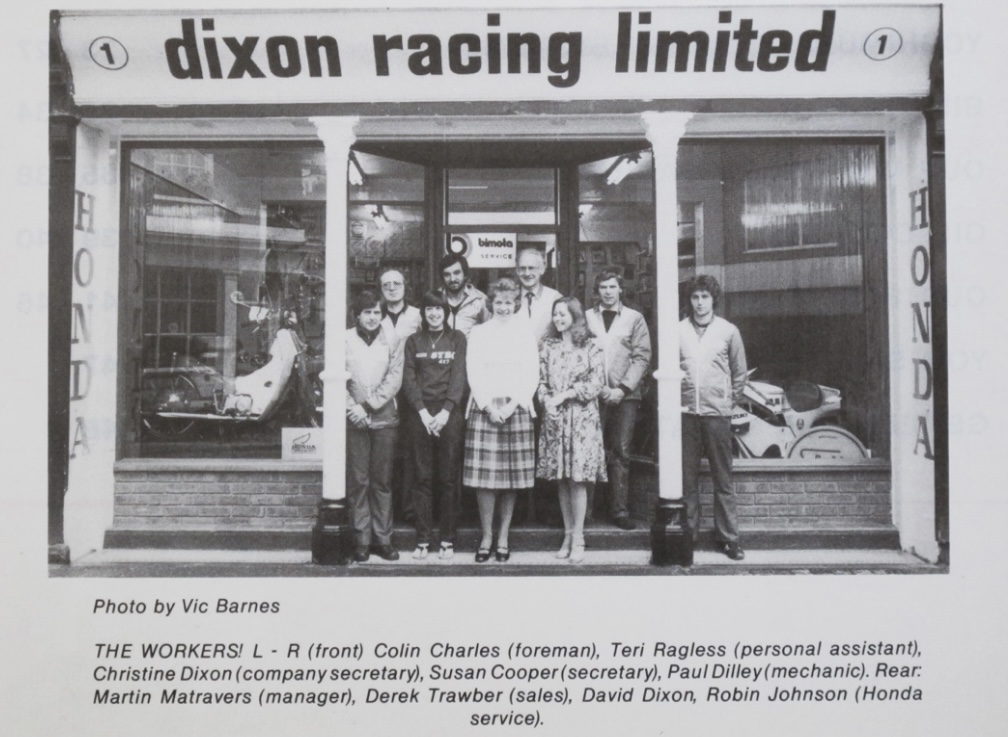
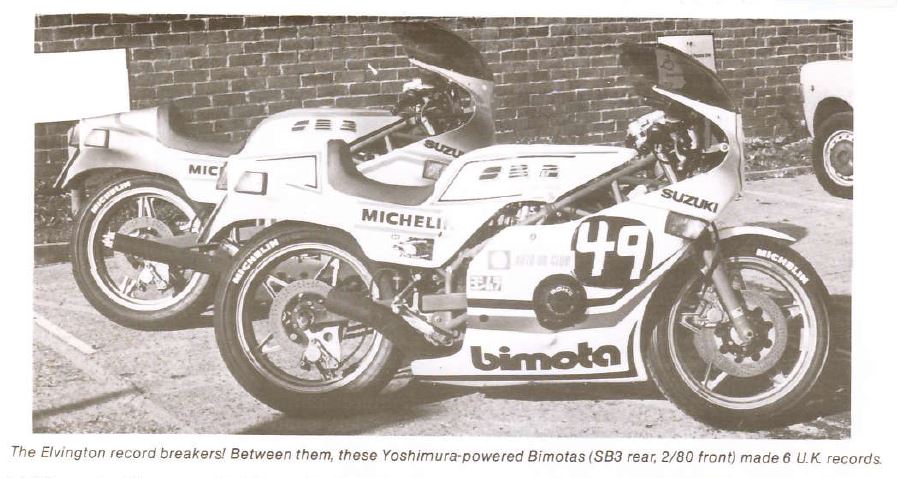
Enter Colin Charles into the frame. Colin was the workshop manager for Dixons Racing in the late 70’s until the 80’s. He built all of the Dixon Bimotas including the Elvington title winning SB2/80 and SB3 and….. worked on an SB2 race bike for TT rider Bill Smith!!
Colin has the most time enduring archive of all time, hand written notes that he has kept to this day. He is able to provide a whole new angle of information and some fascinating insight as well as sharing some wonderful experiences.
I learn from Colin that the bike was sold to Bill Smith on the 15th May 1978. It had the special Yoshimura engine which his notes say was 944cc but he is sure that it was 984cc. The engine was over bored and had a stroked crankshaft. After it blew up (at the TT) the crankshaft was shot and fitted with a standard crank making it 944cc. The bike was converted to r/h gearchange and l/h brake. Colin had just joined Dixon Racing and did not have anything to do with the bike until later.
His detailed entries included information of when and where it raced and other notes;
25th May 1978, practice at Oulton Park, front brake leaked, seat/tank cracked.
Bob White (Suzuki Chester) prepared the bike for IOM.
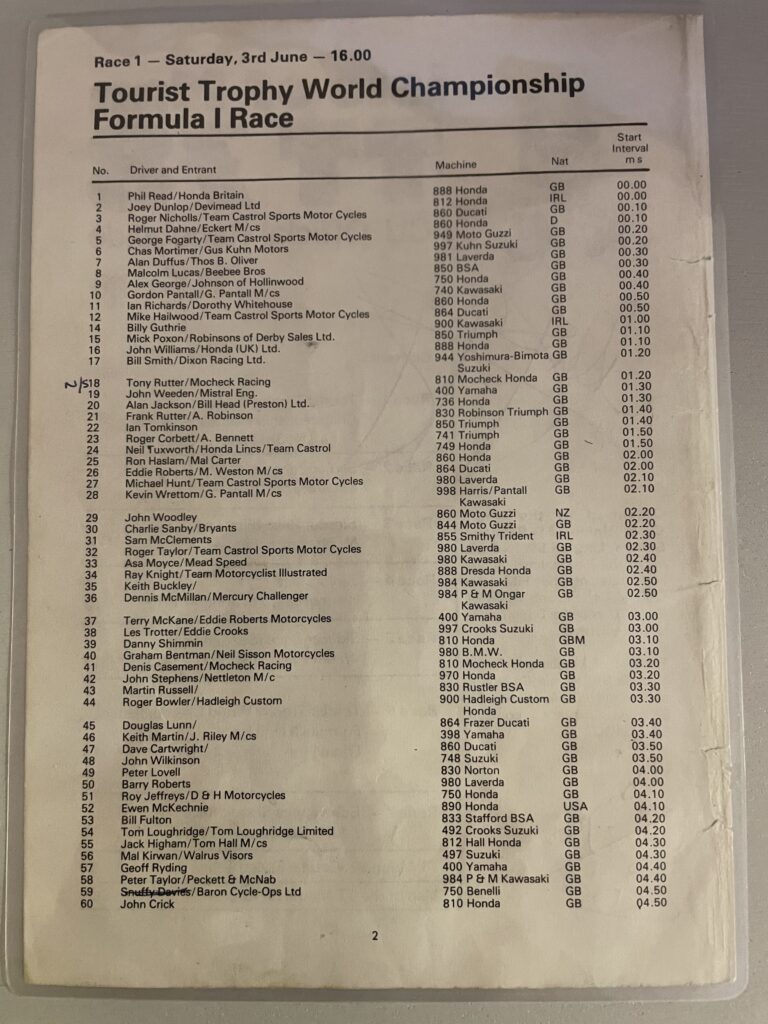
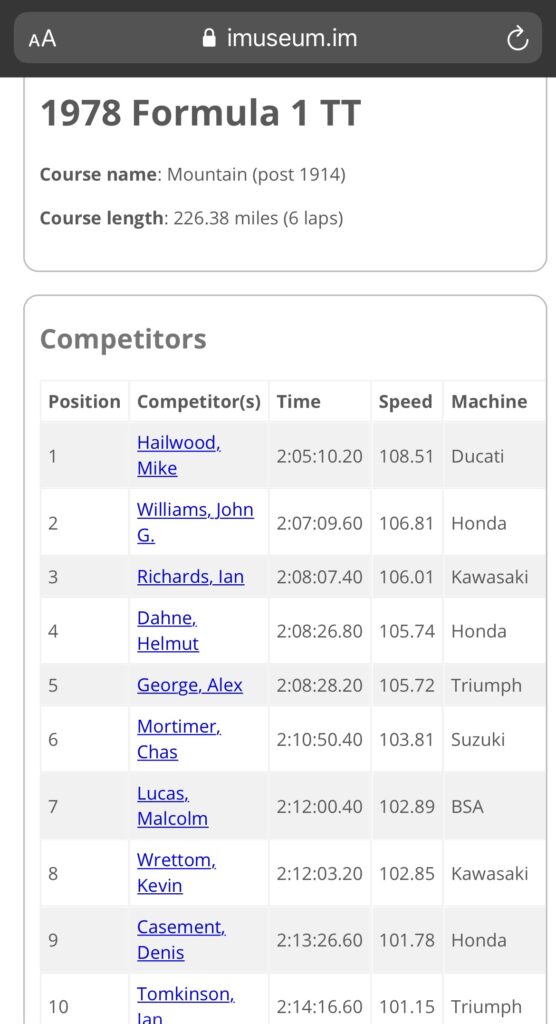
3rd June 1978 IOM F1 TT race, failed after 1 1/2 laps as No.17.
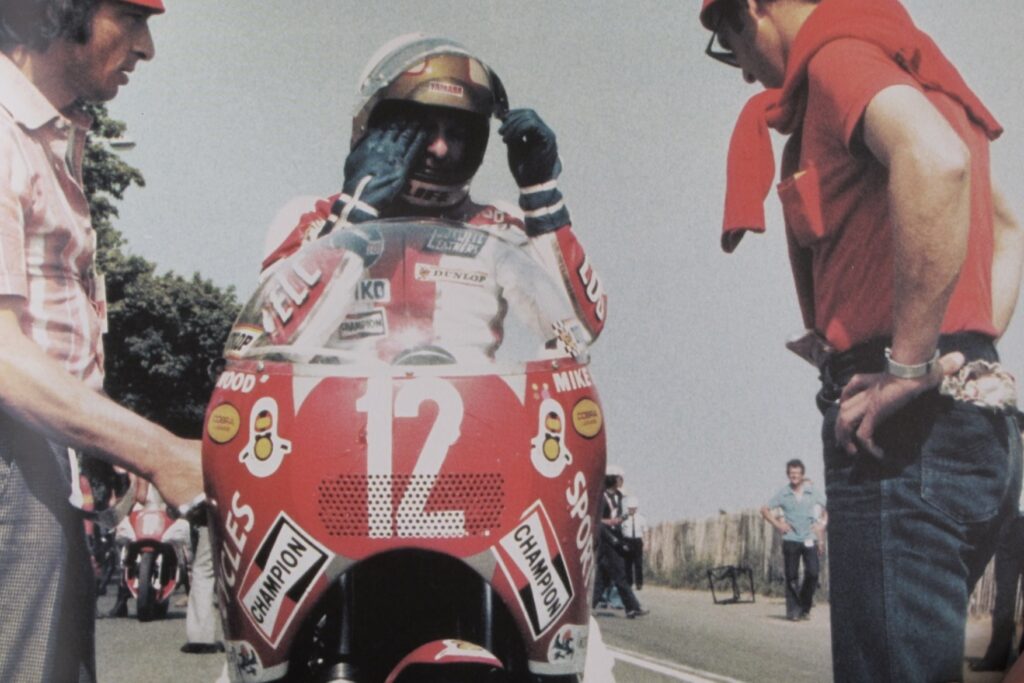
Mike Hailwood (No.12 Ducati) at the 1978 TT, Bill’s Bimota SB2 (No.17) in the background
1978 Ulster GP practice, fastest lap in practice at 168mph.
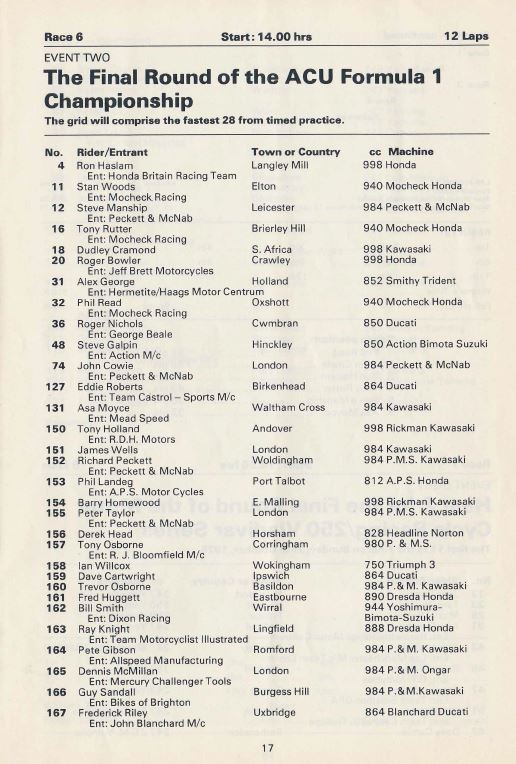
Ulster GP 1978 programme, Bill would have run under the No.8 but it was not meant to be…
Crankshaft snapped, did not race.
Extract from the Dixon Racing catalogue. The SB2 sporting the No.6 this time in Silverstone trim.
Silverstone GP raced but problem with front brake, finished 10th.
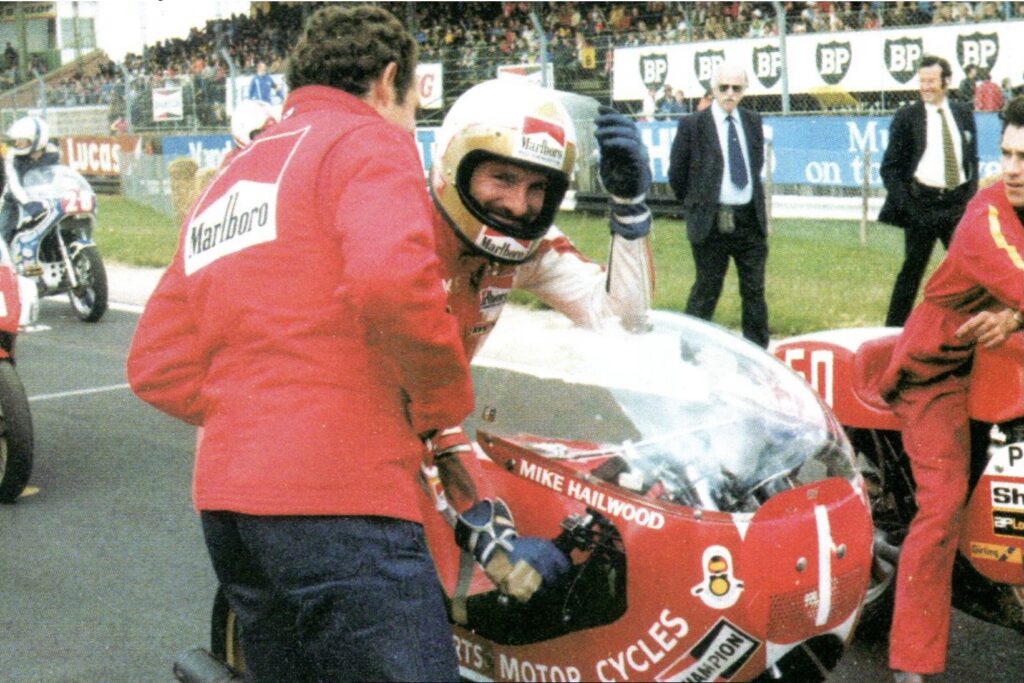
Mike Hailwood at the Silverstone GP, once again, Bill on his SB2 is poking its front wheel into the picture right behind Hailwood on the grid.
Brands Hatch 28th October 1978 raced by Bob Smith (no relation) finished 12th after a bad ride.
Although the Programme shows Bill Smith as the entrant, Bob must have taken his place after the programme was printed. According to Colin’s notes it was Bob Smith racing on the No.162 bike.
The race engine from this bike was subsequently fitted to the Dixon Racing record setting Elvington SB2/80 road bike so they could continue their development.
Extract from Dixon Racing catalogue.
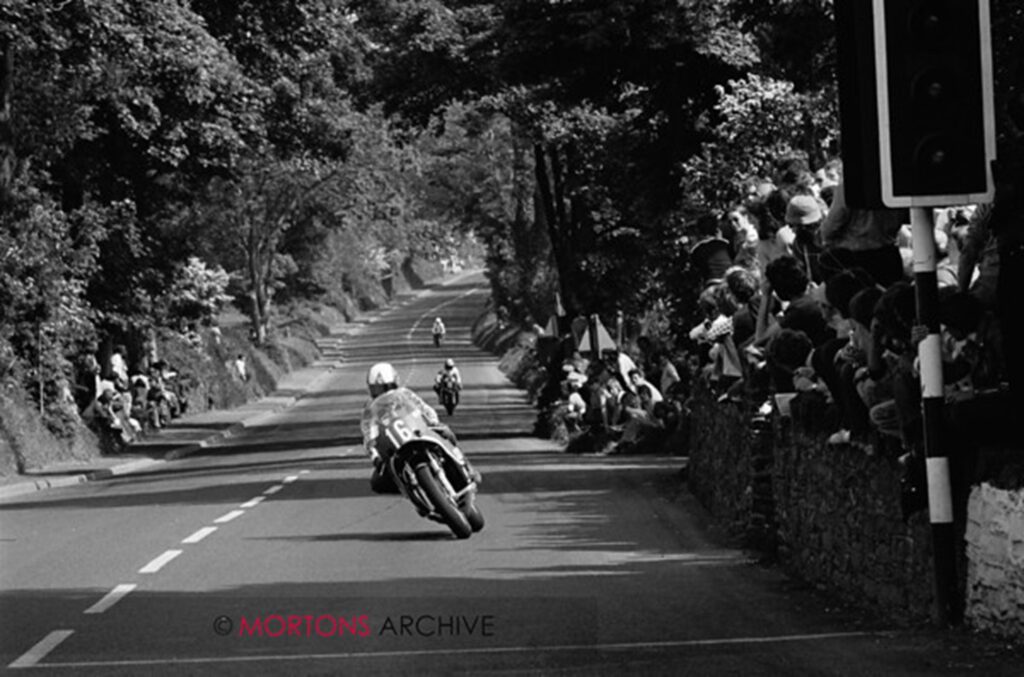
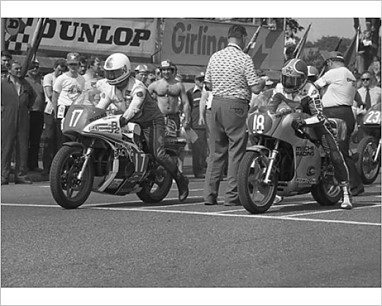
I understand from Colin that Yoshimura ran the engines very highly strung, the idea being that it only needed to hold together long enough to finish a race, twice it didn’t, although as reported by Bill Smith, it was a very fast bike and in fact the bike that came second to Mike Hailwood at the TT was John Williams on bike No.16, who in that TT was running first on the road, both Tom Herron No.18 in second and Bill No.17 in third had gained on him in the first lap alone demonstrating the available pace and hinting what could have been if the cam chain tensioner hadn’t failed in that race taking the crank with it!
Tom Herron’s Mocheck Honda also failed in the race.
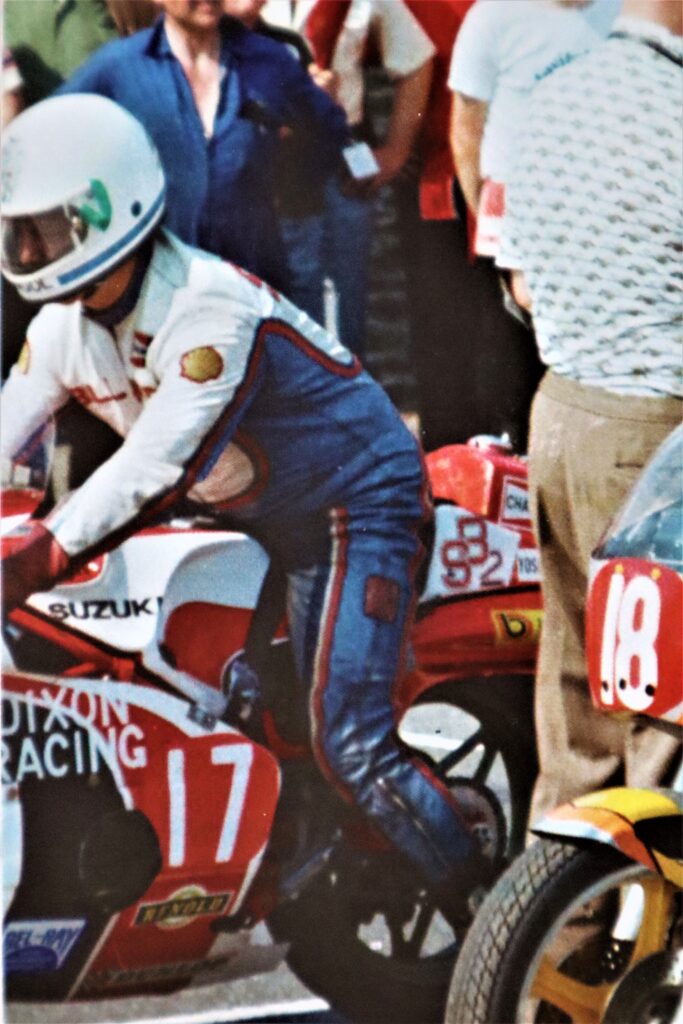
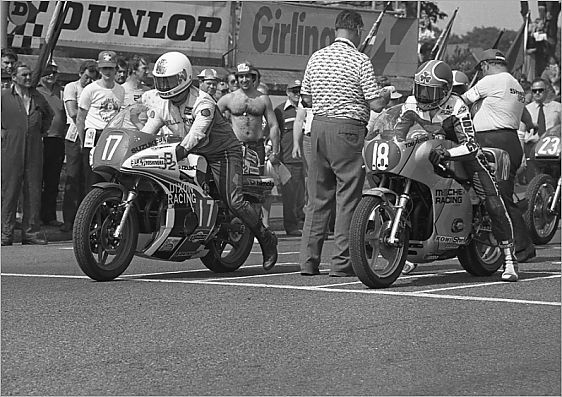
Tom Herron No.18 Mocheck Honda and Bill Smith No.17 Dixon Racing Yoshimura Bimota Suzuki SB2 on the starting grid preparing for take off…
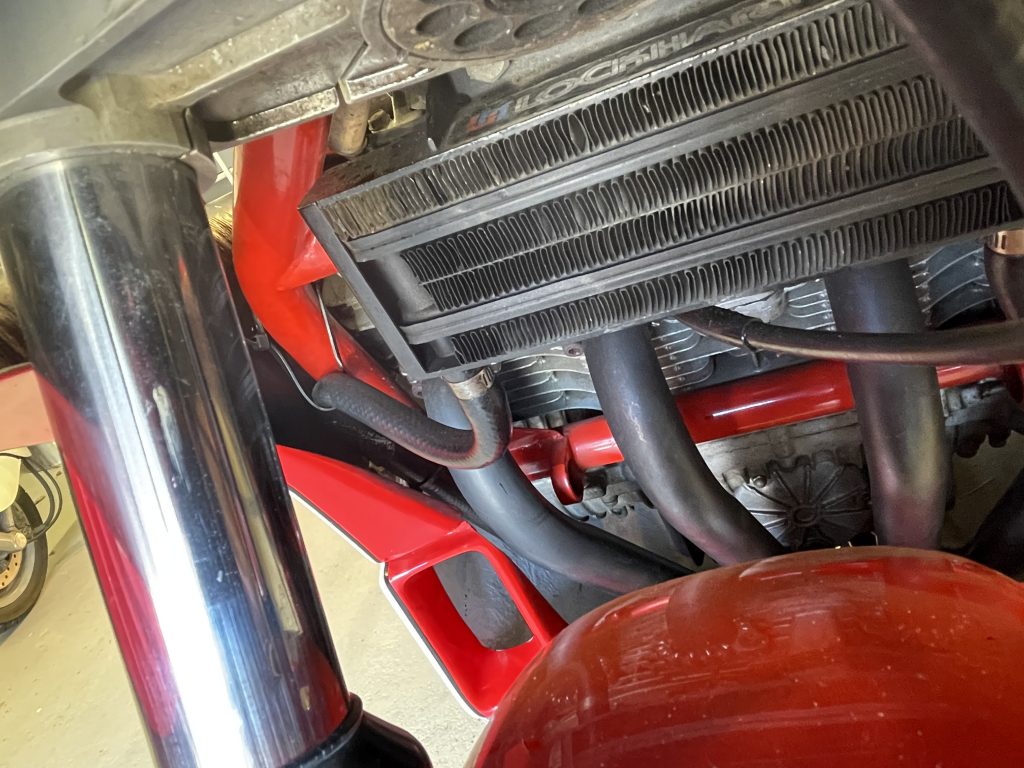
Colin later detuned the engine a little for reliability while still setting the Elvington records and the old SB2/80 is still around to this day. Bill’s bike was subsequently fitted with the Dixon Racing upgraded Yoshimura 850cc GS750 engine and Lockhart oil cooler as fitted to the other fully optioned Dixon customer bikes.
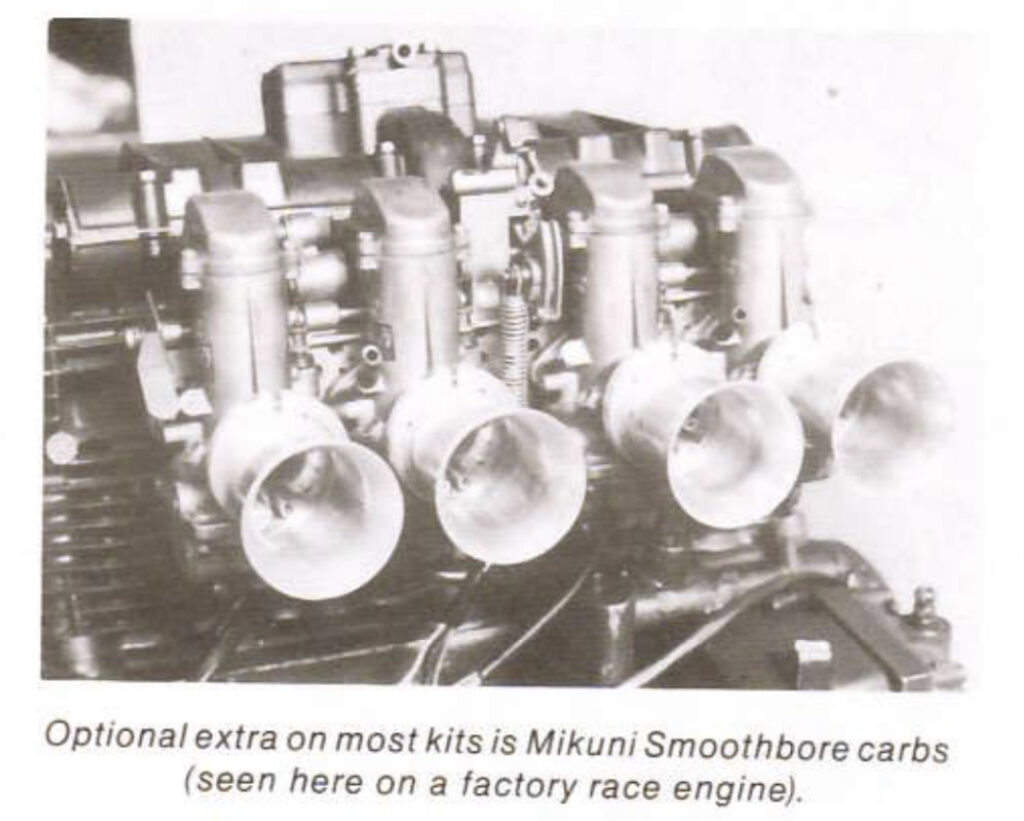
Yoshimura 850cc engine kit for GS750 engine. (Extract Dixon Racing catalogue)Optional Mikuni smoothbore carbs (Extract Dixon Racing catalogue)
Given the frequency with which the highly strung Yoshimura engine was failing, I’m perhaps grateful that a less highly strung lower maintenance unit was installed, complete with the Mikuni Super carbs.
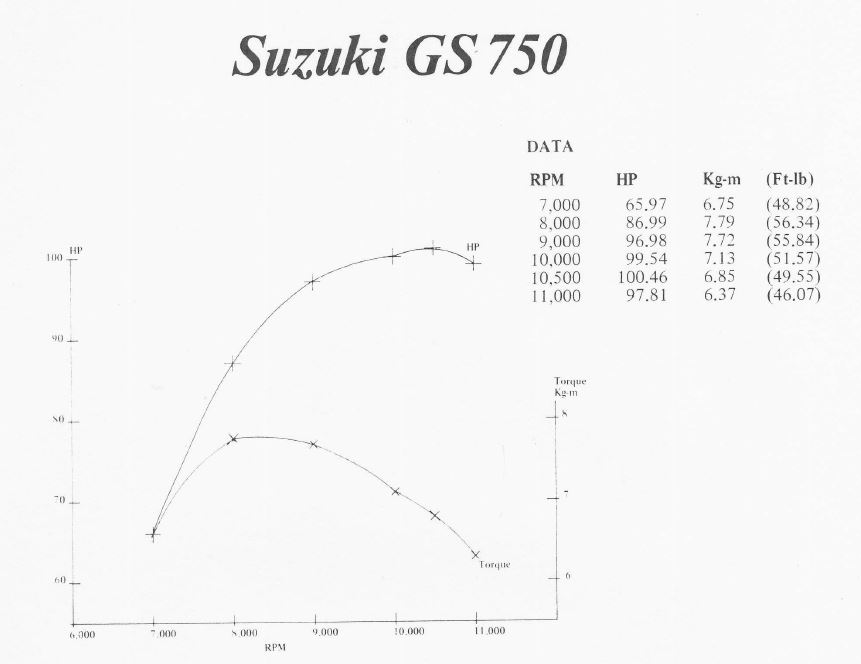
Extract from the Yoshimura Tuning Catalogue showing the Yoshimura 850cc equipped GS750 Powergraph corresponding to the current as fitted Engine peaking at 100.46HP@10,500rpm..
Once again, the quality of information available for something that occured over 40 years ago continues to astound me and that is testament to the passion and dedication of those involved. For this latest update, I owe a special thanks to long time Bimota enthusiast Fedor van de Pol and Colin Charles (ex Dixon Racing) for reaching out to a post on the Bimota Forum. Thank you both so much for the information, interest and support you have provided on this rollercoaster journey.
Not just talking about the expense 😉 … after the rear brake issues I didn’t want to take any chances. This came up available so I jumped on it. The perfect opportunity to overhaul the front brake setup.
Out with the old and on with the new master cylinder and lever setup.
The calipers meanwhile had a full overhaul with new seals…take 1!
Great service form Brake Masters for the supply of the seals.
Splitting the halves…
The hex heads of the bolts weren’t very willing to budge…some drilling out required!!
Pretty clean still after 2.5k miles and 24 years…
Cleaner still…
After disassembly
All laid out…
The replacement seals were a bit baggy! I fitted them anyway to see but they weren’t right. An email to the supplier and he sent new ones out straight away, excellent service.
Replacement seals fitted no problems…
New fittings to replace the drilled out hexes. Turns out these use low profile hex heads, hard to find so I ordered Pro Bolt ones in stainless steel.
Turns out the replacement hex bolts couldn’t take the torque without the hex head rounding. Copy of the message sent to Pro Bolt regarding these bolts…
These were duly replaced with the Ti versions. Nevertheless, they still felt like the hex’s were giving around 21NM. I decided to stick with 21NM and mark the bolts to monitor. I came to the conclusion that 25nm is too much for these low profile hexes.
Ti bolts look great fitted…
That’s the braking system fully overhauled now and ready for action 🙂
It’s the 24th February, just a few days earlier I had written to Mark Smith, Son of the legendary racer Bill Smith, who has over 50 TT replica trophies to his name. I received a very nice response back informing me that Bill was very happy to see the pictures and had passed me his number so that I may call him. Feeling slightly nervous I call up and Bill’s Wife answers the phone, “Ah yes, he’s been expecting your call”. Then Bill comes on the line and it’s an absolute honour to meet him, albeit only through the telephone. That unwritten Biker code cuts straight through everything, immediately there is a feeling of comfort, like straight away we’re on that same wavelength and the conversation just flows naturally.
His first question before anything else is confirming my heritage. “Italian, I thought so, good Italian name that” he says. Meet Bill Smith…
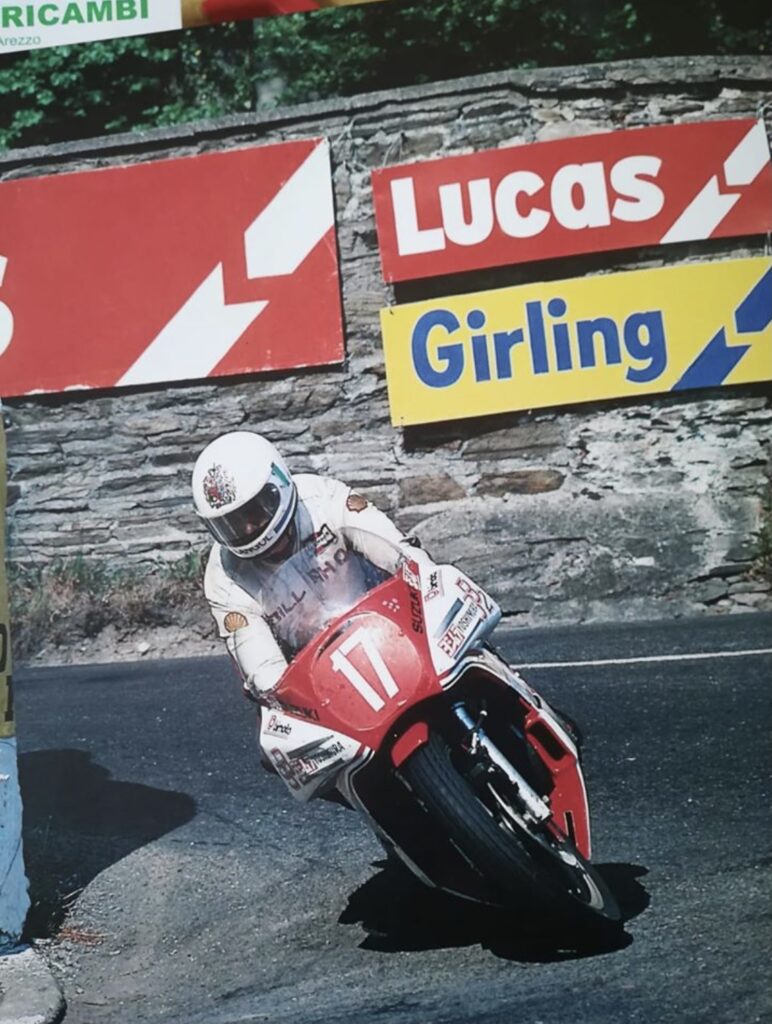
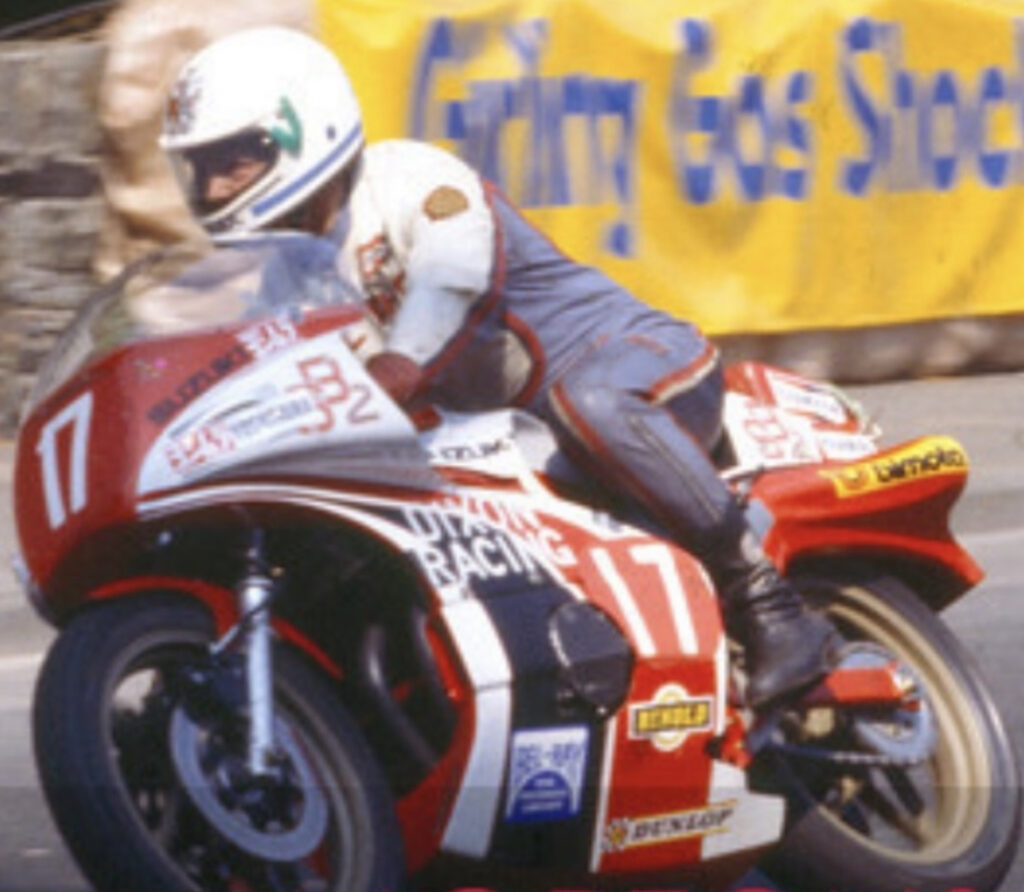
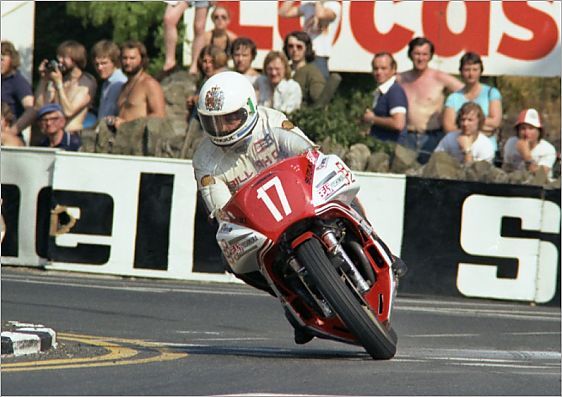
Bill Smith (Bimota Suzuki) at Quarter Bridge; 1978 F1 TT (source: https://www.ttracepics.com/suzuki/smith-bimota-suzuki-quarter-bridge-11427939.html )
On the 3rd of June 1978, Bill Smith guided a Yoshimura Bimota Suzuki SB2 prepared by Dixon Racing Ltd around the Isle of Man for the Formula TT F1 race. The very same race where Mike Hailwood made his widely exalted ‘big comeback’. If it wasn’t for a pesky failed cam chain tensioner, history may have been somewhat different! For competing against Hailwood’s Ducati, was this slippery Bimota, and it was fast.
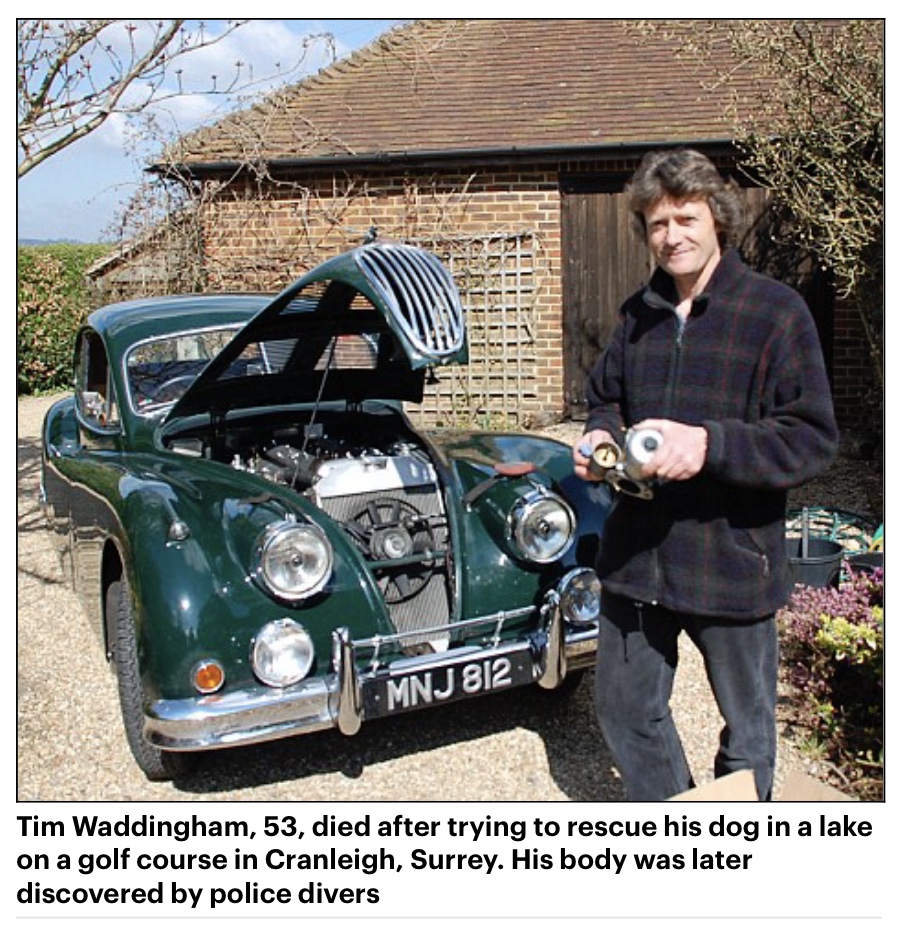
“As soon as I saw the fuel system I knew it was the bike, it’s definitely the one I rode around the Isle of Man”… just like that…Wow! I feel relief wash over me with those words, it’s been a roller coaster journey, from buying a bike with no history whatsoever to piecing together the most interesting back story of any bike I’ve owned, it has been fascinating for many reasons and spooky at the same time with so many coincidences along the way. It has been an emotionally draining and yet rewarding journey and this is the absolute icing on the cake. The SB2 has always been the “unicorn” bike for me and this one’s provenance has gone from zero to hero, going from a lovely bike with an unknown background to quite possibly, one of the most significant SB2’s on the planet as Chris from Lusso Veloce (who sold it to me) nicely put it upon finding out. Sat here speaking so casually with such an experienced racer, a man who was racing this bike around the Isle of Man almost to the day after my second birthday is awesome. He is such a personable, interesting and genuinely down to earth man with a fabulous sense of humour and so many tales. He has lived through the golden era of motorcycling and racing and stood shoulder to shoulder with all the greats, himself the TT F3 champion in that same year.
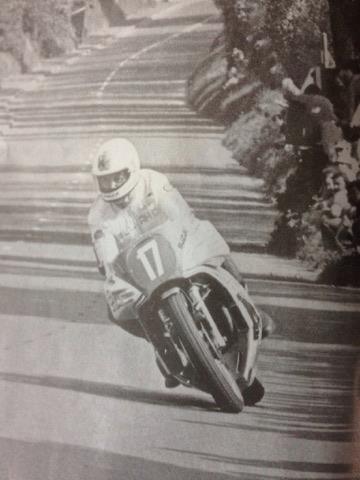
Even the slightly wonky front mudguard is evident both in this picture and the TT one above. Taken 43 years apart!!
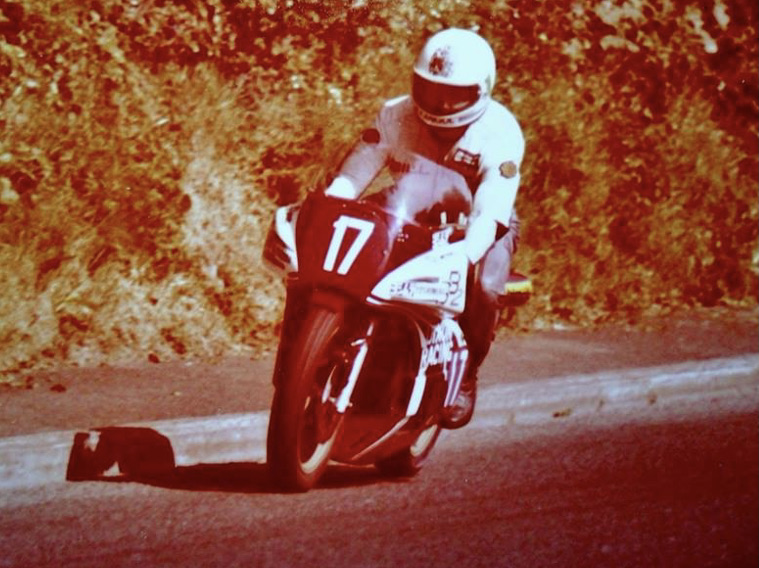
According to Bill it was “Very very fast but it was a bloody handful that’s why it got the name “Whispering Death” because there was a bloody big ‘if’, that ‘if’ you came off it, you’d kill yourself.”
It’s like a motorsport water colour painting which I shall call “The blur”, a freeze frame from the Mike Hailwood documentary video produced by Duke “One day in June” https://www.dukevideo.com/prd1118/One-Day-in-June-DVD
Having just turned 86, there is nothing at all wrong with Bill’s memory. He continues, “I took it easy on the first lap to make sure it was all working ok and limited it to 11,000rpm, I was running fourth on the road at the time and it came in at just under 106mph average. On the second lap I wound it up to 13,000rpm and went for it, I was running third on the road then and I reckon it would have been a 112-114mph average lap if that chain tensioner hadn’t gone, leaving shrapnel everywhere, I had some very bad words to say to Mr Yoshimura, told him it was unreliable. It was a shame for David Dixon, he was a great man and a good friend too.” I ask if he felt his and the bikes pace could have challenged for a podium… “It would have been a top three for sure”. It was an opportunity wasted for everyone, David Dixon, Fujio Yoshimura (who had flown from Japan to work on the bike and fitted the experimental camchain tensioner the night before), for Bill and the whole team and of course for Bimota and Suzuki. Bill’s pace was strong and the bike had fantastic speed. The drama’s with the fuel system meant he only ended up with 2 laps of practice while they messed around rectifying the fuel range. To demonstrate Bill’s pace at the event, he won the TT F3 race and the Championship later that week.
Source: https://www.mortonsarchive.com/p/mortons-archive/5321760250/x1978-fi-1978-tt-isle-man-mortons from the Nick Nicholls collection.
To emphasise the speed the bike had, Bill goes on to tell me that the next race was at Silverstone. There he took the lead on the first lap passing everyone down the long straight it was that fast. He wasn’t so fond of the riding position though, “It was like sitting on the edge of a bathtub”!
An extract from the Dixon Racing brouchure from back in the day
Bill has been working on his autobiography, he tells me that he has written a paragraph on the Bimota and chuckles as he tells me “I put you were a wealthy Italian”. It’s a wonderful touch for him to mention something about our exchange in his autobiography and I feel truly privileged to have had the opportunity to have this conversation. It’s a difficult time in this Covid world but he would love to see the bike again and I would love to facilitate this once things settle, in the meantime there is an open two way invite between us should either of us be in the others vicinity.
Bill Smith (Suzuki Bimota) and Tom Herron (Honda) 1978 Formula One TT (source: https://www.ttracepics.com/honda/smith-suzuki-bimota-tom-herron-honda-12398732.html )
Now that the history is more or less settled and the bike reunited with its past, I owe it to all of the custodians and those whose hands the bike has been through, those who have worked and toiled on it and of course Bill who pushed it so convincingly around the TT, to make sure I restore the bike to it’s full potential and keep the legend of “La Morte Sussurrante” (that’s Italian for the “Whispering Death” Bill 🙂 ), alive and kicking for many more years to come!!!
This is a huge “Thank you” to each and every one of those who have helped me to get to this point in uncovering the story behind this SB2 #00094.
As I am checking over and deep cleaning the SB2 on the Sunday morning after having received it, I make a little discovery…
In the rear tail, things look a little odd and not what one would expect of a factory finish with an unusual array of pipes…my first thought was, why are there water pipes back there? It’s air cooled! Then I wonder if it’s housing the loom for the indicators…I also note that the base of the tail is not as thick as the rest of the fibreglass. It appears to have been moulded around the shape of the wheel and it is very thin, I can flex it with my hand, it’s clearly been modified as the lay up is of a different type to the rest of it. I’m thinking to myself, well that’s one job I’m going to need to get sorted, having the tail section reinforced…
I then check out the underneath of the arch, and this is where I make a discovery that resonates with an article I had read while researching as much information as possible regarding all things SB2.
There are what appear to be auxiliary fuel tanks neatly grafted into each side of the rear tail, connected with fuel pipes to the main tank and to each other via balance pipes.
This now explains what the pipes are for in the rear tail. It’s a balance pipe between the fuel tanks.
I recollect a posting I had seen on Facebook from fellow SB2 owner Peter, (which is why I made contact with him in the first instance), where he is telling someone about the bike that was at Galleria (this bike), saying his friend had bought it and that he thought it had a race history. That and the findings above brought this article below in particular to mind…
Source: Classicbikehub.uk Article written by John Nutting 1978
Could it be? There are a lot of coincidences there. Further investigation reveals a Lockhart oil cooler (for whom Dixon Racing where distributors for)…
And collapsed into the frame are the old rubber mounts for the seat unit.
A makeshift rubber grommet set up has been glued to the tail instead to occupy the hole where the recessed rubber bush would have been.
From the information I have gathered on the bikes history, I have an ex Dixon’s bike, bought by a classic vehicle restorer (sadly now deceased) who was told it had a race history. I have since found a trail of clues eerily matching a magazine article written in 1978 about none other than a Dixon Racing race Yoshimura Bimota Suzuki SB2 bike, campaigned by Bill Smith at the 1978 F1 TT no less.
My bike wasn’t registered for road use until 1993 which could mean that it was a race bike up to that point and possibly owned by a collector or just abandoned in the corner of someone’s workshop until it was finally road registered.
It’s a fanciful thought and I need to remain grounded, but it fires up a new line of enquiry. I make contact with Bill Smith Motors, which gets me through to Bill’s son Mark who now manages the business. He very kindly passes an email with information and photos on to his father. If anyone can verify the bike, Bill would surely be the man!!
In the meantime, I’m working through the clues with the ever helpful Peter, whose SB2 is away having some carb tuning work done. When he gets it back, he kindly sends me pictures of his bike. I see that he too has saddle tanks, virtually the same as mine in fact. He explains to me that they all have these saddle tanks beneath the tail, however they had a weakness in that they can crack due to flex and leak fuel. His did exactly this, therefore Tim (my bikes old owner), who restored Peter’s bike also, emulated the tank setup that was on his own bike. Peter’s tank was removed and custom ones fabricated from the template of the original. His new setup involved the main tank and two separate saddle tanks joined via flexible fuel hosing with balance pipes matching the arrangements on my bike. I guess having been used for racing, mine would have exposed this weakness fairly early on, hence the modifications that were carried out. Very usefully, Peter sent me photos of his original tank which would be fitted to all SB2’s and a drawing schematic of the factory setup;
The above image shows the saddle tanks in the tail. Below is the original tank when de-bonded from the main fibreglass one piece unit. Interestingly, there are no balance pipes in the original setup and it is all one piece, not in three separate pieces as on mine and subsequently Peter’s bike.
It transpires that the auxiliary tank that was referred to in the magazine article, wasn’t the saddle tanks under the tail, but an extra one perched on the rear of the motorcycle with what look like bungee hooks around it.
Source: https://www.mortonsarchive.com/p/mortons-archive/5321761050/x1978-fi-1978-tt-isle-man-mortons from the Nick Nicholls collection.
My rear tail looks like it has had a different lay up and been modified around the rear tail light area in the inside, with some ply also showing there, and the T piece on the balance pipe has a hose at the top coming off it which leads nowhere. It is almost too coincidental because this could well have been the feed pipe from the auxiliary tank into the saddle tanks and not a breather as I first thought since the main tank already has a breather and the fuel level in the main tank is at a higher point than this hose anyway. Since no one has done any mileage on this to speak of, it’s possibly just as well, since I could well imagine that if the tank were brimmed fuel would come out of this!
So my initial thoughts were somewhat misdirected in thinking the saddle tanks were the auxiliary ones from the article, however had it not been for me thinking that and remembering the magazine article, it would not have led to the further observations and comparison with other SB2’s. At least the recognition of the non factory looking split tanks and hose array led me closer to getting to the bottom of it all, learning an awful lot along the journey.
All that really remains now before I can get any further is for someone familiar with the bike at that time to verify the setup. With this having been 43 years ago it’s a very tall order.
History. Provenance. It’s a big part of buying a motorcycle, knowing, where it came from, how it was used, how it was cherished, maintained and generally cared for. Although there was no history with this bike, there were some clues to follow. I had the details of the previous keeper and the V5 says 5 former keepers, making 6 recorded in all. There was also a hint that the bike had been supplied at some point in the past by Made in Italy Motorcycles.
I decided to make the start of my research with Made In Italy Motorcycles. This was the conversation that kicked off the whole history trail as I was given invaluable information by the very helpful Neil there. The conversation began when I asked to speak to the owner John (who had also just sold an SB2 out of his own personal collection to the USA) however he wasn’t about, so Neil asked if he could help. We got on to the Bimota that had apparently been supplied by them, and it looked like it might be a struggle, “we see a lot of bikes, I doubt John would remember that particular bike”, we persevere, it’s not like they’d have seen too many SB2’s given their scarcity, armed with the reg number and chassis number, Neil miraculously finds the information and suddenly it all comes back to him. Fair play to him for going the extra mile and actually making the effort to look on behalf of some random phone in.
He recalls the story; the bike had been traded in by the widow of a chap who had died under tragic circumstances. During a dog walk in freezing weather, the dog went through the ice of an icy lake, the owner removed some clothes and rushed to try and save it, he sadly didn’t make it, although the dog did survive. (I’m also told by Neil that he restored classic vehicles and apparently restored this and another SB2 side by side). Armed with the wife’s name who was the recorded keeper at the time of sale, I research that story and find the article, which leads to the owners name, Tim Waddingham, RIP.
He is a well known classic car restorer in the Jaguar world, I read as much as I can about him, the articles, the comments, the enthusiasts who entrusted their vehicles to him, he sounded like a wonderful person. He passed in 2012 tragically leaving behind a wife and 7 year old daughter. His wife parted with the bike in 2014 and in 2015 Made in Italy sold the bike on, as an almost complete restoration project to a buyer in Valencia, Spain. I find a picture on their blog…
The photo shows the bike with no exhaust, no rear indicator lenses, no rear master cylinder and other minor unfinished details. Tim had done most of the restoration work but the bike was clearly an unfinished project at his untimely demise.
I then set about researching to see if Tim had been on any of the owners groups, that drew a blank, however a search on the Bimota UK facebook group up-turns some more clues. I read a couple of posts on the subject, and through this group get chatting to someone who turns out to be an old friend of Tim’s, he knew him from 18 years old as a local biking and drinking buddy. Peter, it transpires, was the owner of the other SB2 which Tim had restored. Peter has owned his from 1982 and has arguably covered more miles on an SB2 than anyone else in the world, being his only daily transport at one point!
This is Peter’s SB2 in Tim’s garage, Tim’s SB2’s front wheel can just be seen poking into the photo. A Jaguar D Type also being restored in front!
The above picture puts the two restored SB2’s together, albeit only the wheel of Tim’s is visible in the photo. Peter also informs me that my bike had had a race history and that Tim had found some clues on the bike that corroborated that but he didn’t have any further details as such.
I’m also in dialogue with another Tim, this one recalls seeing the bike in the workshop at Galleria in Cranleigh circa 96-97. He recalls it needed some work, according to the sales guy and that this was the first time he had seen one in the flesh and was impressed with it.
I then have correspondence with Bill, he had put a post on facebook asking if anyone had bought any of Tim Waddingham’s bikes. Tim had carried out work on Bill’s Jaguar and he had hosted Tim and his wife for dinner. He describes Tim as a “Kind and gentle man but also a real artist with cars and bikes” he informs me that his Son worked at Galleria in Cranleigh who were the Bimota distributors after the original importers who were Dixons. He recalls seeing the SB2 there and only remembers that it was an ex Dixons bike. He was there from 95-98. It would appear that Tim therefore purchased the bike around 1996-1997 ish.
I have a lengthy phonecall with Peter again and it’s wonderful to get such rich detail of the man and the way he came about buying it. He recalls the conversation where Tim tells him about the bike at Galleria only 10 miles from his home, they go to look at it. He tells me it was raced at some point and needed restoring. Tim then set about restoring both bikes side by side with Peter’s taking priority as a paying customer. Peter received his bike back around 2010. Tim never got to finish his own one when he passed in February 2012. This puts Tim as the longest serving custodian of the bike from circa 1997 to 2014 when his wife moved it on some 17 years after he first bought it. In that time, it had never really turned a wheel.
From the information so far, the bike was first registered for road use (according to online DVLA info) on November 1993. I had assumed when I bought the bike that it had been imported into the UK at that date. However having a race history and being a Dixons bike, it is possible it just hadn’t been registered for road use when it was initially brought in by Dixons. With it being registered in ‘93, there must have been an owner before Tim, making Tim the second owner and his wife the third owner. It then gets sold and leaves for Valencia in 2015 where it must have been finished off, works included finishing off the rear brake master cylinder, fitting indicators, a new exhaust and painting the inside of the fairing uppers in black.
It must have arrived back to the UK in 2018 where it has the only MOT on file, this would have been required by the DVLA to re-register the bike. The mileage is noted as 6,693 miles however this should read km’s and not miles and will need to be corrected at the next MOT.
The bike is also on what is presumably it’s original plate. It is on a T plate which is 1978. Bizarrely the V5 has manufacture date stated as 1979 which would have put it on a V plate, I can only surmise that on re-import the wrong date was put on the dating certificate which DVLA would have required at the time, however it appears to have reassigned to it it’s original plate.
On arrival back to the UK it was MOT’d and re-commissioned by Manleys Motorcycles in Southend for a chap called Simon, the fifth owner. I saw it advertised on ebay in early 2020, where it was snapped up by a Terry at Silverstone before ending up at dealer Lusso Veloce where I purchased it from.
This accounts for all owners on the V5, the only info I don’t really have is for the first registered keeper between 1993-circa 1997.
The timeline looks a bit like this…
1978-1993 Manufactured 1978, brought in by Dixon Racing Limited based in Godalming who were the UK Bimota distributors of the time, but it was never road registered, this aligns with the racing history story as Dixon Racing prepared and tuned racebikes before moving into bike sales. They were also the distributors for Yoshimura’s tuning products. Peter’s SB2 featured above, was their press bike and also fitted with the 850cc Yoshimura engine. It is possible that my bike was their racing bike. It remained a racing bike or locked away in a shed or collection until…
1993-1997 Road registered in 1993 by the first registered keeper, this then went to Galleria to sell.
1997-2014 Purchased by Tim circa ‘97 and registered first to Tim and then his wife, accounting for the second and third keeper. Sold to Made In Italy Motorcycles in 2014.
2015-2018 Made in Italy sold to a Mr. V who took it to Valencia Spain, exported 2015.
2018-2020 Brought back into the UK in 2018. Re-assigned its plate, this keeper would continue the keeper chain as the 5th registered keeper on the V5. Simon M from Southend on Sea who had it recommissioned and MOT’d by Manleys Motorcycles.
2020-2020 He sold to Terry K of Keys Motorsport (Silverstone) early 2020 who then sold it around October time to dealer Lusso Veloce.
2021-XXXX Lusso Veloce sold it to myself in Feb 2021.
Not a bad investigative job to get the history trail to this point…but this is just the beginning, it gets far more interesting from here on out!!